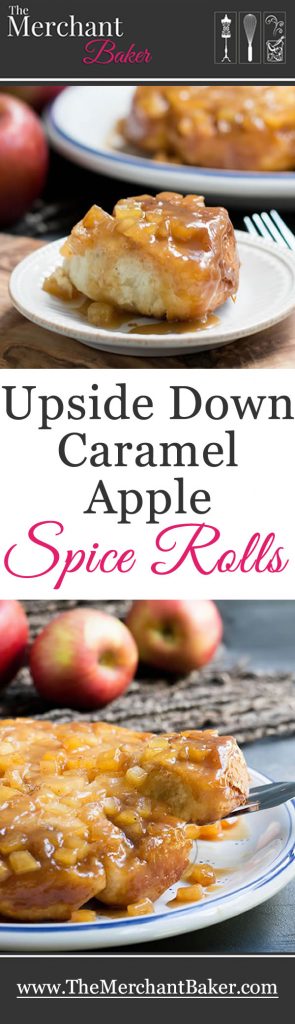

Okay kids, here is my last installment of recipes of the caramel apple variety this season…Upside Down Caramel Apple Spice Rolls!

Are you tired of apples and caramel and cinnamon yet? During recipe testing, my family and I often get tired of whatever I’m testing/developing. Yes, even brownies.
I know. It’s shocking, but you can actually get tired of brownies. It happened during the great search for my perfect brownie.
But apples? For some reason, no one in my house nor those with whom I share, have gotten tired of all the apple related recipes I’ve been making.
And it’s been weeks since my first apple post of the season. We’ve just been loving all of the different choices from pancakes, to sauces and cookies, ice cream and even a cocktail!
It might be because most of those recipes were nailed early in the process. For example, I didn’t have to make 500 pancakes before landing on the final version of what I wanted to post.
The Chewy Apple Toffee Cookies wore me down a bit, but I stuck with them and was glad I did.
Today’s recipe for Upside Down Caramel Apple Spice Rolls? Well, this recipe has some history to it.
Last year, I was working on something similar. I knew I wanted to do something gooey, appley and biscuity. I had a few trials that simply came out like a big mess.

There were a whole host of issues, some had too much moisture. One was underbaked. (I didn’t find that out until after it cooled and I cut it apart. I ended up scraping the whole thing back into a pan and baking it a second time. Lovely.)
It didn’t taste bad, but, as I said, what a mess it was.
I abandoned the whole idea and made Pumpkin Biscuit Sticky Buns instead. So even though I was discouraged with the whole apple experiment, those sticky buns certainly made up for it. Seriously, they’re so good and so worth any effort it takes to make them.

That was then. This is now. Apple season. The failed attempts from last year were still fresh in my mind. Armed with the lessons I had learned, I decided to take a page out of the sticky bun book and go “upside down.”
I love fruit mixed into things. But I really, really like when you get a serious layer of fruit that you can bite into. Then the fruit really shines! I used that philosophy for my Dutch Apple Pie Muffins and for Blueberry Pie Baked Oatmeal.

So, if I made a layer of fruit, instead of trying to mix it all in, then I’d definitely get lots of apple flavor. That layer of fruit would be perfect for an upside down idea.
After I made that decision, the rest was easy. I knew I wanted lots of apples. And, I knew I wanted them bathed in some type of caramelly sauce.
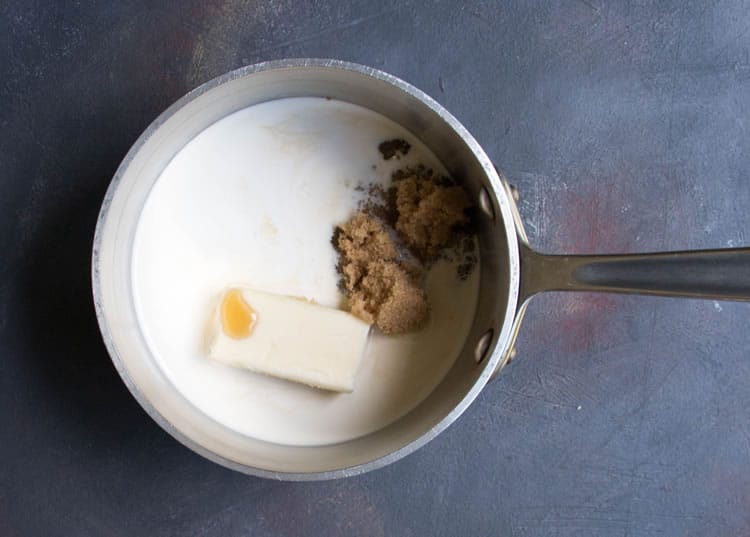
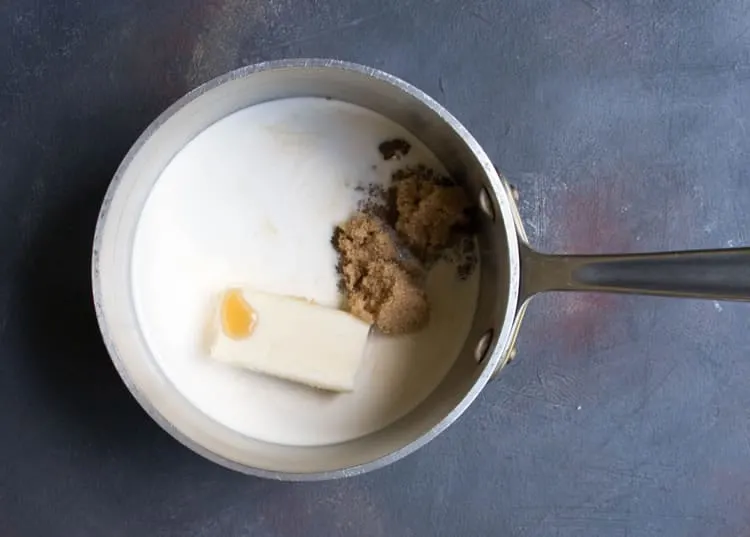
I used the same sauce as I did for the sticky buns. It’s a mixture of cream, butter, brown sugar, maple syrup and spice. Easy peasy. Cook it and set it aside.
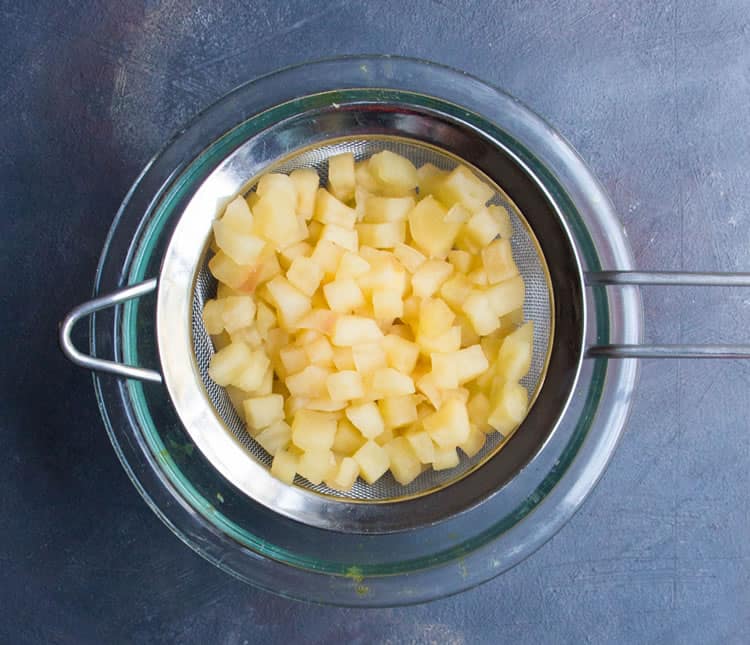
Then, the apples. I knew that the baking time wasn’t going to be incredibly long and I wanted to insure that my apples were tender but not mushy. I also wanted to render out some of their moisture. So, I gave them a little pre-cooking boost in the microwave.
I tossed the chopped apples in lemon juice first, both for flavor and to keep them from browning.
After their little stint in the microwave, I poured them into a sieve and let them drain while I worked on the rest of the recipe.
Let’s talk dough. Instead of bread dough, I love to use biscuit dough. And this biscuit dough? I love it, love it, love it! It makes wonderfully fluffy biscuits. Add cheese and you’ll be in heaven! It inspired my Sour Cream Chive Biscuits and Pumpkin Buttermilk Biscuits and more!
Aaaaannnd, it’s my go to dough for Buttermilk Biscuit Cinnamon Rolls. No yeast, no waiting to rise…and it turns out the most tender rolls. So tender you could skip the icing.
Clearly this was the dough to use for this recipe. So I made a batch and rolled it out.
Note the plastic wrap on my counter. This is my secret to easy clean up.You need to have plastic wrap that will stick to your counter. I use two long sheets and overlap them for a nice large work surface.
I place a little pile of flour in the corner and use it to flour the surface and to keep the dough from sticking to my hands while I go through the steps prior to rolling.
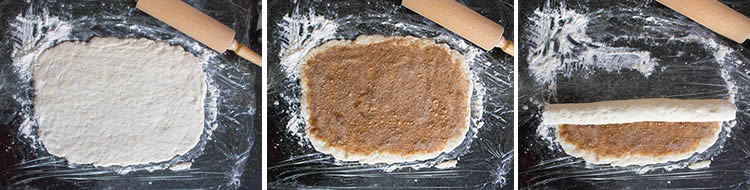

Then, it’s just a matter of rolling out the dough and topping it with the filling. I decided to use apple pie spice instead of cinnamon in the filling. The clove, nutmeg and cardamom are just some of the things that set these apart from your everyday cinnamon roll.
Once you have your filling evenly distributed, just roll it up. Now, you can’t just roll it up all at once like a piece of paper. The dough is soft and it has weight.
You will have to work from one end and roll it up bit by bit until you get to the other end. Then, you’ll work your way back to the other end.
Eventually you’ll have the roll almost complete. Pinch the open edge to the roll to seal it and to keep it from unrolling.
At this point, I figure the butter in the dough has gotten a little warm from all the handling. So I just wrap the plastic wrap up and around it, place it on a little sheet and stash it in the refrigerator/freezer for a bit to make sure the butter is chilled. (If you didn’t use plastic wrap on your counter to roll the dough, just roll the dough onto a piece and wrap it up.)

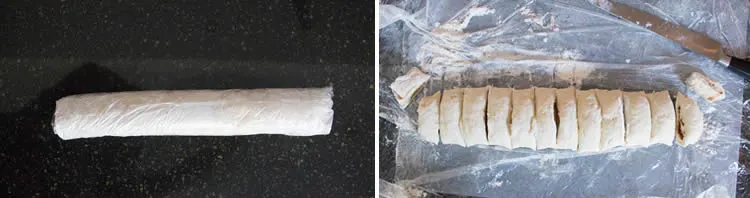
Once it’s chilled, cut it up into slices. Those slices will then get placed into the pan on top of the caramel sauce and apples. I sprinkle a bit of flour on top of the fruit to absorb excess juices.
The rolls? They might look a little loose and imperfect. No worries. They get all puffy and beautiful when they bake.

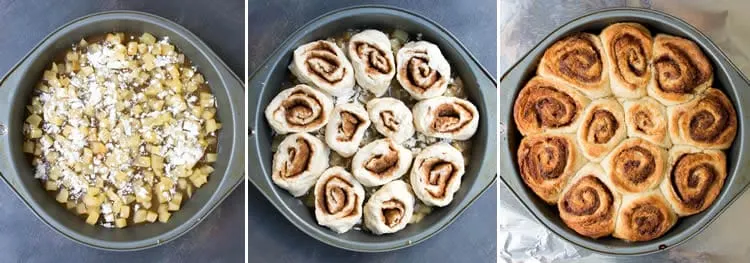
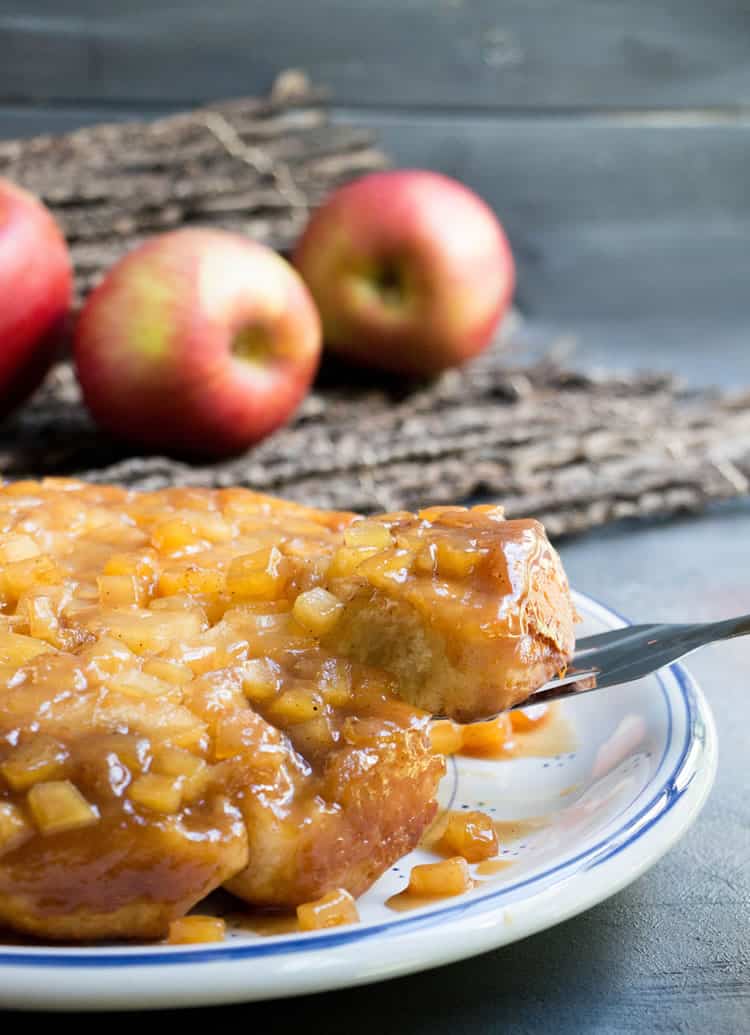
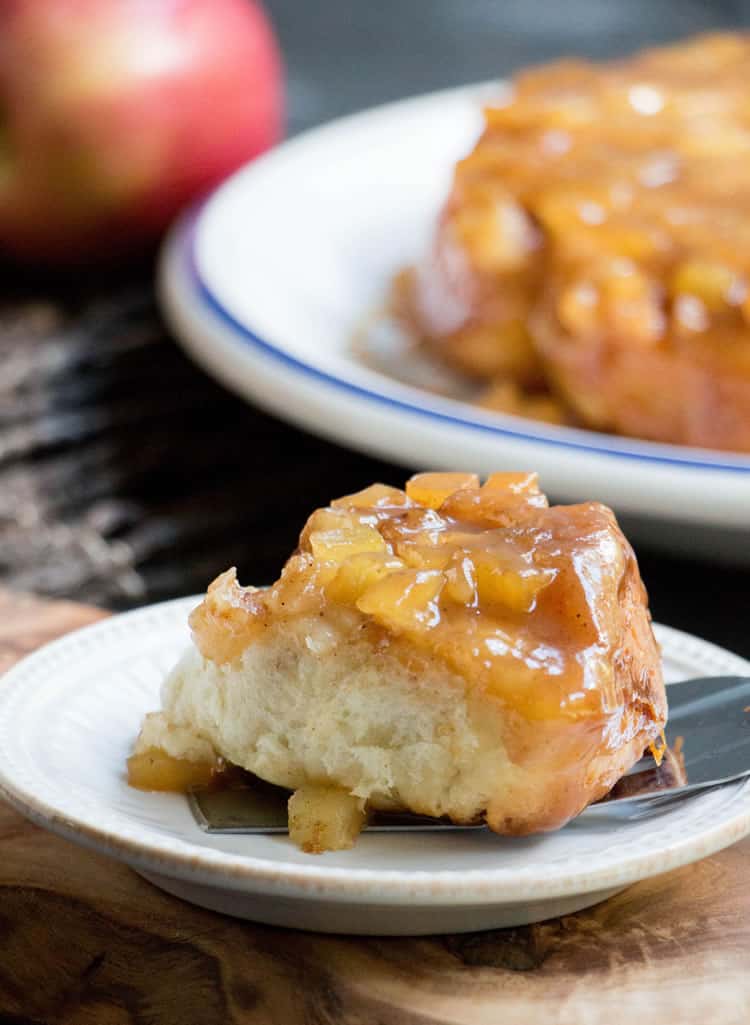
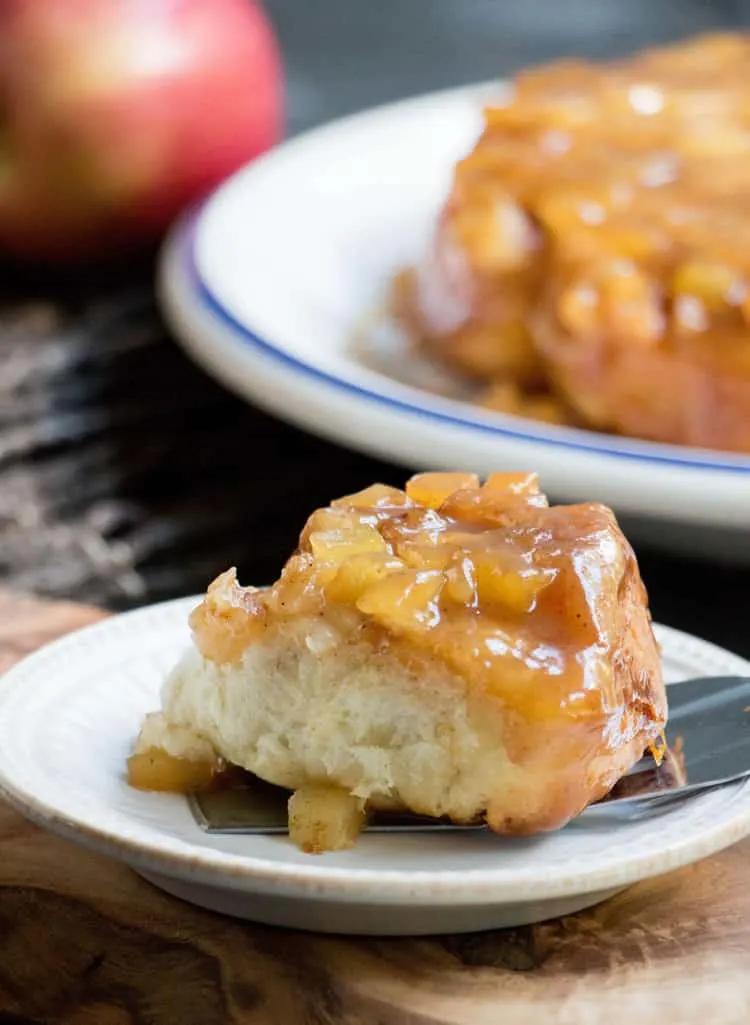
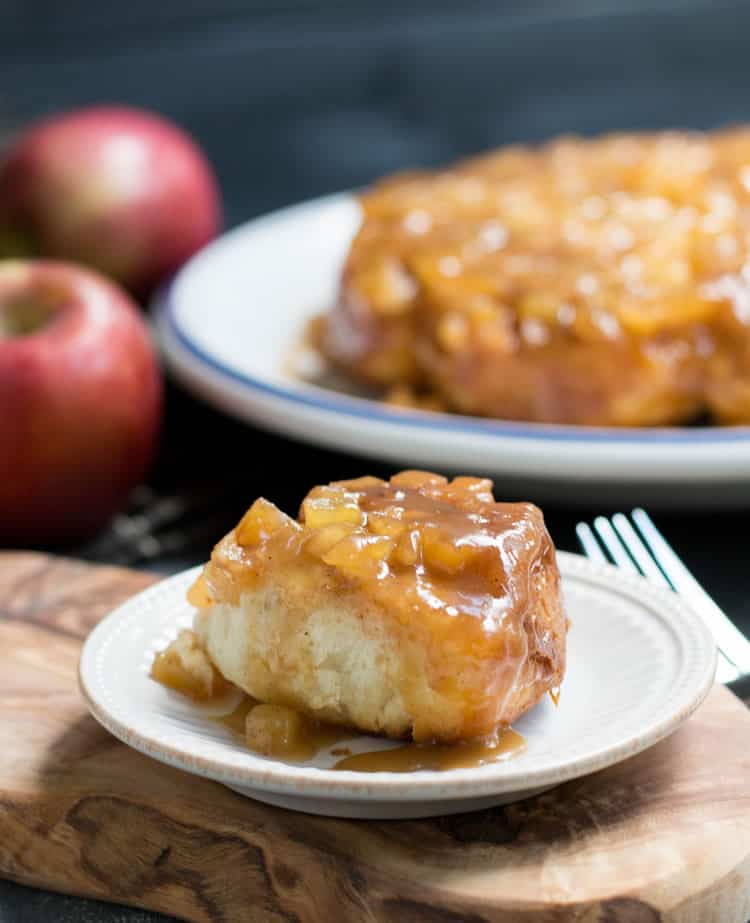
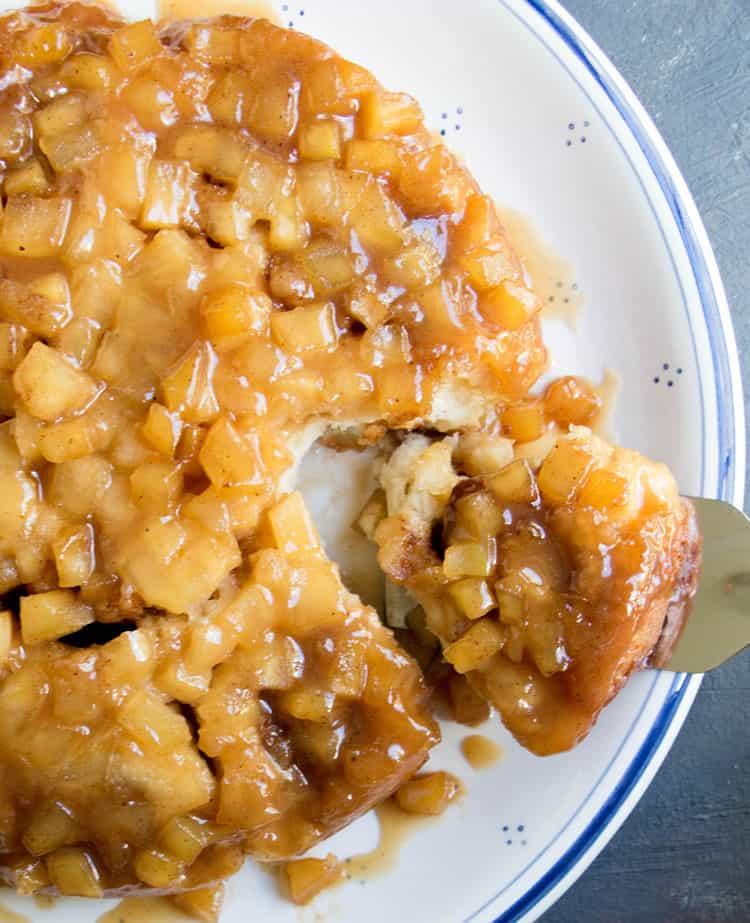
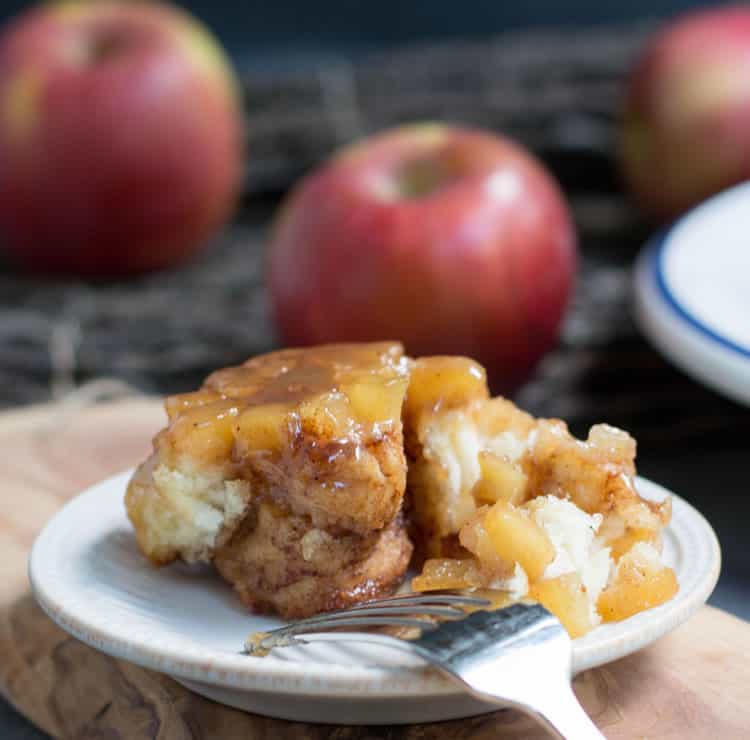
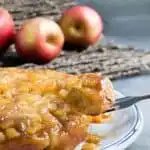
Then, it’s just a matter of flipping them over. It’s a beautiful thing, all of those juicy apples and caramel sauce dripping down the fluffy spiced rolls.
You’ll have extra sauce. You can save it for another use or you can drizzle it all over the top of those apples. I like to let each person drizzle their own roll. Some like none. Some like a little. Some like a lot. To each his own.
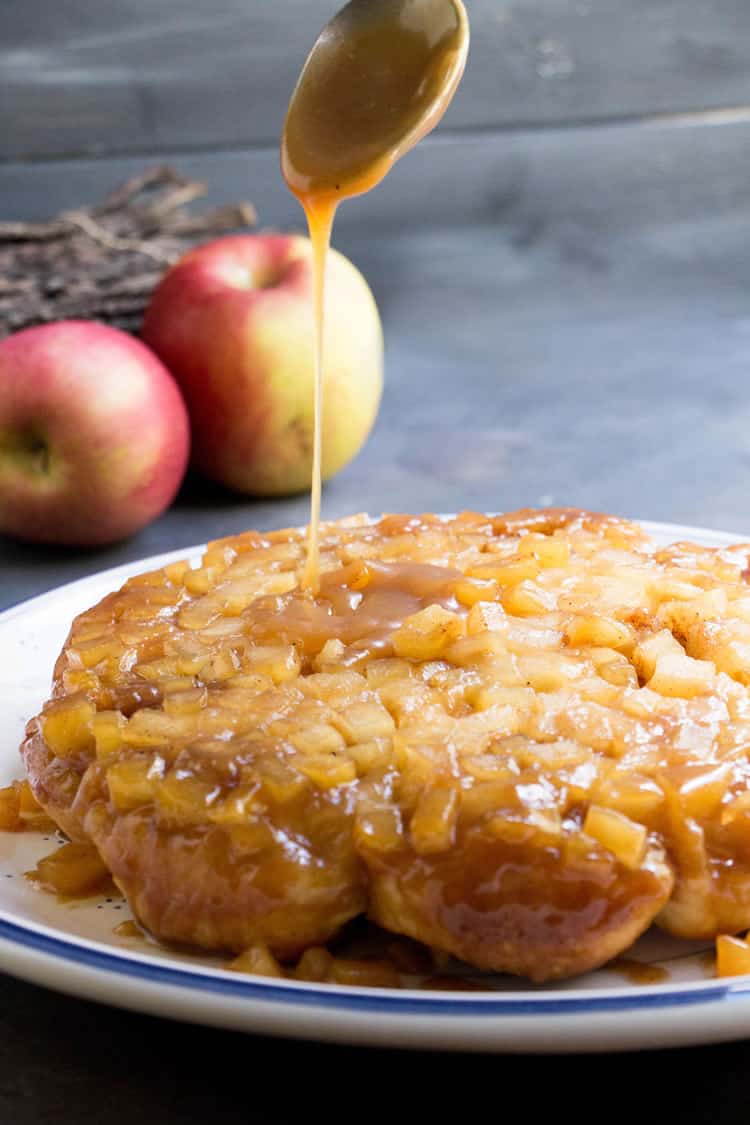

I have to say, it felt good to nail something in the apple caramel biscuit category. And when I say nail something? I really mean I nailed it! The apples were perfectly cooked, tender but not mushy in a perfect pie like layer.
The spice rolls are fluffy and flavorful and not overwhelmed by the apples. No under baked mushy parts. They were perfect! These Upside Down Caramel Apple Spice Rolls were so delicious! They are the ideal sister act to Pumpkin Biscuit Sticky Buns.
So let’s think about this…are you really tired of all the apple and caramel and spice recipes this season?

Yeah, I didn’t think so.
Upside Down Caramel Apple Spice Rolls

For the Glaze:
- 4 Tablespoons unsalted butter
- 1/2 cup brown sugar
- 1/2 cup heavy cream
- 2 Tablespoons maple syrup or honey
- 1/4 teaspoon kosher salt
- 1/4 teaspoon apple pie spice (or cinnamon)
For the apples:
- 1 1/2 cups peeled (chopped apple (mine was a little heaping))
- juice from 1/2 lemon
- 1 Tablespoon of flour
For the dough:
- 1 batch Fluffy Buttermilk Biscuit Dough
For the filling:
- 2 Tablespoons unsalted butter (melted and cooled)
- 1/4 cup brown sugar
- 2 Tablespoons white granulated sugar
- 1 1/2 teaspoons apple pie spice (or cinnamon)
- Grease or spray a 9″ round pan. Set aside.
- Make the glaze. Place the 4 Tablespoons of butter, brown sugar, cream, maple syrup, salt and apple pie spice into a small sauce pan. Cook over medium heat, stirring to combine until the butter is fully melted. Raise heat and bring to a boil, stirring constantly, then simmer for 3-4 minutes while continuing to stir. Sauce should be golden brown and glossy. This will make about 1 cup of sauce.
- Pour 1/2 cup of the sauce in the bottom of the prepared round pan and tilt pan to cover the bottom evenly. Set aside. Reserve the balance of sauce for extra topping after baking.
- Prepare the apples. Toss chopped apples with lemon juice. Partially cook in microwave for 2-3 minutes, just until slightly softened. Drain thoroughly. (I leave them to sit and drain until I’m ready to assemble.)
- Prepare biscuit dough as recipe directs through step #11 where you’ll just have finished gently folding the dough. It is now ready to roll.
- On a floured surface, (see notes about using plastic wrap) roll dough into about a 12″ x 10″ rectangle or until your dough is just a little more than 1/4″ thick. Mine ended up being about 13″ X 11″. It doesn’t have to be exact.
- Spread the 2 Tablespoons of melted butter all over the dough, leaving a little space at the upper and lower edges so that it doesn’t squeeze out when you roll it. (I used an offset spatula to quickly spread the butter, but you can brush it on, use a spatula or use your hand.)
- Mix the brown sugar, white sugar and apple pie spice together. Evenly sprinkle this mixture over the melted butter.
- Starting from a long side, roll up the dough tightly but without stretching it. It’s not going to be super tight. Just do your best. I work from one end and roll a little bit while I work my way down to the other end. It doesn’t all roll up at once. When you’re done rolling, pinch the loose edge to the roll to seal it so that it doesn’t unroll.
- You should now have about a 12-13″ long rolled up log. It may have gotten longer while rolling. No worries.
- If the dough has gotten too soft from handling, cover the roll with plastic wrap and place it into the refrigerator or freezer for 10-15 minutes. (I always do this step.)
- Preheat oven to 450 degrees F.
- After the dough is cold and the butter firmed up again, proceed with the cutting step. Using a sharp knife, cut a little off each end to even up any uneven edges.(See notes, you can save these little slices and bake them separately, if you wish.) Dip the knife in flour in between cuts to help keep it from sticking.Then slice the log into slices about 1 to 1 1/4″ wide. How many slices you get will depend upon how long your log is. You just want them all to be about the same size so that they bake up evenly. I got 12 slices out of mine.
- Scatter the drained apples evenly on top of the caramel sauce in the baking pan. Sprinkle the apples with a Tablespoon of flour.
- Then, place the slices flat in the baking pan on top of the apple layer. It’s okay if the sides just touch, but you don’t want to crowd the pan. The biscuits need room to rise and expand while baking. Don’t worry if they feel loose and like they’re going to unravel. Just put them in the pan and wrap any loose ends back around the rolls.
- Place pan on a baking sheet to catch any possible drips. I didn’t have any issues, but better to be safe than sorry. Bake for about 15-17 minutes or until golden. Then cover the top loosely with foil and bake for another 5 minutes. Mine baked for a total of 22 minutes. You can put the foil on sooner if you think your rolls are browning too quickly.
- Remove from oven and allow to cool in pan for about 5 minutes. Then, place a serving dish on top of the pan and flip the biscuits out onto the dish. The biscuits should release easily.
- Serve warm. Drizzle additional reserved syrup on top of the biscuits, if desired.
*Biscuits are best served immediately. Store leftovers at room temperature wrapped in foil. You can reheat them the next day, covered with foil in a 350 F degree oven. (If you think you’re going to have leftovers, don’t drizzle the extra sauce over all of the biscuits. Just do it individually and save the rest for after you reheat the biscuits the second time.)
*You want your bits of butter that you cut into your dough to be firm when you bake these. If they are all melted from too much time out or too much handling, then you need to put your dough back in the refrigerator or freezer for 10-15 minutes to firm the dough up. Cold butter means better biscuits, so I always do this step.
*I roll my dough out on plastic wrap. I lay two sheets down on my counter and then flour the surface. My plastic wrap sticks to the counter, so there’s no shifting. (This doesn’t work well unless your plastic wrap is clingy enough to stick to your counter) If my dough gets too warm from handling, I just roll it up in the plastic wrap, move the whole log to a baking sheet and put it in the freezer to firm up as mentioned above. The plastic wrap makes it easy to transport the dough from the counter to the freezer and back. And it makes for easy clean up.
*If your dough is cold enough to roll, but it’s gotten very soft from being out too long, you can also refrigerate/freeze the biscuits after you’ve rolled, sliced and put them into the pan. Basically, you just want the butter firm when you bake the rolls. You can put the dough in the refrigerator to get cold at any point in the process before baking. If you refrigerate them once you put them into the baking pan, you may have to add some additional baking time to compensate for a cold pan.
*The amount of biscuits you yield from this recipe will vary simply based on what size your dough is when you roll it and how thick your slices are when you cut it. It may differ a bit each time you make it unless you decide to be extremely exact each time you roll it. I only measured it for the post to give you an idea. I usually wing it and do it by eye, so I may end up with anywhere between 9 and 12 rolls. If you accidentally (or purposefully) roll it from the short side, then you will end up with larger biscuits with more layers, but you will get less biscuits. Either way, you’ll be fine.
*I saved the uneven ends I sliced off and baked them separately. I would have just tucked them between the “good” rolls in the pan, but it didn’t make for a nice photo, so I baked them up on a separate pan in my toaster oven because they would bake up so much faster than the full pan and I didn’t want to keep opening the big oven to check them. (The kids always fight over those scraps :)
*I gave you enough glaze in the recipe to put in the pan, then top the biscuits again after they are baked. I drizzled the extra on each biscuit individually while serving. It makes for a super drenched roll. For me personally, I didn’t need any extra, but it’s a sweet bonus for those who do. If you want to skip the extra glaze, cut the glaze recipe in half and use all of it in the bottom of the pan.
*Store extra glaze covered in the refrigerator. You can quickly reheat it in the microwave. If you don’t use it for your rolls, it’s also good over pancakes and waffles.
The Merchant Baker © 2017