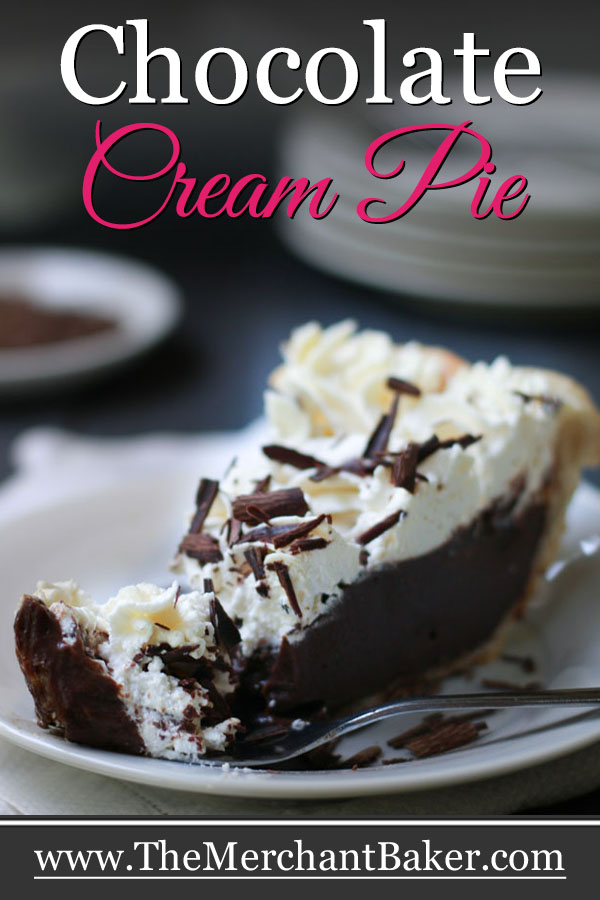


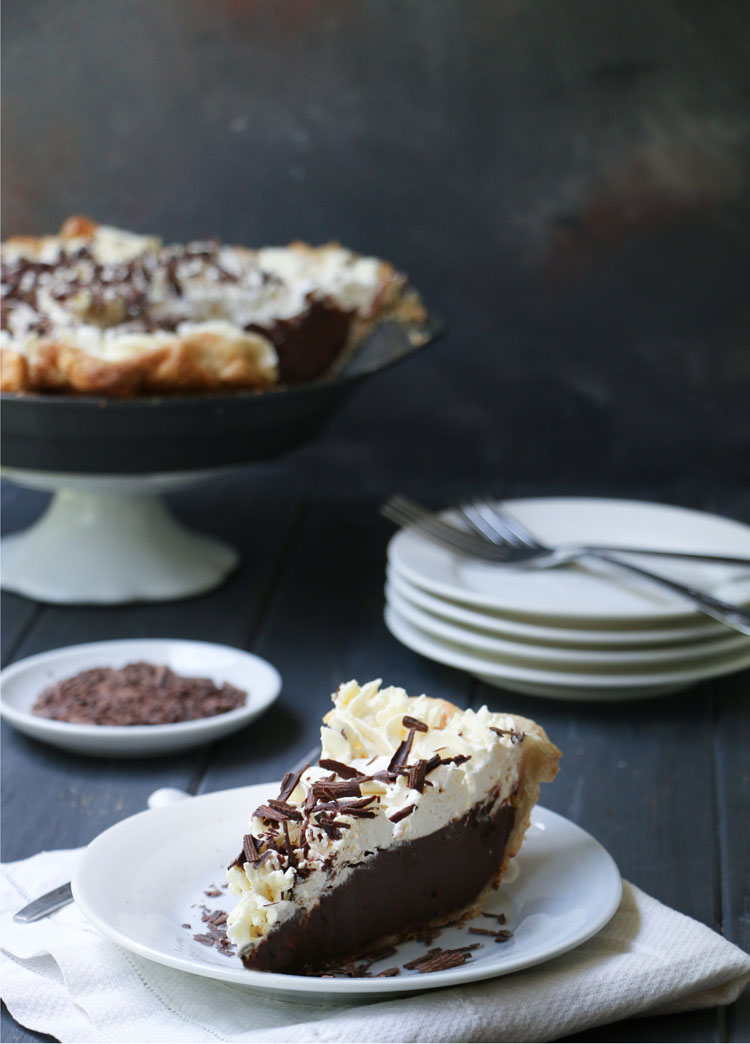
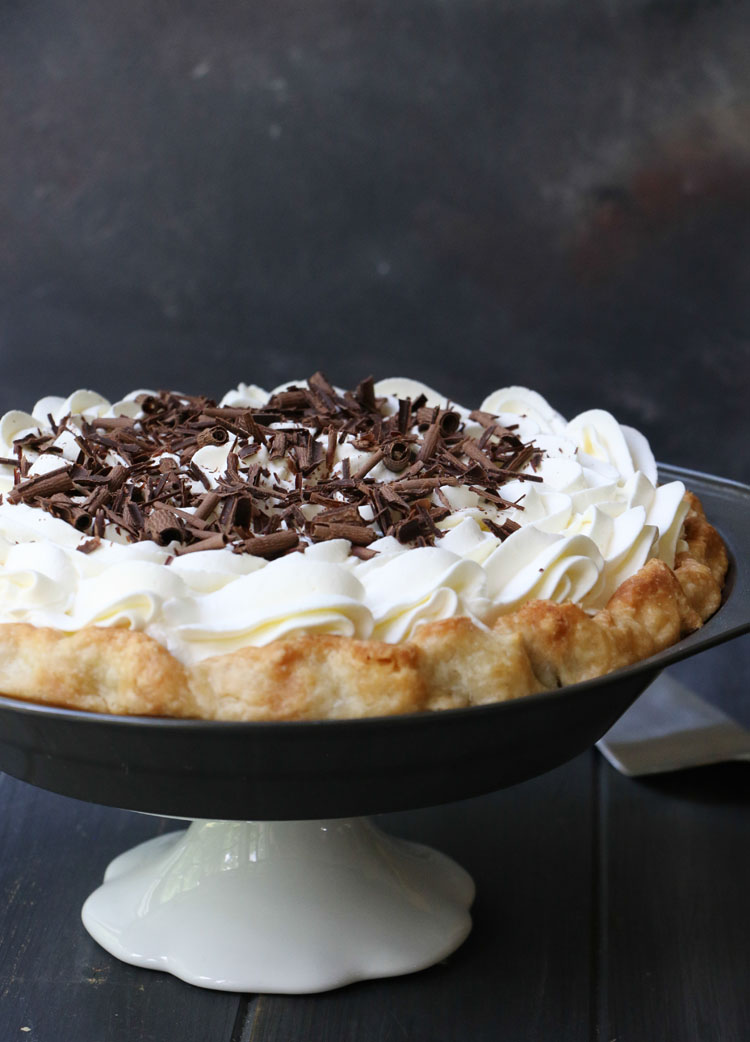
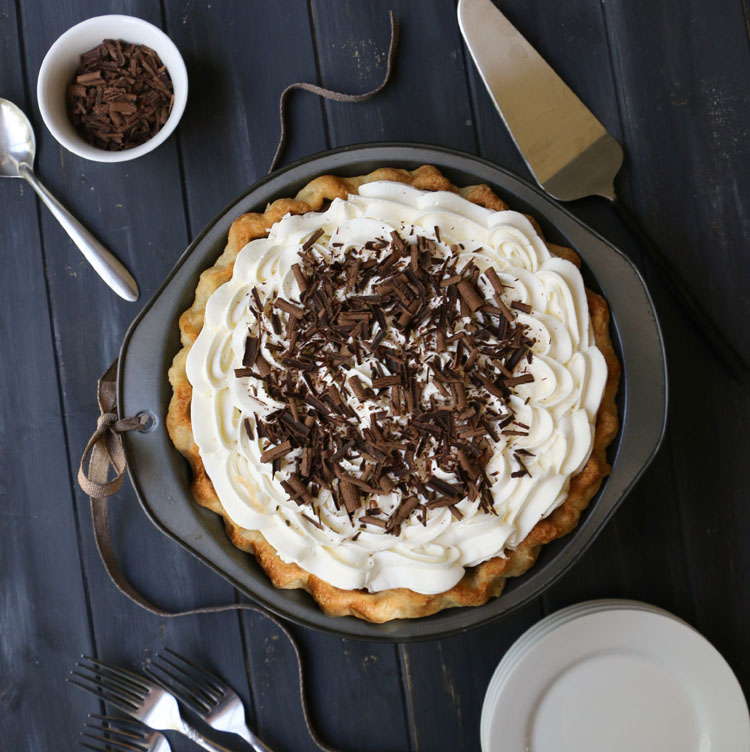
Make Chocolate Cream Pie from scratch using an easy homemade chocolate custard. Pour that rich, deep chocolate filling into a pre-baked pastry crust and then top it with lots of fluffy whipped cream. Finish it off with a pile of chocolate shavings to give everyone a little hint as to what deliciousness lies beneath…
I never thought I’d ever post a Chocolate Cream Pie. Remember what I said about chocolate pudding in my Mint Chocolate Pudding Parfait post?
You know…the whole thing about liking chocolate and liking pudding, but chocolate pudding not necessarily being in my top 10 dessert choices?
And yet, when I finished my minty parfaits, I thought they were really quite delicious.

Today, we’re going full force with a chocolate pie filling and, yes, we’re going to love it!
The filling is deeply chocolate complemented by a lightly sweetened, thick layer of whipped cream.

Let’s get started with the crust…
What kind of crust should I use for a Chocolate Cream Pie?
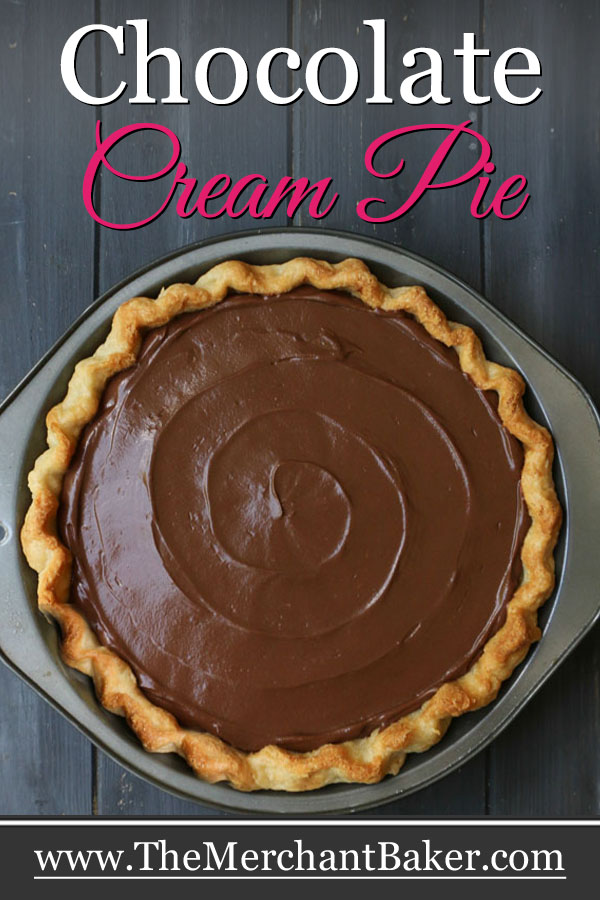
This is a no bake pie, so your crust needs to be fully baked and ready to go. That being said, you can use whatever kind of crust you love.
I went with my Easy All Butter Pie Crust, mostly because I was working on my post for How to Blind Bake a Pie Crust.
Needless to say, I had a few extra crusts laying around from all the various shoots we did for that post, so I rolled with it!
Now, my pie crust isn’t a sweet crust. It has a bit of sugar in it, but it’s a classic pie crust, serving as a buttery backdrop to whatever filling you add to it.
So, if you’re looking for a sweeter crust to complement your Chocolate Cream Pie, then by all means go with a graham cracker crust (like I used for my Fresh Blueberry Cheesecake Pie ) or a vanilla wafer crust (like I used for my Lemon Lime Cream Slab Pie ) or maybe double down on the chocolate and use a chocolate cookie crust (like I did for my Cookies and Irish Cream Cheesecake Pie)
You could also take an easy shortcut and just buy a premade crust at the store. Whatever you crust you love with whatever ingredients or time you have to make it works here.
How to Make Chocolate Cream Pie Filling
Now, for the filling. It’s really not difficult at all. I made sure you didn’t have to worry about tempering eggs and pouring things back and forth.
Basically, this recipe calls for putting a bunch of things in a pan and then cooking until thickened.
Now….this is a different recipe than my chocolate pudding recipe. This filling contains egg yolks and is a custard. The egg yolks add an extra richness to the filling.
I used three kinds of chocolate for this custard. First, I use dark cocoa, one of my very favorite ingredients. Then, I add both unsweetened and semisweet chocolate at the end. This results in a deep, dark, rich chocolate custard that simply does not taste like boxed pudding mix.
As I always say, the better the ingredients you use, the better the flavor, so use cocoa and chocolate brands that you love. I love using King Arthur flour cocoas. My favorite is the Double Dutch Dark Cocoa. I use that one the most!
I’m recommending a dutch process cocoa for this recipe. They are simply less acidic than natural cocoa and provide a mellower, more rounded flavor in this recipe.
Now, just because we stepped up to a custard, does not mean this is going to be any harder to make. In fact, it comes together on the stove top in one sauce pan.
First you’ll whisk together your dry ingredients…sugar, cornstarch, cocoa, salt and espresso. Then, add the yolks and whisk them into the dry mixture.
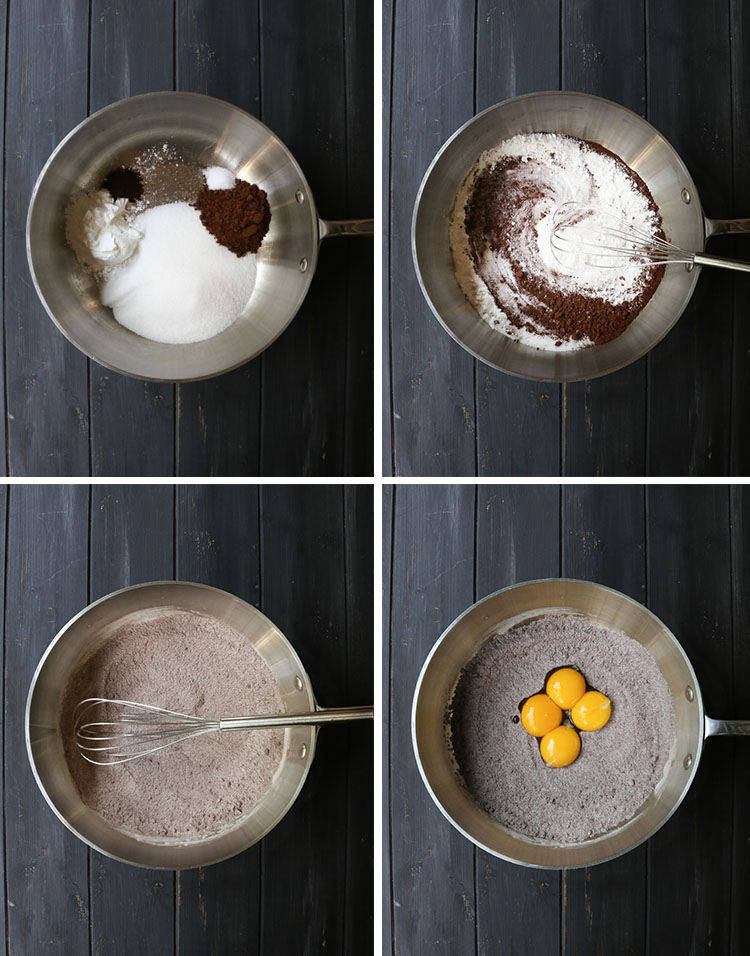
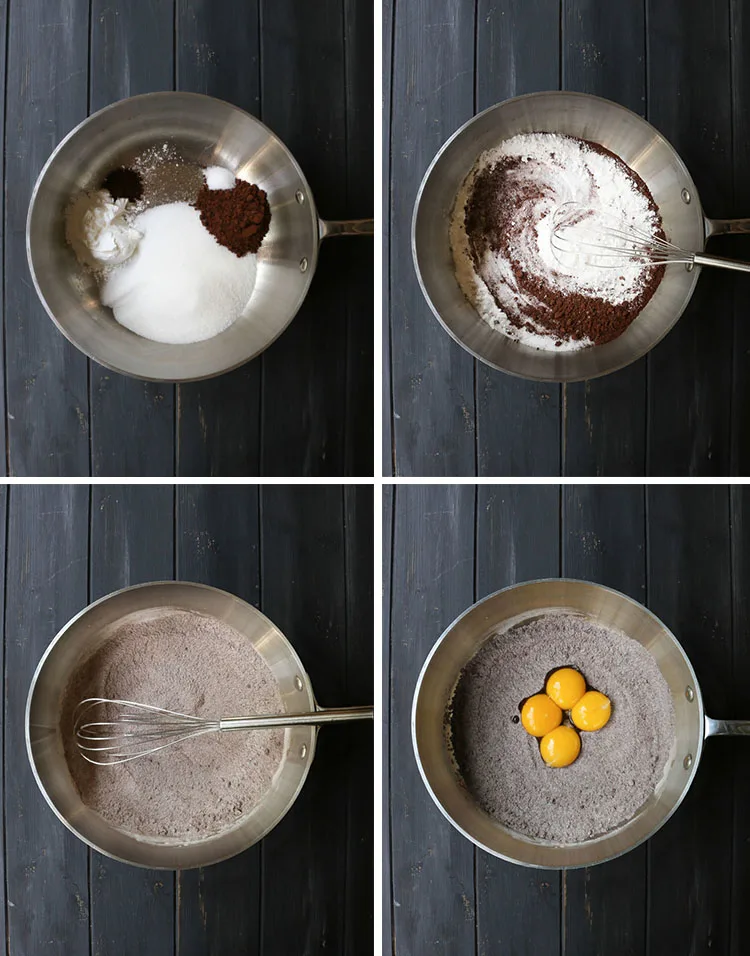
Slowly add the milk…and whisk it until combined.
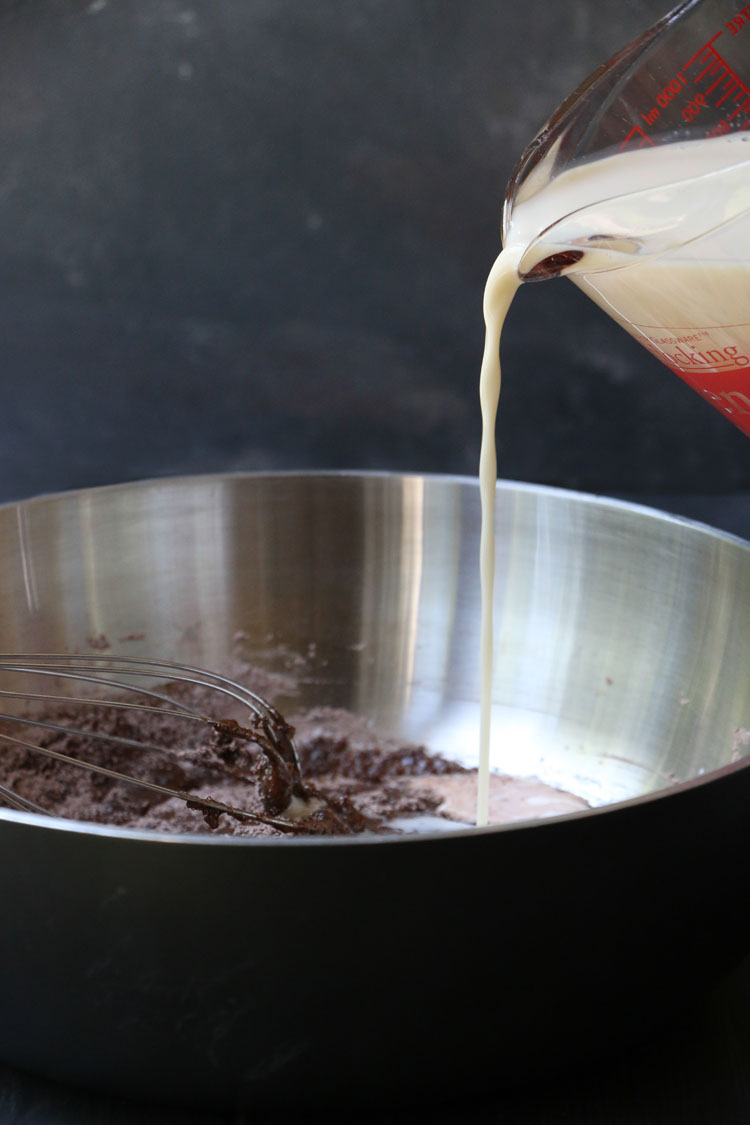
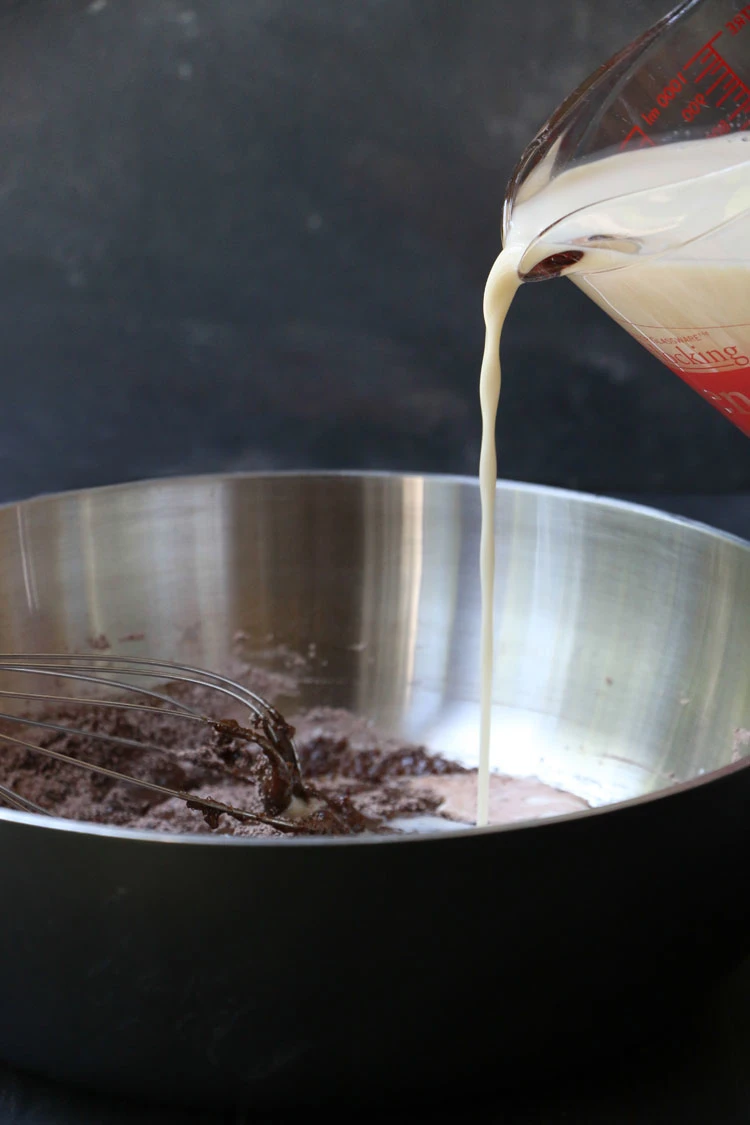
That’s it. Put the saucepan over medium heat and bring to a boil, whisking CONSTANTLY. The thin, milky mixture you just whisked up will thicken as it comes to a boil. Whisk and boil for 1 minute and then remove from heat.
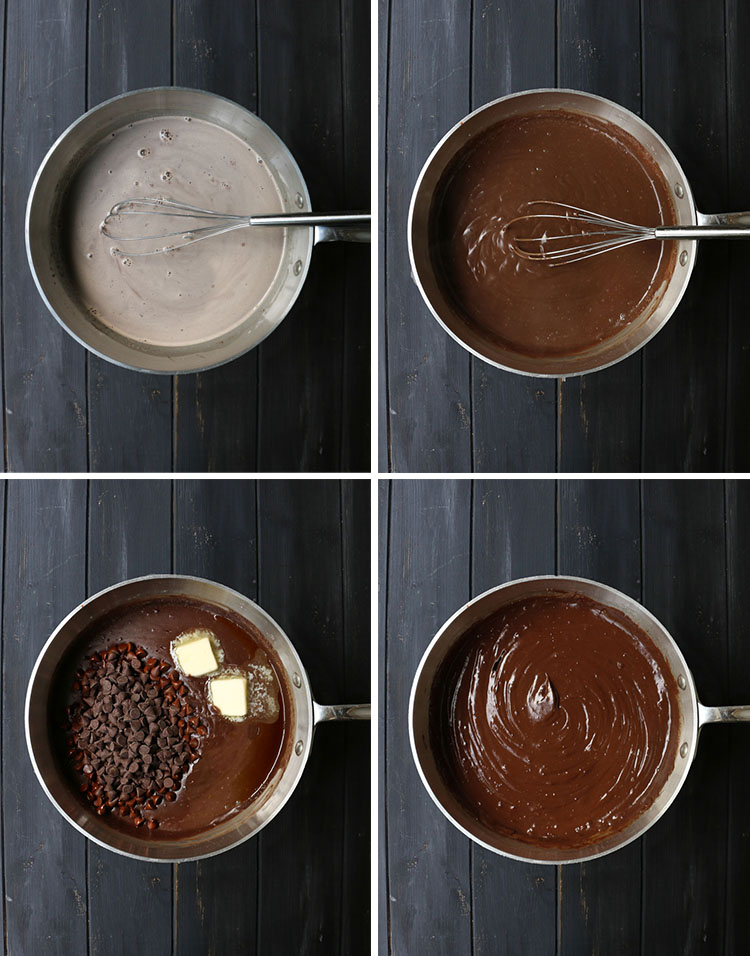
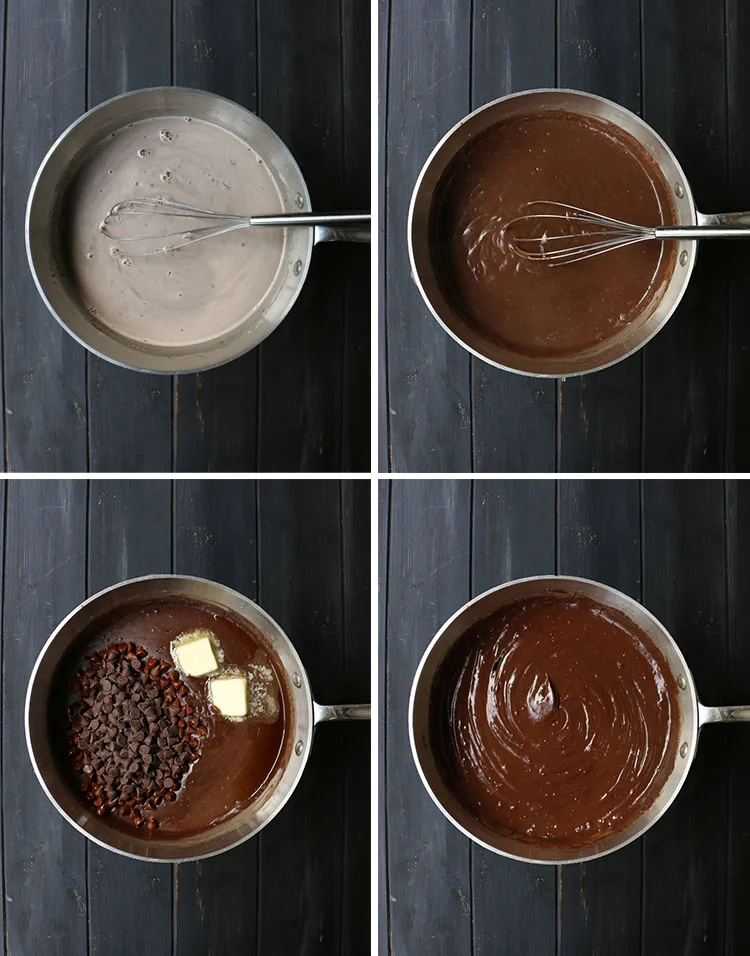
Then, add the chopped chocolate, butter and vanilla. The residual heat from the filling will melt all those yummy additions. Just whisk until everything is melted and well combined.
Should I strain the cooked custard?
This is completely up to you. I like to strain the hot mixture to insure the smoothest filling. Just pour it through a sieve right over a heat proof bowl.
Now, I’ll be honest with you. If you’re not feeling it, you can totally skip this step. You’ll still end up with a delicious pie filling. I swear I always make this decision on the fly thinking I might skip it, then decide that it’s really no big deal to pour it through a sieve, so I do.
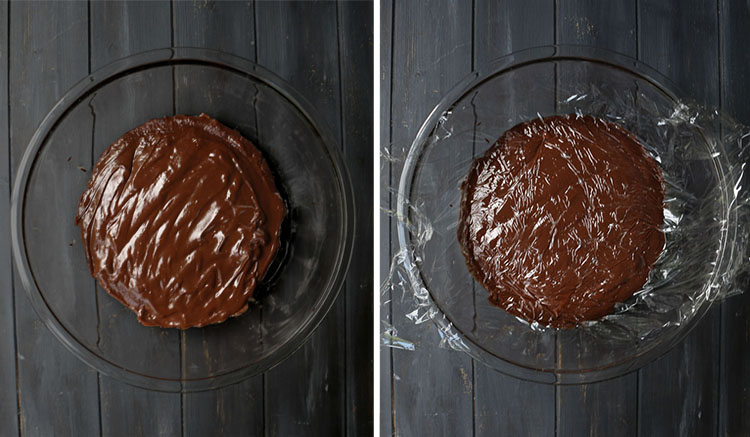
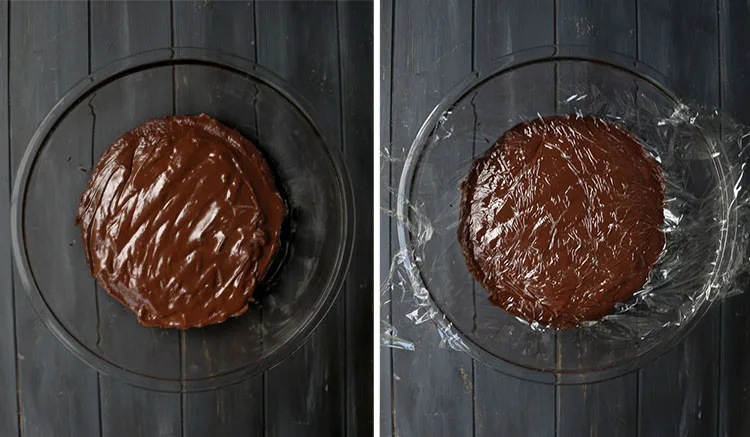
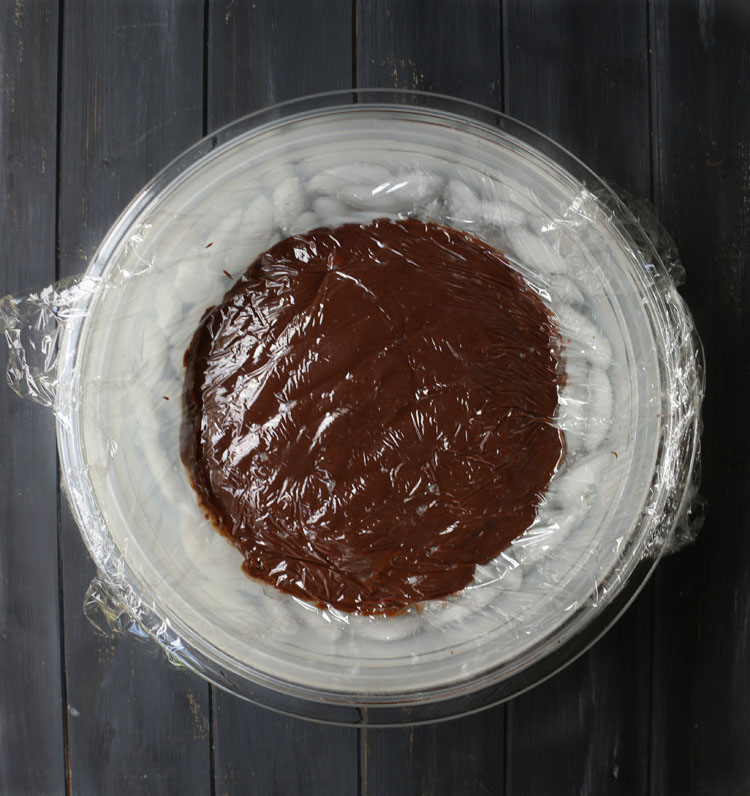
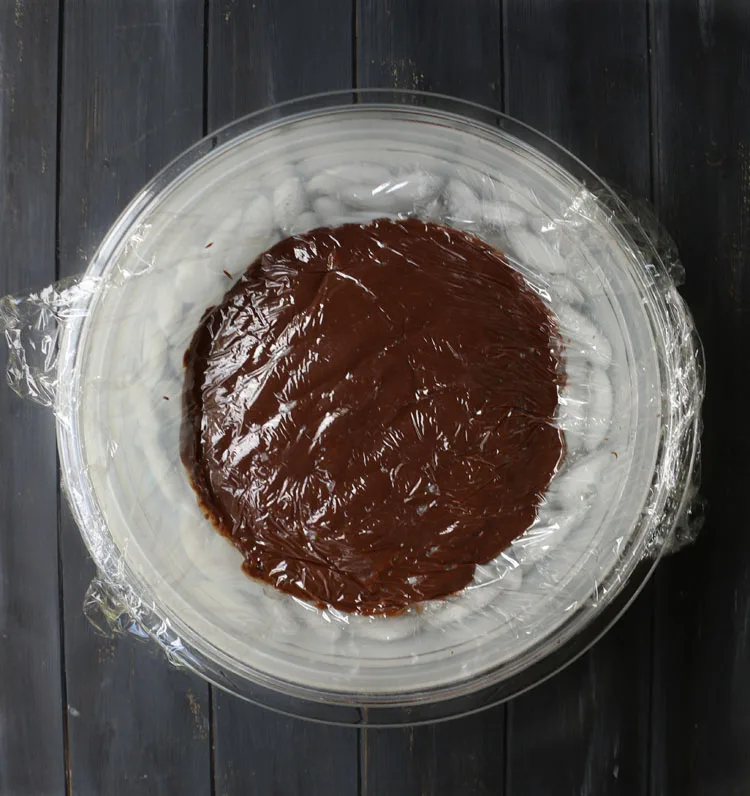
Place plastic wrap directly on pie filling
This must be done as soon as you finish pouring the pie filling into the bowl. The plastic wrap will prevent a skin from forming on the top of the custard. That “skin” is simply what happens when the custard is exposed to air.
So, the plastic wrap keeps it from being exposed. If you want a smooth filling, this is a mandatory step.

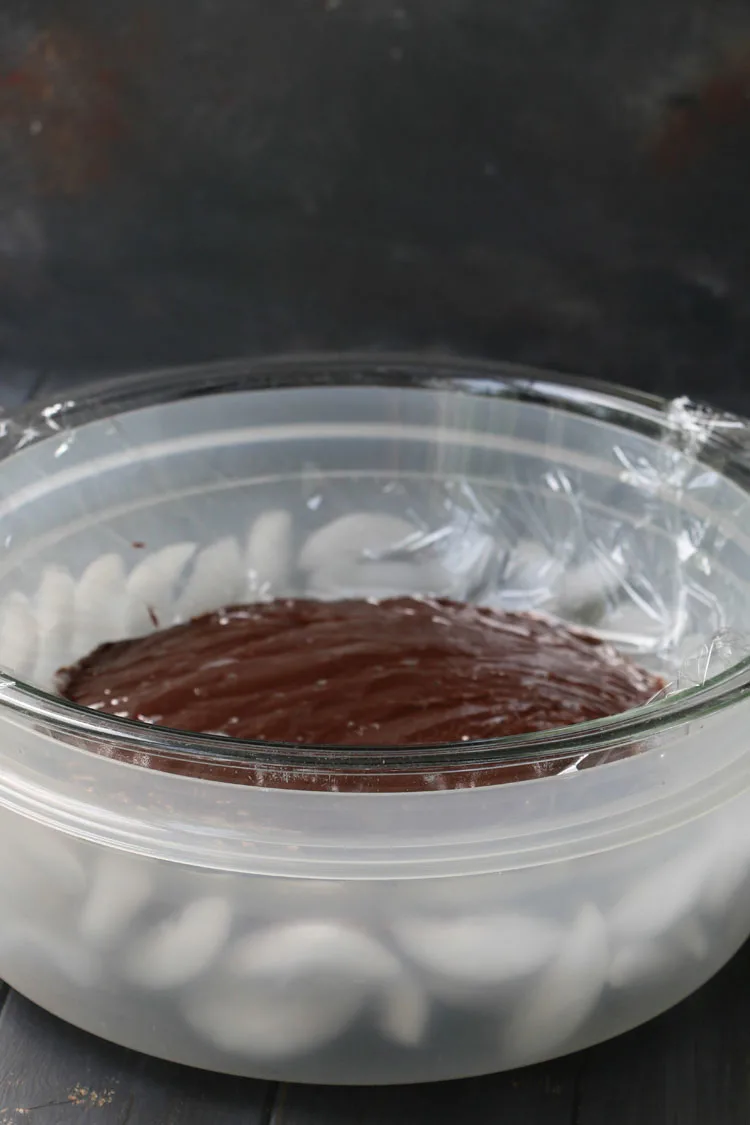
How to quickly cool chocolate cream pie filling
Some like to pour warm filling right into the crust. I prefer to cool it first because my plan is to top with whipped cream shortly thereafter; heat and whipped cream are not good friends.
To speed the process, I’ll place the bowl of hot custard into a bowl of ice water. Make sure the level of water is not so high that it will come crashing over the edges and into the custard. Remember, the ice will melt as the pudding cools, so leave some extra room at the top.
It doesn’t have to be completely chilled and ice cold. It should simply not be warm at all.
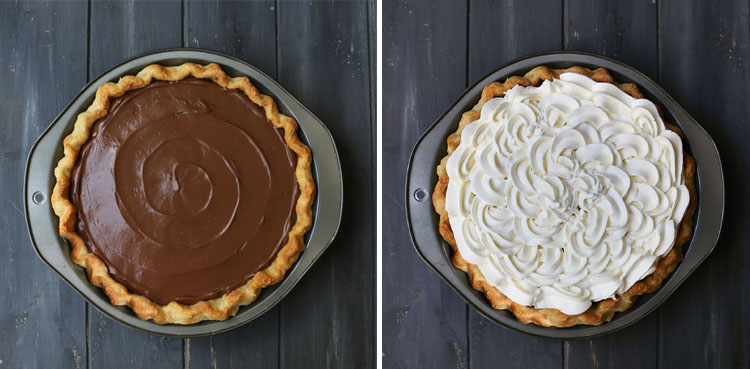
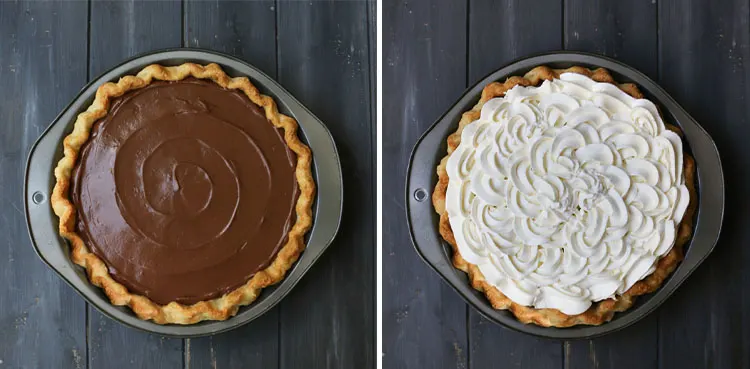
Whisk it up and pour it into the pie shell.
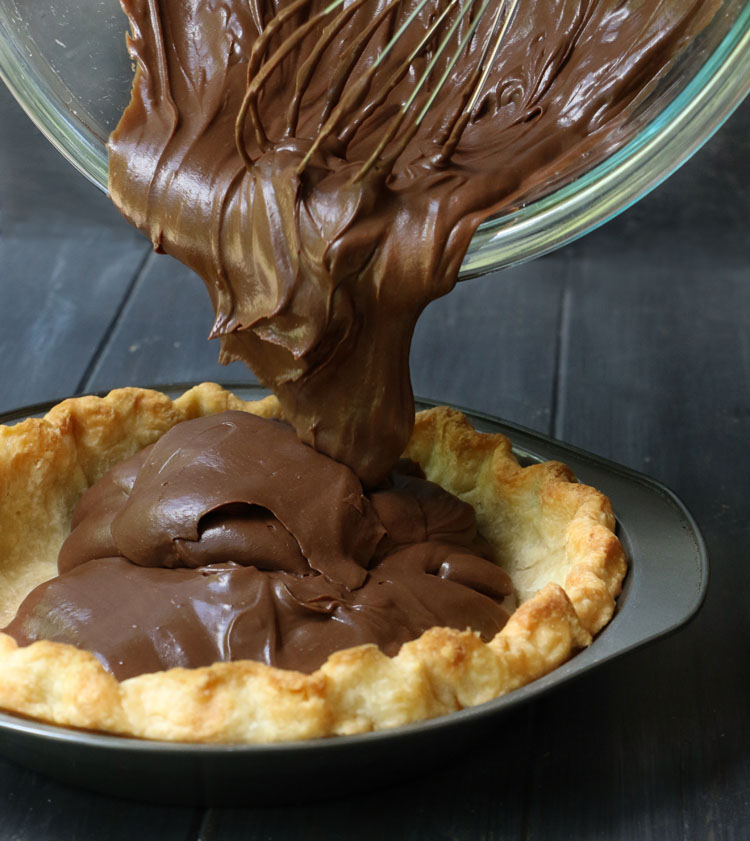

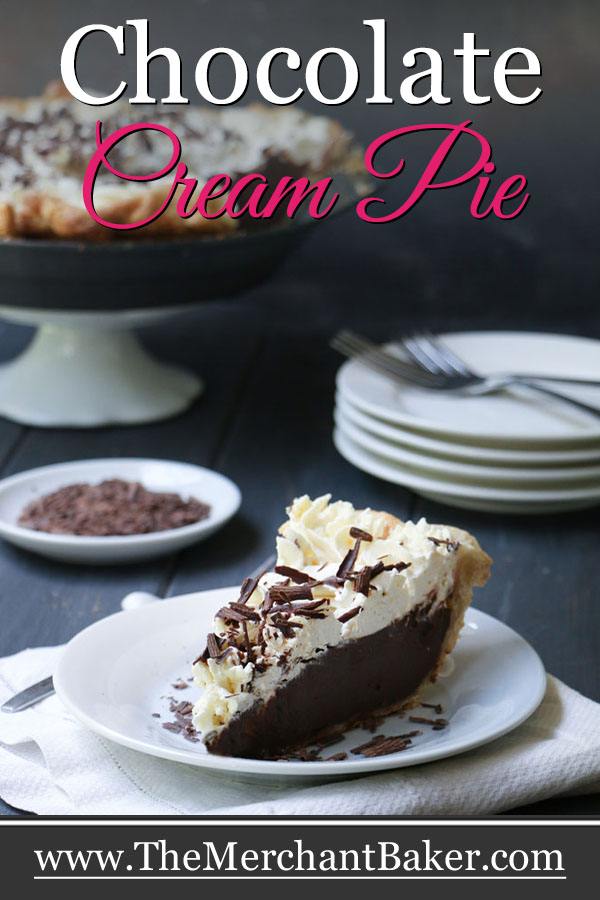
Look how creamy and smooth that chocolate custard is in the photo above. That’s probably because I strained it ;)
Next up, whipped cream topping!
Stabilized Whipped Cream Topping
Would it be wrong to say that the whipped cream is my favorite part of the pie? Ok…maybe I should say that there simply is no Chocolate Cream Pie without the cream on top, right?
And homemade whipped cream? So, so delicious! And easy! Just keep everything cold and whip until you either soft peaks or stiff peaks.
I just whip the cream with a few spoonfuls of confectioner’s sugar. There’s cornstarch in the confectioner’s sugar and that helps to stabilize the whipped cream. As long as I keep it chilled, I don’t have any issues with the whipped cream breaking or weeping. It stays nice and whipped and piped for a couple of days.
I enjoy a lightly sweetened whipped cream, but feel free to add more sugar if you like yours sweeter.
Stiff peaks or soft peaks?
If you’re going to do any piping, then whip to stiff peaks. Don’t over whip the cream or you’ll end up with a grainy result because you’ll have crossed the threshold into making butter. Test as you go. Stop the mixer, lift the beater and see if those peaks stand up without flopping over.
If you want a nice billowy top that you can pile on with a spoon and create pretty swirls in, whip to soft peaks. You can see how that looks with my Easy Banoffee Cream Pie.
I wanted to go to town with piping, so I went with stiff peaks this time :)

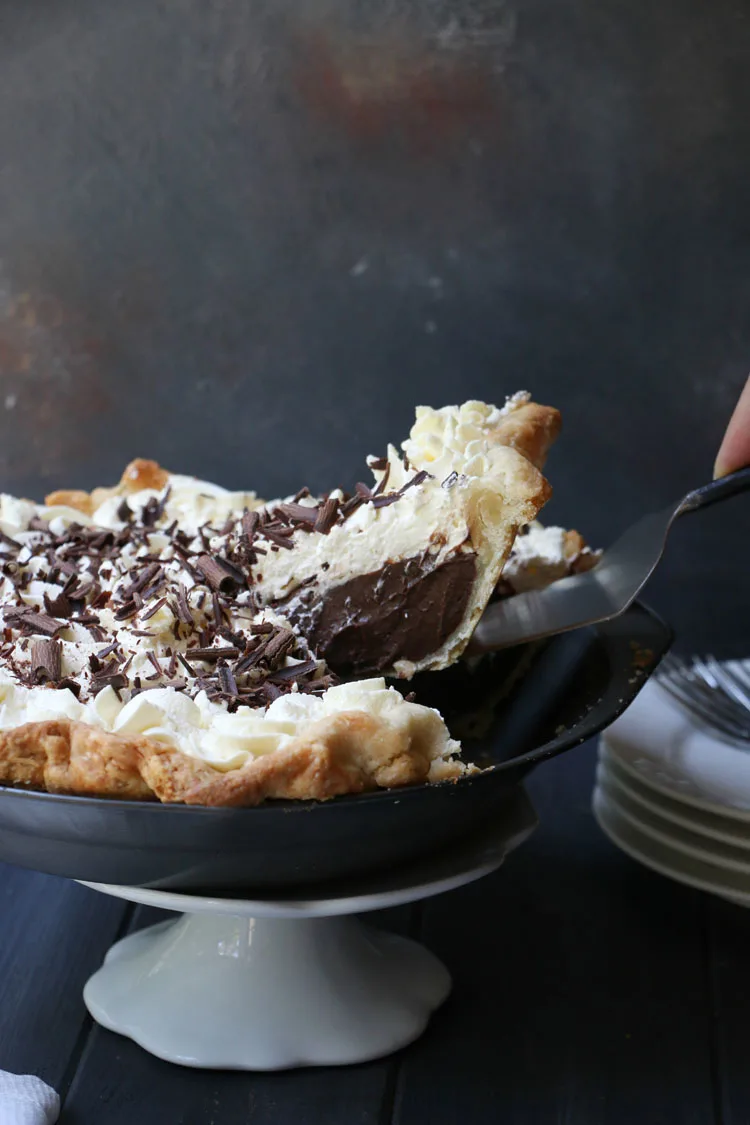
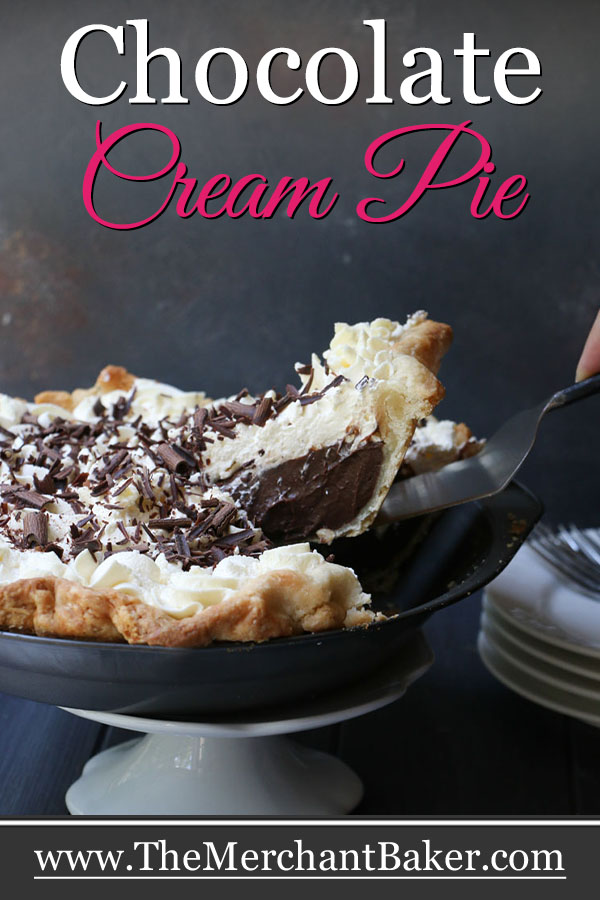
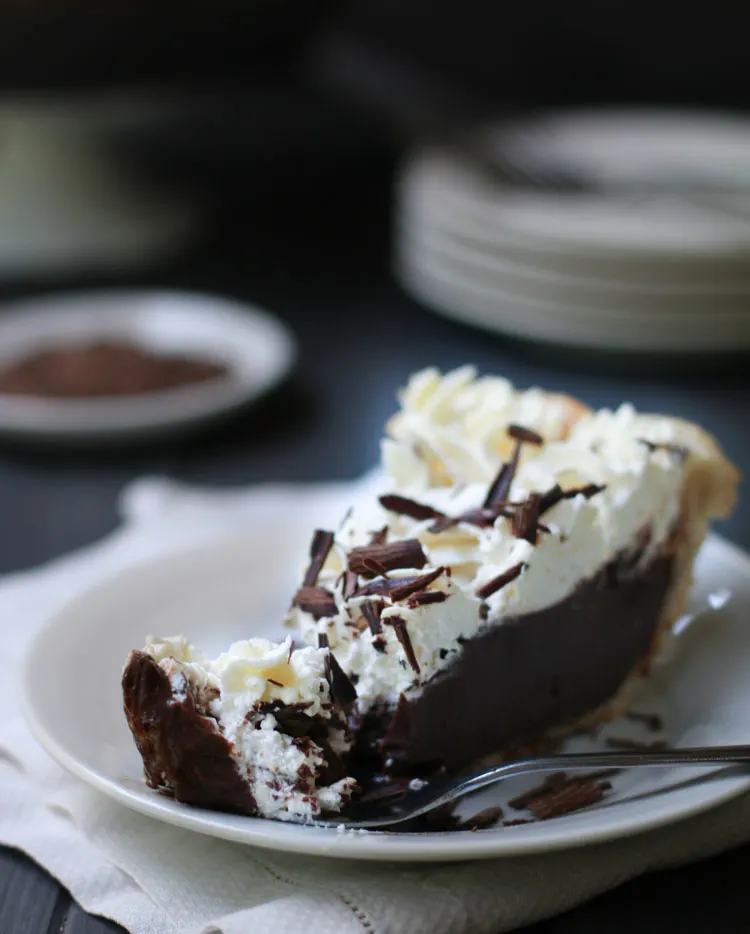
Tip: How to get the cleanest cuts
The most important thing you can do to get clean cuts is to chill, chill, chill, chill, chill! That’s right. Chill it! And not for just a few hours. It really needs time to set up to a firm enough state to hold up to a cut.
So four hours is better than right away and overnight is better than four hours.
(The bonus here is that I think the pie tastes better on the day after it’s made and possibly even better 2 days after. Chocolate just seems to need time to mellow for best flavor.)
That doesn’t mean you can’t cut it sooner. But, I’ll warn you now, your slices will be messier.
I’ll also confess that the slices I cut the next day were cleaner than the cuts that you see in the above photo.
Secondly, clean your knife between cuts. Wipe it off on a paper towel and start each cut without any residue left from the last cut. This is a good tip whenever you cut something that leaves a messy knife.
One more bonus? Instead of the eight servings you might get from a fruit pie, this pie is rich enough to warrant 12 smaller, yet still very satisfying slices.

I guess I’m finally going to have to let go of my “maybe chocolate custard/pudding isn’t my fave” narrative because I certainly enjoyed my slice of pie :)


Chocolate Cream Pie
This Chocolate Cream Pie starts with an easy homemade chocolate custard. Pour that rich, deep chocolate filling into a pre-baked pastry crust and then top it with lots of fluffy whipped cream. Finish it off with a pile of chocolate shavings to give everyone a little hint as to what deliciousness lies beneath...
Ingredients
For the pie crust:
- 1 pre-baked pastry crust
For the filling:
- 2/3 cup sugar
- 3 Tablespoons cornstarch
- 2 Tablespoons unsweetened dark dutch cocoa powder
- 1/4 teaspoon salt (heaping)
- 1/2 teaspoon espresso powder (optional)
- 4 egg yolks
- 2 1/2 cups whole milk
- 6 ounces semisweet chocolate (chopped)
- 1 ounce unsweetened chocolate (chopped)
- 2 Tablespoons unsalted butter
- 1 teaspoon vanilla
For the whipped cream topping:
- 1 1/2 cups heavy whipping cream, chilled
- 3 Tablespoons confectioner's sugar
For the topping:
- Chocolate shavings (see notes)
Instructions
- Off the heat, in a medium saucepan, whisk together sugar, cornstarch, cocoa powder, salt and espresso powder.
- Whisk in egg yolks until smooth. Slowly whisk in milk until combined.
- Bring to a boil over medium heat, whisking constantly. Allow to boil for 1 minute, while continuing to whisk constantly. Remove from heat.
- Add chopped chocolate, butter and vanilla and whisk until chocolate and butter are melted and mixture is smooth.
- For smoothest filling, pour custard mixture through a sieve and into a heat proof bowl. Place a sheet of plastic wrap directly on the surface.
- To speed cooling, set bowl in a larger bowl of ice water, insuring water isn't so deep that it leaks into the custard.
- Once custard is cooled, whisk again and pour into crust, spreading evenly.
- Whip cream and confectioner's sugar with an electric mixer. Whip to stiff peaks if you're going to pipe it or soft peaks if you're going to spoon it on and swirl it into a billowy pile. Spoon or pipe on top of custard layer, covering it fully. Sprinkle chocolate shavings, if desired.
- For best slices, chill pie for 4 hours or overnight in refrigerator. Leftovers should be stored in refrigerator.
Notes
* I used my Easy All Butter Pie Crust, but you can use any prebaked crust. See blog post for more ideas.
*I used King Arthur Flour Double Dutch Dark Cocoa, but you can also use Hershey's Special Dark Cocoa. I prefer a dutch process cocoa here instead of regular unsweetened cocoa for smoothest flavor.
*The espresso powder is optional, but it really brings out the chocolate flavor. I use King Arthur's.
*I used Ghiradelli mini semisweet chocolate chips to avoid having to chop chocolate more chocolate. They worked out well, but you can use any good quality semisweet chocolate that you love.
*If you want a thicker layer of whipped cream, increase cream to 2 cups and confectioner's sugar to 4 Tablespoons. I'm definitely going to go for the full 2 cups next time.
*To keep whipped cream cold while beating, it's good to chill your bowl and beaters before starting, especially if you're working in a warm kitchen.
*This recipe makes a lightly sweetened whipped cream. If you're a fan of much sweeter whipped cream, feel free to double the confectioner's sugar.
*To make chocolate shavings, place a thick bar of desired chocolate into the microwave for a few seconds. You don't want to melt it, just warm it slightly. Use a vegetable peeler and scrape against one of the edges to "peel" off a thin shaving of chocolate. The colder the chocolate, the more broken your shavings will be. A slightly warmer piece of chocolate will create small curls. Repeat heating for a few seconds each time until you get your desired result. Be careful not to melt it!
Penny
Thursday 29th of October 2020
This looks so delicious and I may try it for Thanksgiving - especially if it tastes even better two days after you make it. I like dishes I can make ahead of time. I'm curious about putting the chocolate through a sieve, though. Isn't the chocolate thick? How does that work?
Ramona
Thursday 29th of October 2020
Hi Penny, I used a wire mesh strainer and didn't have any issues. It is thick, but you do it right after you finish mixing it up, while it's warm so it hasn't fully set yet. So it's thick, but it's soft and can get through the mesh. I usually whisk it while it's in the sieve and that pushes it through. Toward the end, I'll push it through by using a spreading motion with a rubber spatula, pushing the custard against the sieve. I also used the spatula to scrape the excess off the bottom of the sieve if it was blocking any flow. I did take some photos of the straining step, but didn't get any that I thought illustrated the action of it all. You would have seen that the custard was moving through the sieve before I even started whisking it to push it through. I hope that helps!