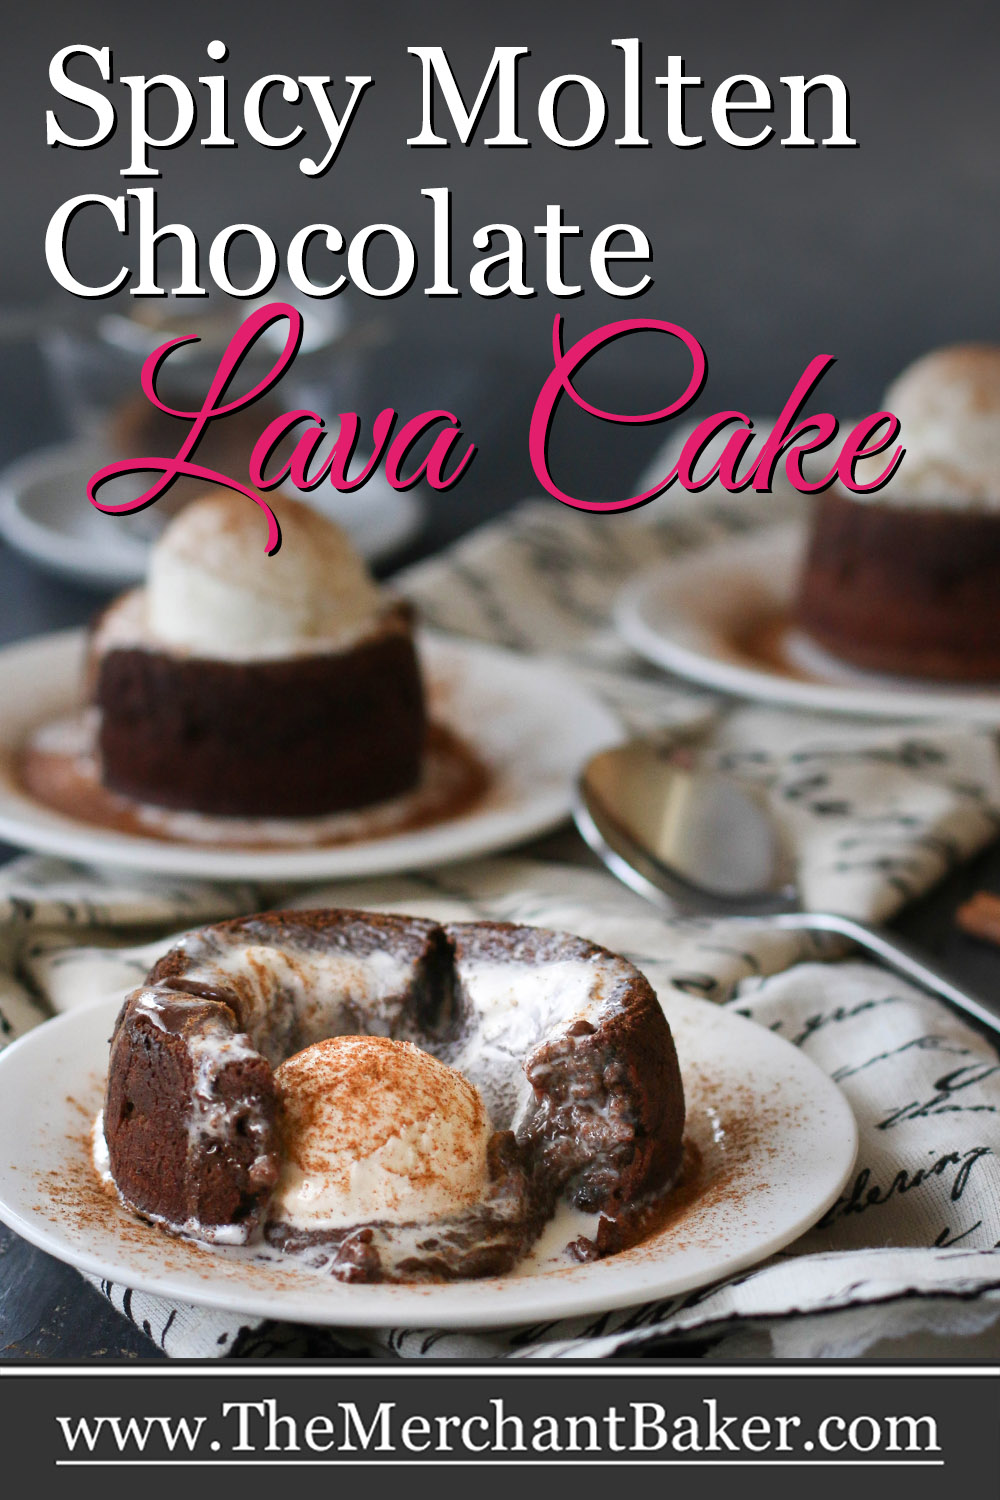


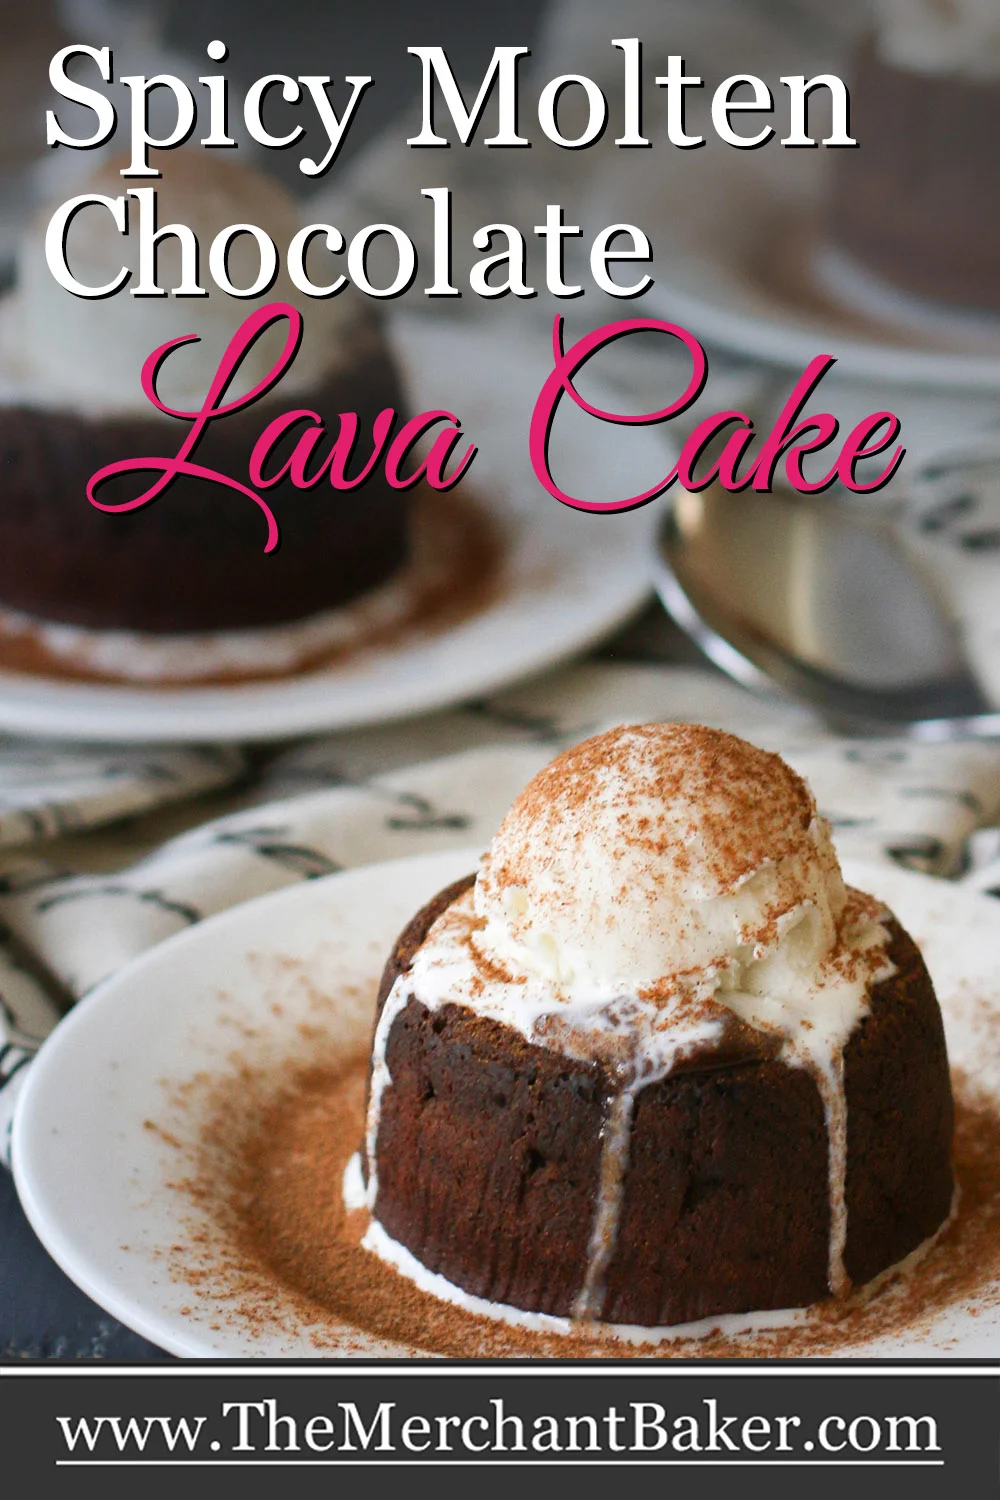

Spicy Molten Chocolate Lava Cakes get a kick of spice with just enough cinnamon and cayenne to keep the deep, dark chocolate flavor lingering deliciously on your palette. Top with a scoop of vanilla ice cream and a sprinkling of cinnamon for the most delicious chocolate dessert. Perfect for Valentine’s Day or whenever you want to warm somebody’s heart!
Ok, kids. These aren’t just any old molten chocolate lava cakes. These are red hot Spicy Molten Chocolate Lava Cakes!
And no, they aren’t red hot like you’ll need to rush to a glass of cold milk for rescue. They’re more like warm and cozy Spicy Molten Chocolate Lava Cakes.
They were inspired by one of my favorite brownie recipes, Mayan Brownies. I took the spices from that recipe and used them to amp up a classic lava cake.

Why add spice to chocolate?
With the evolution of exotic chocolates and truffles over the past couple of decades, I don’t suppose this is as common of a question as it once might have been.
However, if you’ve never tried chocolate with a bit of spice, I’m here to tell you that you don’t know what you’re missing.
When you add a little heat to chocolate, it seems to open up your palette to more fully embrace chocolate flavors.
I find that spiced chocolate is a slower eating experience because, as each bite is finished, the warmth of the spice blooms and allows the deep dark chocolate flavors to linger on your palette.
This allows you to savor each and every bite just a little bit longer, and makes the overall experience just a little more exciting. It’s a dessert that you definitely want to enjoy slowwwwwly…

I feel like I’m a heart beat away from the text you might find on a dog eared page of a racy novel, lol!
But hey, they say chocolate is an aphrodisiac, don’t they?
Just promise me that you won’t eat it too quickly. You won’t taste the spice at first. The flavor experience starts with chocolate and finishes up with spice. It’s lovely.
Enough said.
What is a chocolate lava cake?
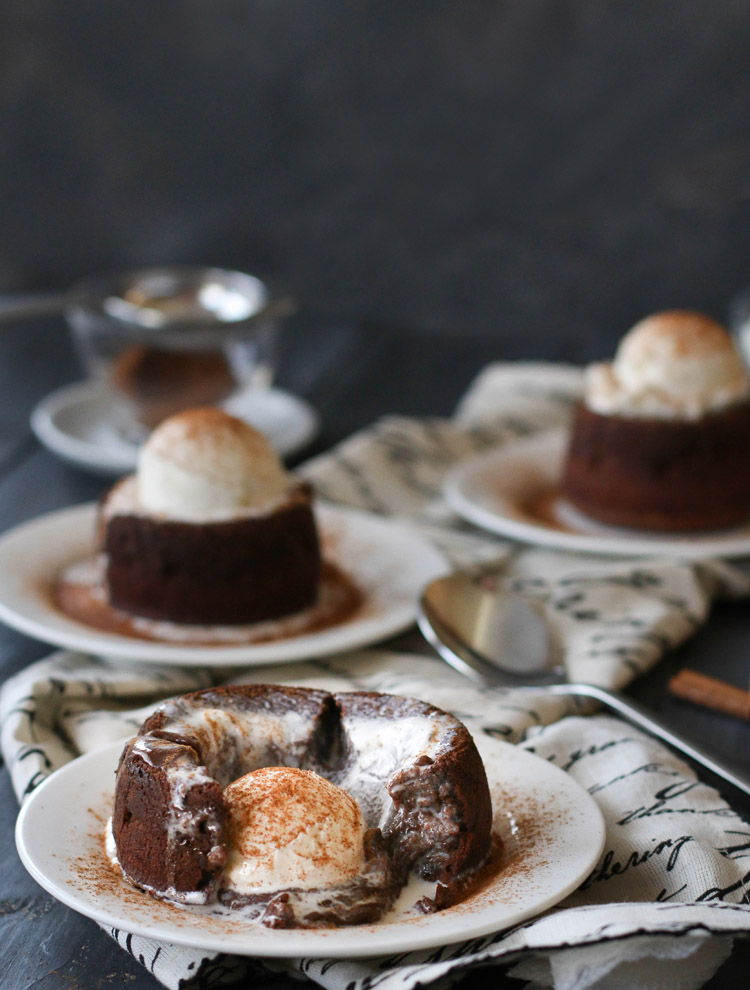
A lava cake is a delicious chocolate cake that is like a marriage between a chocolate pudding cake and a souffle. The batter is baked for a short time in the oven, creating an outer layer of cake while leaving the center molten and fudgy.
This particular recipe is adapted from Gale Gand. It’s a recipe I’ve been making for, what seems like, decades.
Is the center of the lava cake raw cake batter?
No. I like to think of the center as a warm chocolate pudding or custard. Take a look at these Lemon Souffle Pudding Cakes. The batter bakes up into separate layers of spongey cake and lemon curd.
If you’ve ever made pudding cakes, you know the kind where you pour water over the top? You end up with a cake layer and pudding layer, but we never think of the pudding layer as unbaked cake batter, do we?
When you make chocolate custard on the stove top, you cook it until thickened, taking care not to over cook the eggs.
For this recipe, think of the center as sort of a custard that is simply cooking in the oven as opposed to the stove top. We are taking care not to over cook it, just as we would if we were making it on the stove top.
And, while these Spicy Molten Chocolate Lava Cakes aren’t exactly like the other recipes mentioned (that fudgy center WILL solidify into cake if overbaked), I hope they better explain that the center isn’t just raw cake batter.

The following paragraphs contain affiliate links. We are a participant in the Amazon Services LLC Associates Program, an affiliate advertising program designed to provide a means for us to earn fees by linking to Amazon.com and affiliated sites.
What kind of pans can I use to bake a chocolate lava cake?
You can use all kinds of pans to make lava cakes, as long as they are oven proof.
I use 6 ounce ramekins that are 3.5″ across and 2″ high, similar to these {aff. link}.
I have also baked them in muffin tin. When I make them in a muffin tin, I use all 12 muffins cavities and simply make smaller cakes and bake for a shorter time. It’s a good option if you’re looking for a little extra portion control.
If you don’t have any of these pans or don’t want to invest in owning any, you can always opt for foil tins {aff. link}. Amazon sells them in large quantities, but you can usually pick up a smaller package in your grocery store where they sell the rest of the foil baking pans.

How can I make sure my chocolate lava cake doesn’t stick to the pan?
I’ll be honest; I’ve never had an issue with this cake sticking to the pan.
I use a trick that I always use with my bundt pans…I make a paste. For bundt cakes, I make a paste of flour and melted butter, about a Tablespoon of each.
But with this recipe, I didn’t want any flour residue showing up on the dark cakes, so I made a paste using unsweetened cocoa and melted butter instead.
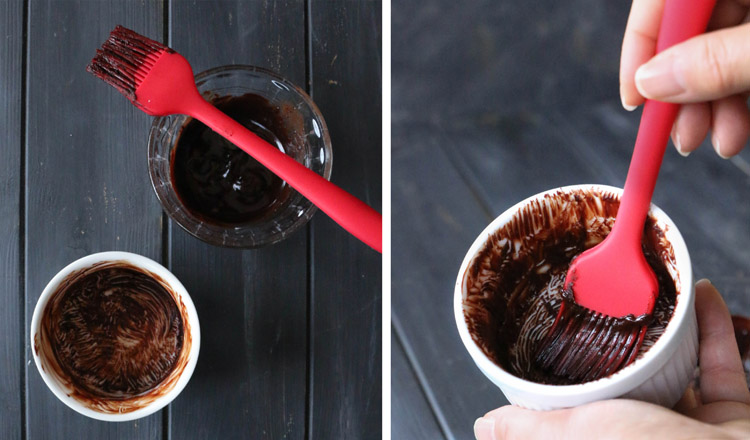

One of the things that I love about using this paste method is that I can just brush the liquidy paste all over the pan. It makes it easy to get into all of the corners.
One extra bonus…because the paste is dark, it’s very easy to see if you missed a spot.
After baking, run a knife around the ramekin to loosen the cake from the edges.
Another tip is to make sure you take the cakes out of the pans about 1-2 minutes after removing them from the oven. Allowing cakes to cool in their baking pans is rarely a good idea if you want them to release from the pan cleanly.
How to Make Spicy Molten Chocolate Lava Cakes
What kind of chocolate should I use?
This recipe uses bittersweet chocolate. One of the reasons I love this cake is because it’s not super sweet, but it IS super chocolatey!
Normally, I would have a bar of Ghiradelli bittersweet chocolate {aff. link} to chop up for the recipe. (Remember, the chocolate is the main flavor here so the better the quality chocolate you use, the better the flavor.)
On this particular occasion, I had Ghiradelli 60% bittersweet chocolate chips. {aff. link} So, that’s what I used. It’s fine. No chopping necessary. And you can see how it turned out. Still makes a delicious cake.
That being said….I do recommend choosing a bar over using chips because you’ll get a a better texture to your molten center.
Now, if I want to go a little higher with the cacao percentage and a better quality chocolate, I might go with Guittard {aff. link}, Scharffen Berger {aff. link} or one of my faves, Valrhona {aff. link}.
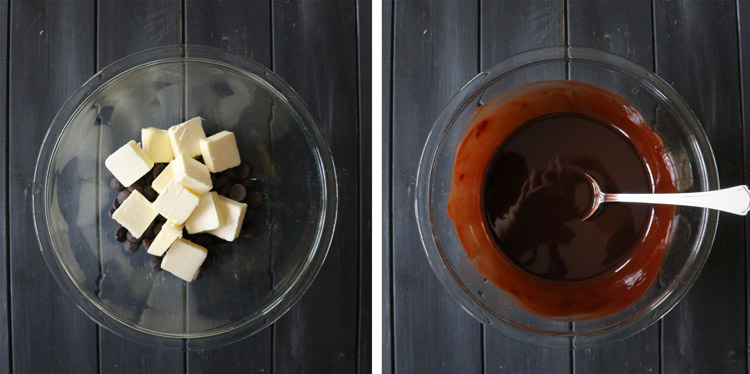

Melt the chocolate and butter
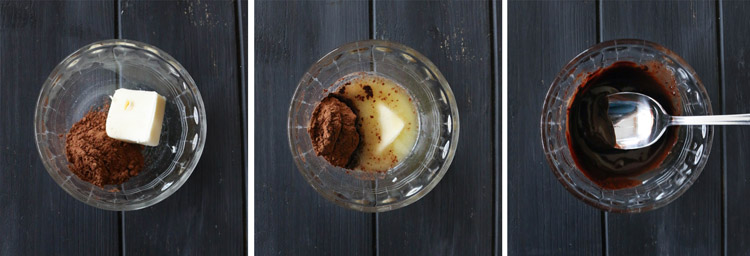
Start by melting chocolate with butter. You can do this on the stove top, but I prefer to save a dish and save time by simply melting it in the microwave.
I heat it in 30- 60 second increments, stopping to stir it frequently as the butter melts and gets warm enough to melt the chocolate.
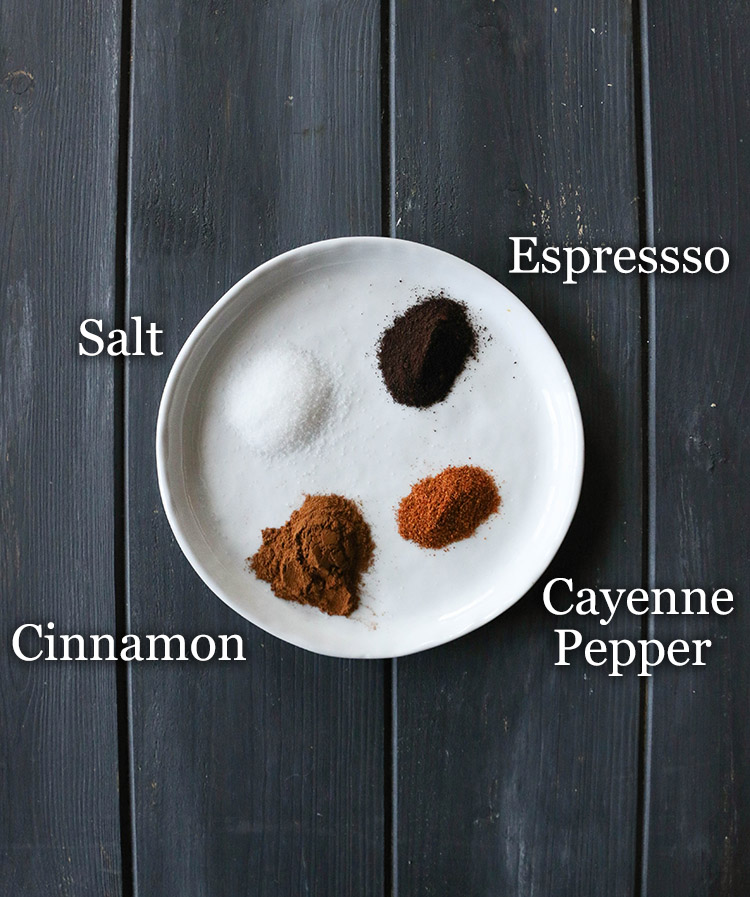

Add spices, espresso and vanilla
Once the chocolate is melted, you can add the salt, cinnamon, ground cayenne, espresso and vanilla. Then, set that spicy mixture aside to cool while you continue with the recipe.
I used Vietnamese cinnamon in this recipe. It’s stronger, richer and sweeter than your typical grocery store cinnamon. I love the extra boost of flavor it provides.
And, even though the cinnamon isn’t a primary flavor, it acts as a strong partner in boosting the warmth of the cayenne.
The espresso simply brings out the rich flavor of the chocolate. Again, it isn’t a strong flavor, but every ingredient has a part to play.
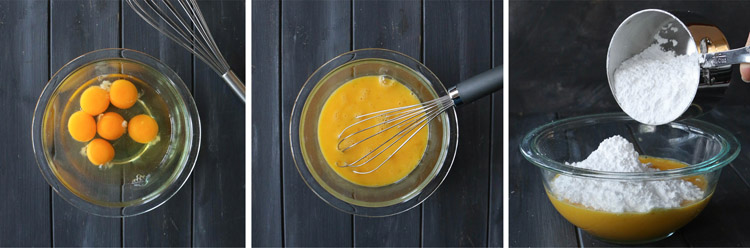
Whisk eggs and sugar
In a separate bowl, whisk the eggs and additional yolks until everything is combined. Add the powdered sugar and whisk until incorporated. It may be a little lumpy at first, but keep whisking and it will all come together.
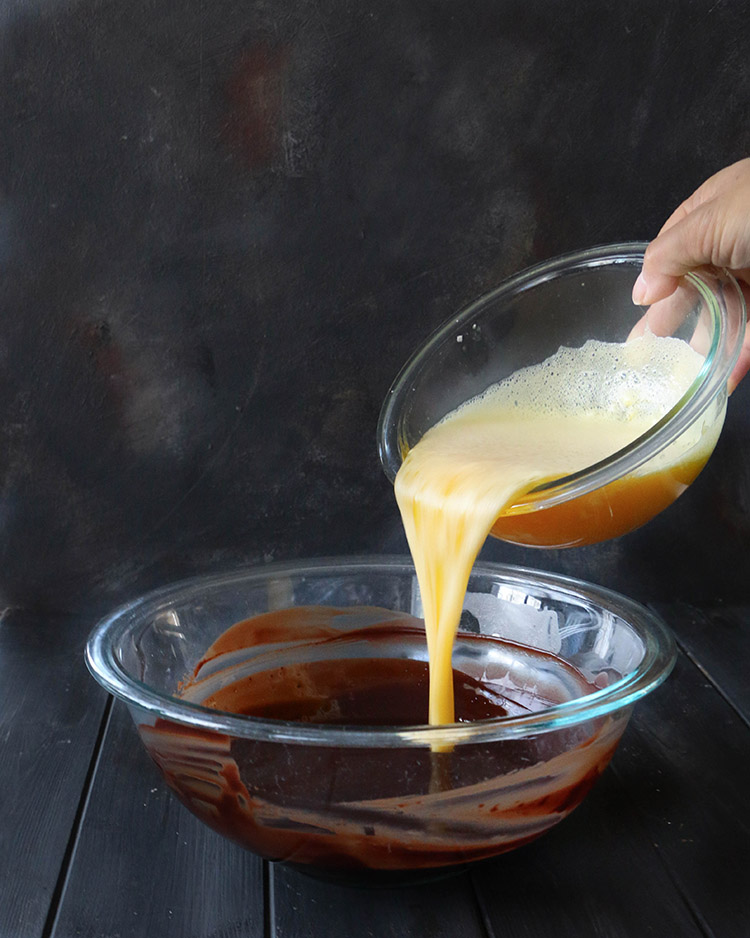
Add the egg mixture to the cooled chocolate mixture
Just pour it in and whisk it up until fully combined.
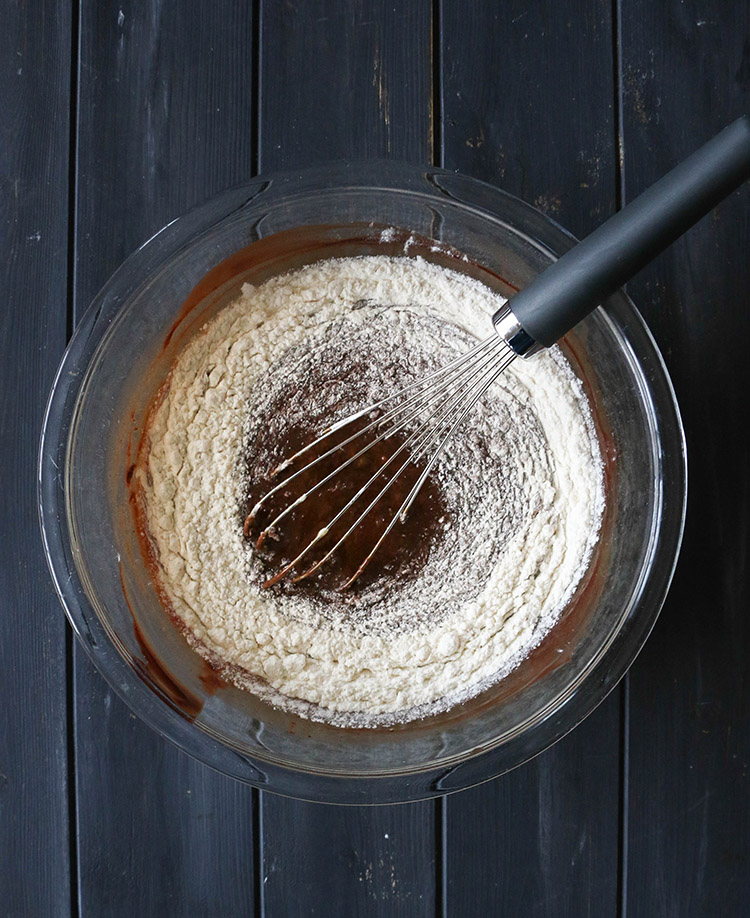
Sprinkle the flour over the batter
First, remember not to over measure your flour. I use the stir, spoon and sweep method.
That means you stir the flour to lighten it up. Then, spoon the flour lightly into your measuring cup. Finally, use the back of a knife or other straight edge to sweep the excess off the top.
I recommend sprinkling the flour evenly over the batter to help distribute it more evenly once you start incorporating it. Whisk the batter until the flour is fully incorporated and you’re ready to start filling the ramekins/baking pans.

Fill the prepared pans
Divide the batter evenly amongst the baking pans and you’re ready to bake (or refrigerate to bake later.) I like to place my ramekins on a tray for stability and for easy transport to either oven or fridge.
How long should you bake chocolate lava cakes?
This is going to depend on whether you’re baking your cakes from room temperature or cold from the refrigerator. The colder the batter, the longer the baking time.
Baking time will also depend on the type of pan you use to bake the batter. Smaller pans will bake for less time; larger pans, longer. I give time guides in the recipe, but the best way to tell if your cake is done is by how it looks.

How can I tell when a lava cake is done baking?
Remember how we discussed oven thermometers {aff. link} in my last post? This is yet another great use for them.
Full disclosure, I didn’t calibrate my oven temperature before baking my cakes this time. It had been running accurately, but for some reason, it was on the cool side.
So, for my first set of cakes, the time was taking so much longer than usual. Guess what happened? I overbaked my cakes. Ugh!
Now, this wouldn’t be an issue if I weren’t shooting them. I mean, we would have missed out on the molten lava, but my family would still have some yummy chocolate cakes to eat.
Thankfully, I only baked 3 of them, so I still had 3 left to bake.
I checked my oven temp and the thermometer validated the fact that my oven was baking much cooler than I wanted. I needed 450 degrees to get the result I was looking for and that’s not what my oven thermometer was reading.
I increased my oven temperature up to 500 and waited for the thermometer to get to 450.
At that high of a temperature, the outer shell of the cake has time to rise and bake before the center has time to solidify.
So, check to make sure your oven is really at the right temperature.
Visual tests for doneness are critical!
There are so many variables that will make your baking time and experience different than mine… be it type of pan, oven temperature and, as mentioned above, the temperature the batter is when you bake it.
I almost want to tell you to ignore baking times. Use them as a gauge so that you have some idea of what you’re looking for instead of as the absolute last proof of doneness.
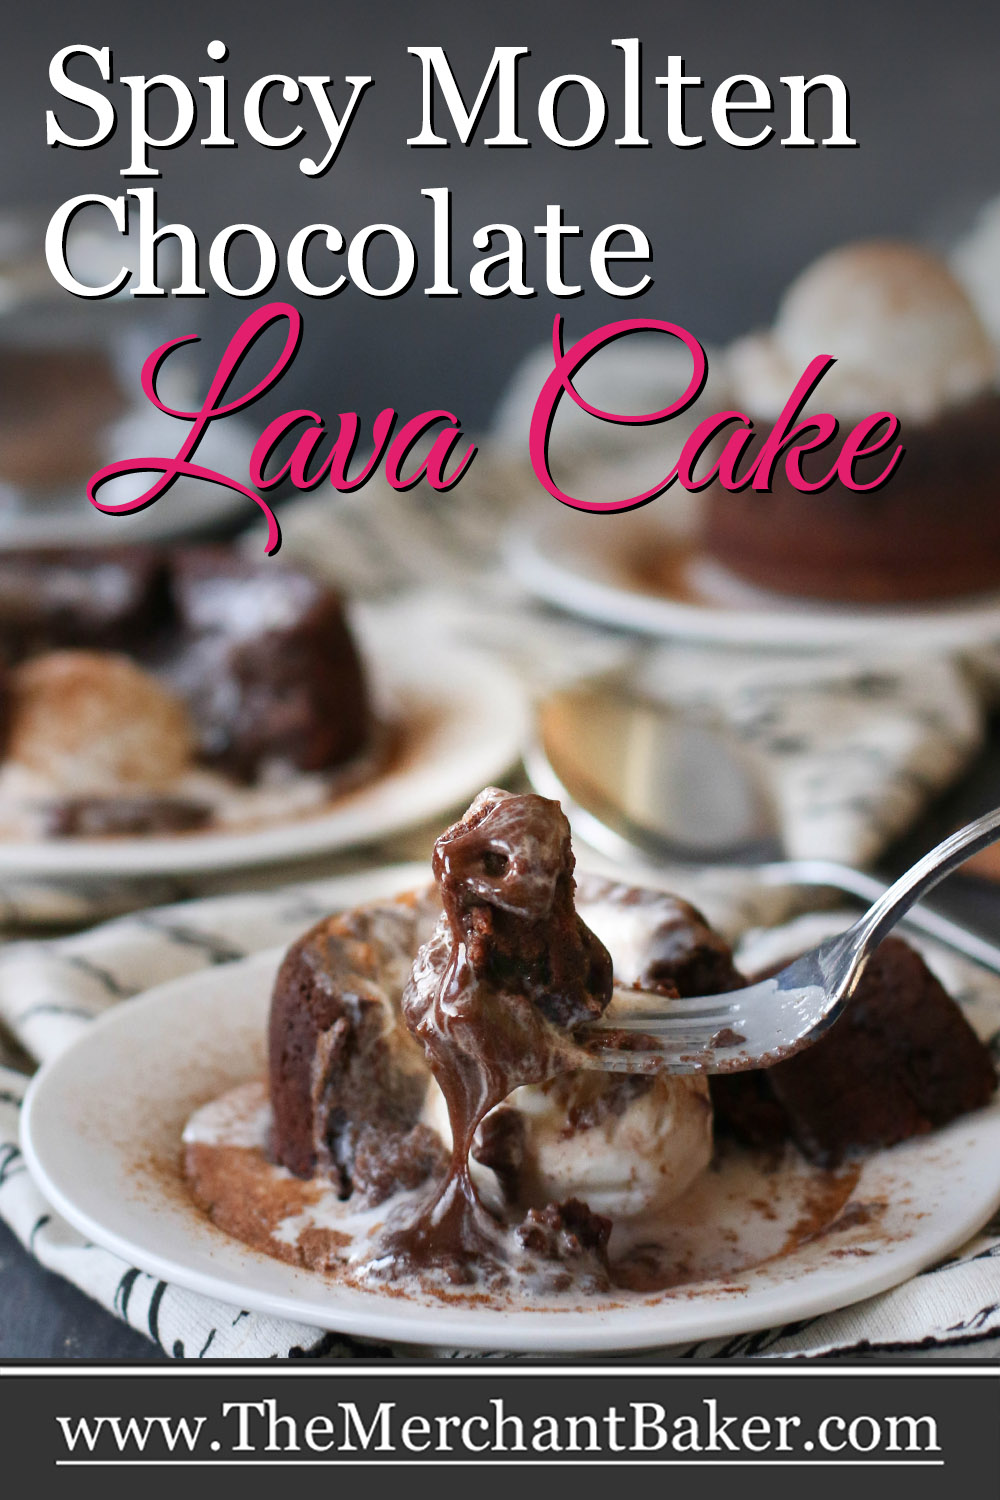
So, what are you looking for? You’re looking for sides that are firm and cakey, but the center is still soft, just a bit wobbly, but not wet looking.
You can use a toothpick to check this as well. Inserted in the sides, it should come out with a few moist crumbs. For the middle, there should be some structure to the top of the cake as you poke through it, but the toothpick should come out covered with the molten chocolate center.
Once you know how long your oven takes to bake the cakes in whatever pan you’ve used, make a note on the recipe for the future. That will become your new guide.
Remember, always check to make sure your oven is calibrated to the correct temperature for consistent results.
Can you make chocolate lava cakes ahead of time?
Yes! In fact this is my preferred method of making them. Then, there’s no need to fuss when it’s time for dessert.
Just fill your prepared pans with the cake batter and cover with plastic wrap. Refrigerate until ready to bake.
You can make them 1-2 days ahead of time and bake them when you need them. I, personally, never make them further in advance than the day before.
Once baked, you can store leftovers (should you have any) in the refrigerator, covered for up to 3 days.
Can you freeze chocolate lava cakes?
If you’d like to store baked cakes for longer, you can freeze them. Once baked, allow them to cool.
Carefully wrap each cake in plastic wrap. Set on a tray and freeze until solid. Once frozen, pop them into a zip top freezer bag and store for up to 3 months.
How to reheat chocolate lava cakes?
Baked cakes that were stored in the refrigerator can be warmed quickly in the microwave. If you’re reheating cakes that were frozen, thaw them first.
You can thaw previously baked frozen cakes overnight in the refrigerator, then reheat in the microwave just until warm throughout. It usually takes about 30 seconds. Better to check at 15-20 seconds first, then add time as necessary. Just like ovens, microwaves vary.
Remember, every time you reheat a cake, you risk cooking the center further, so proceed cautiously and reheat gently.
How to Serve Spicy Molten Chocolate Lava Cakes
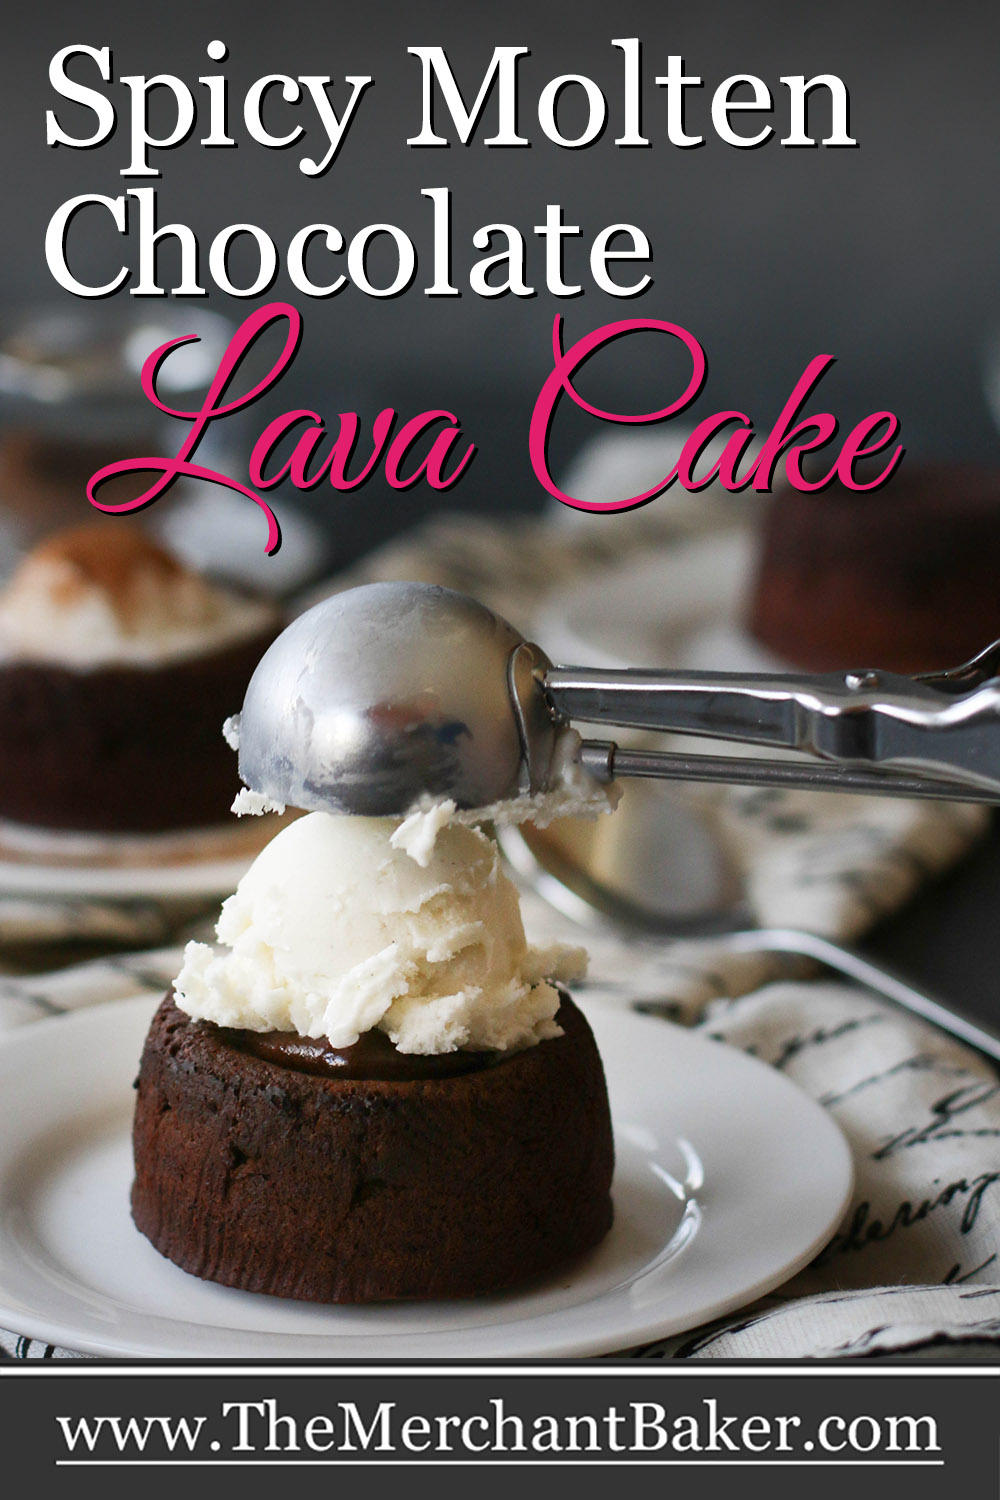
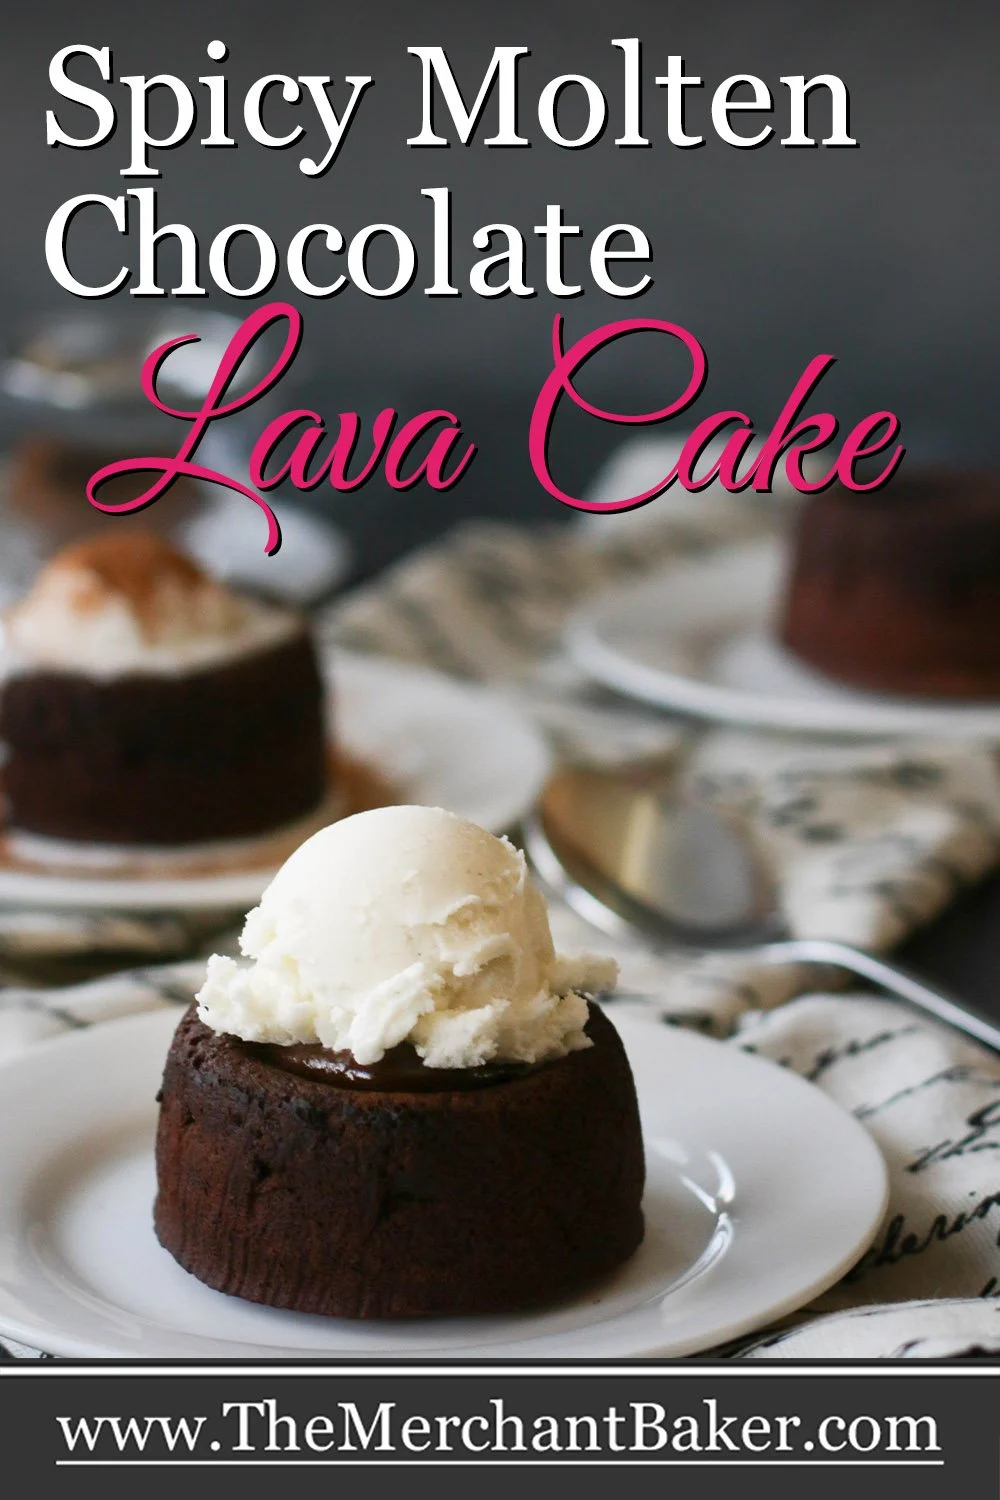
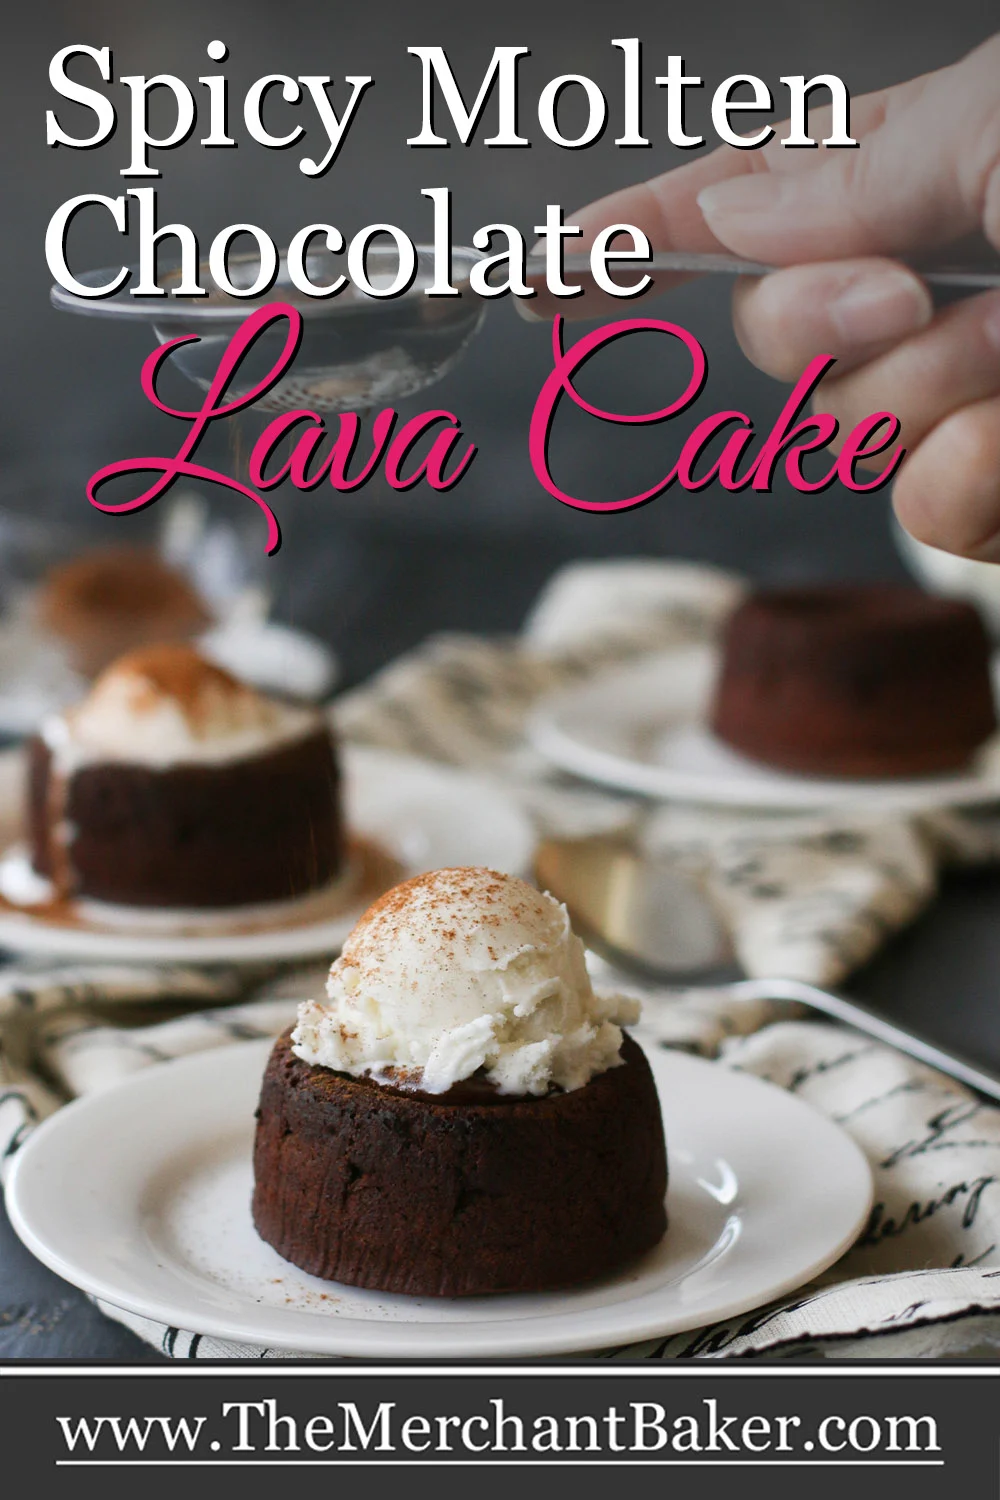
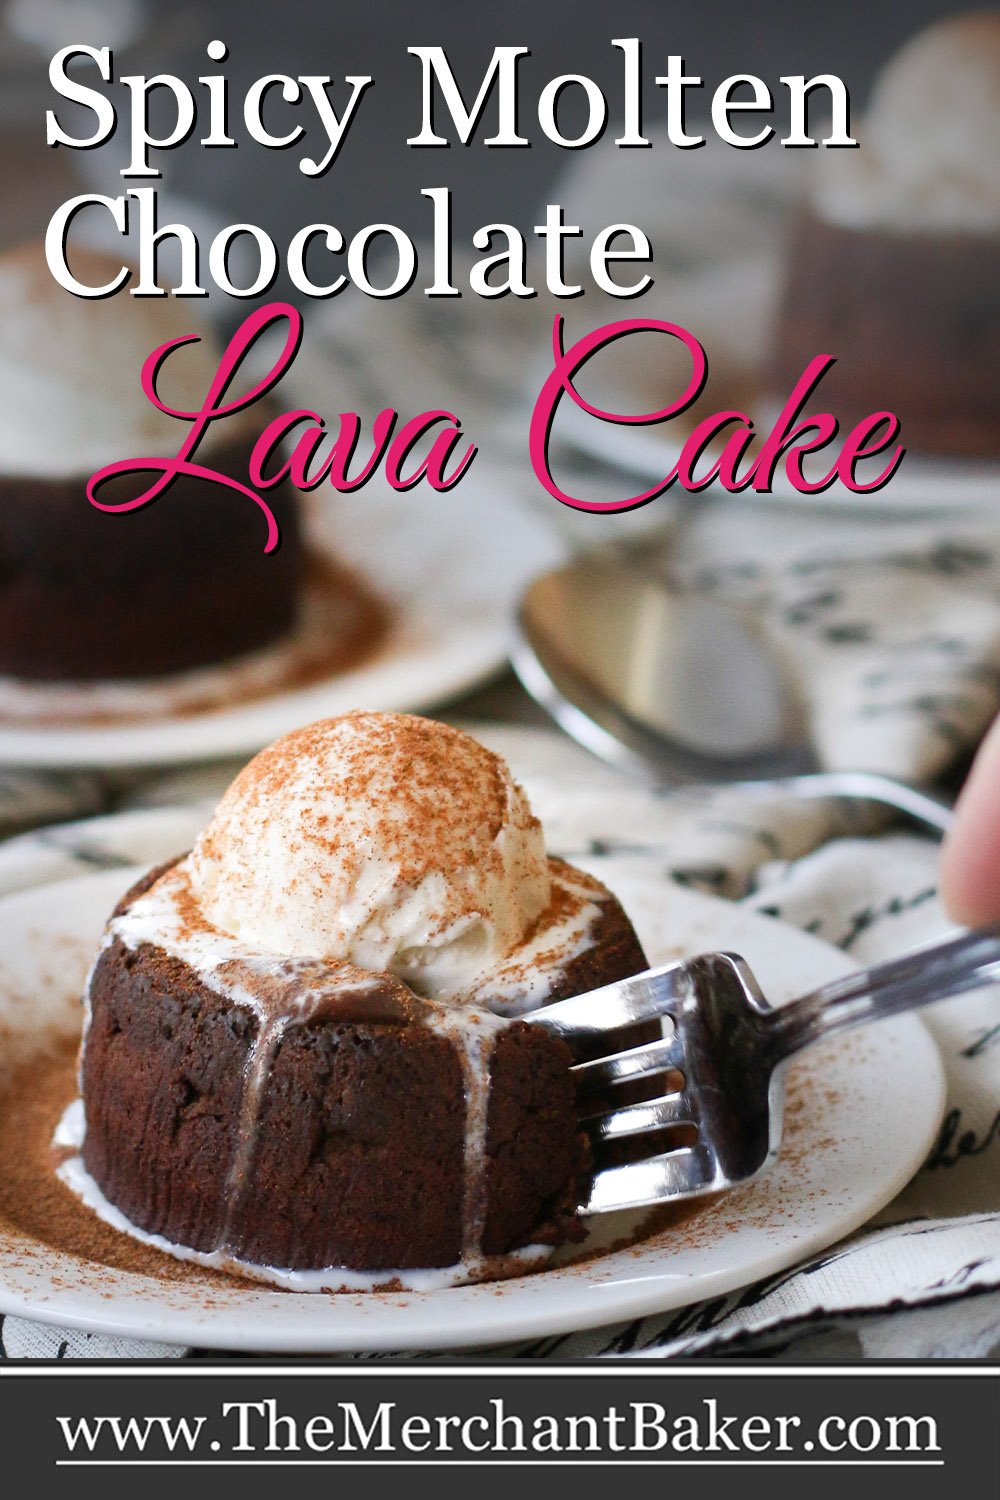
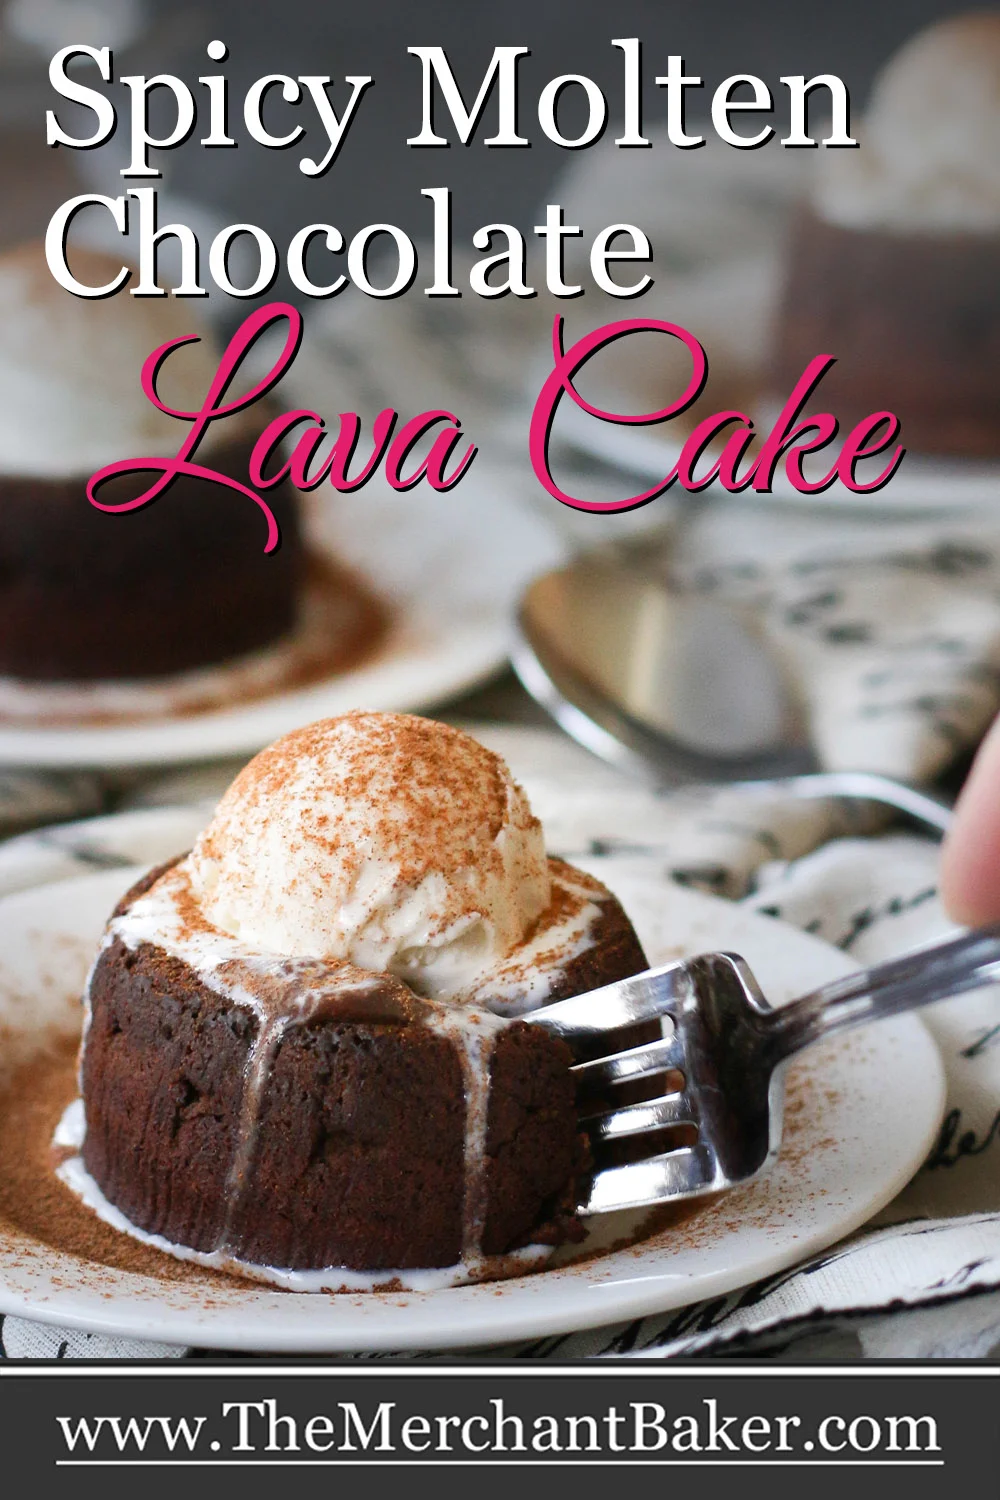
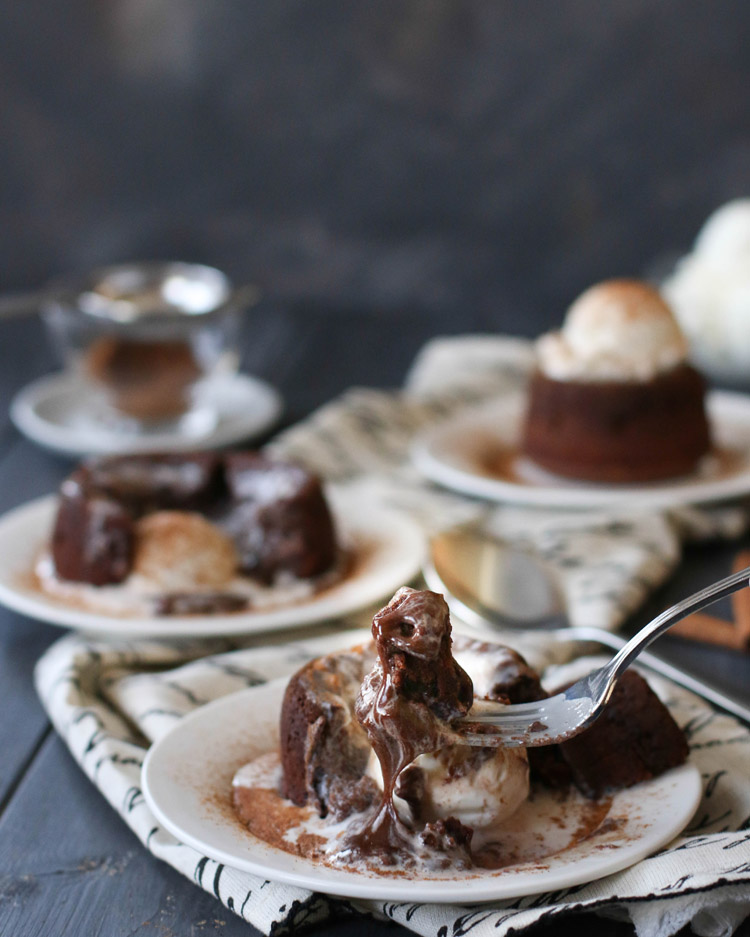
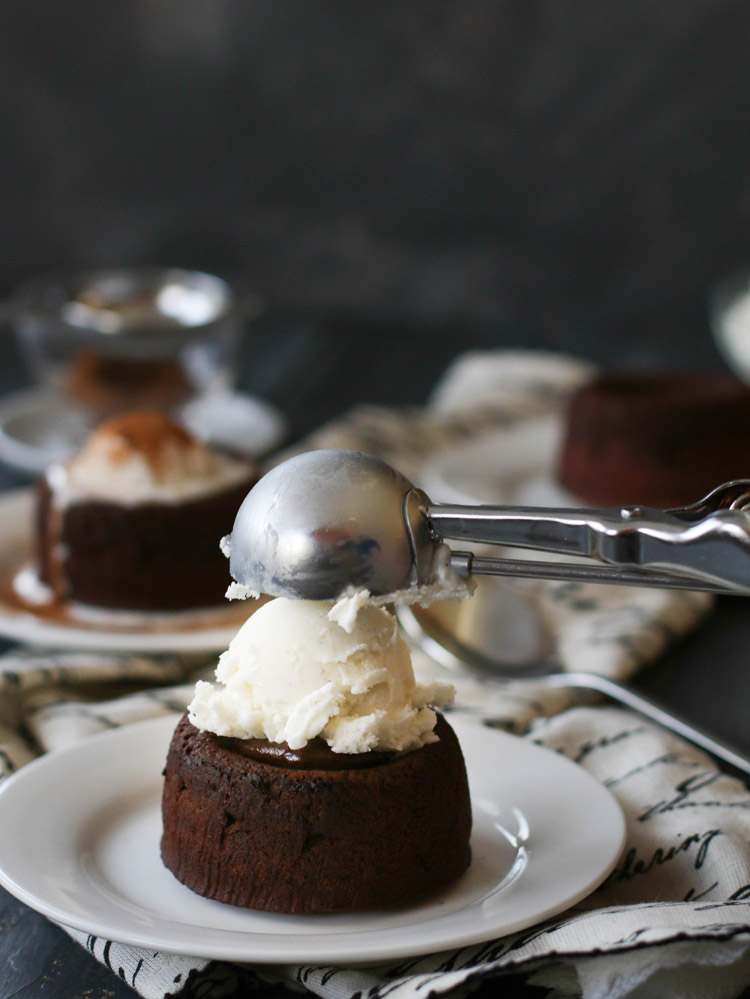
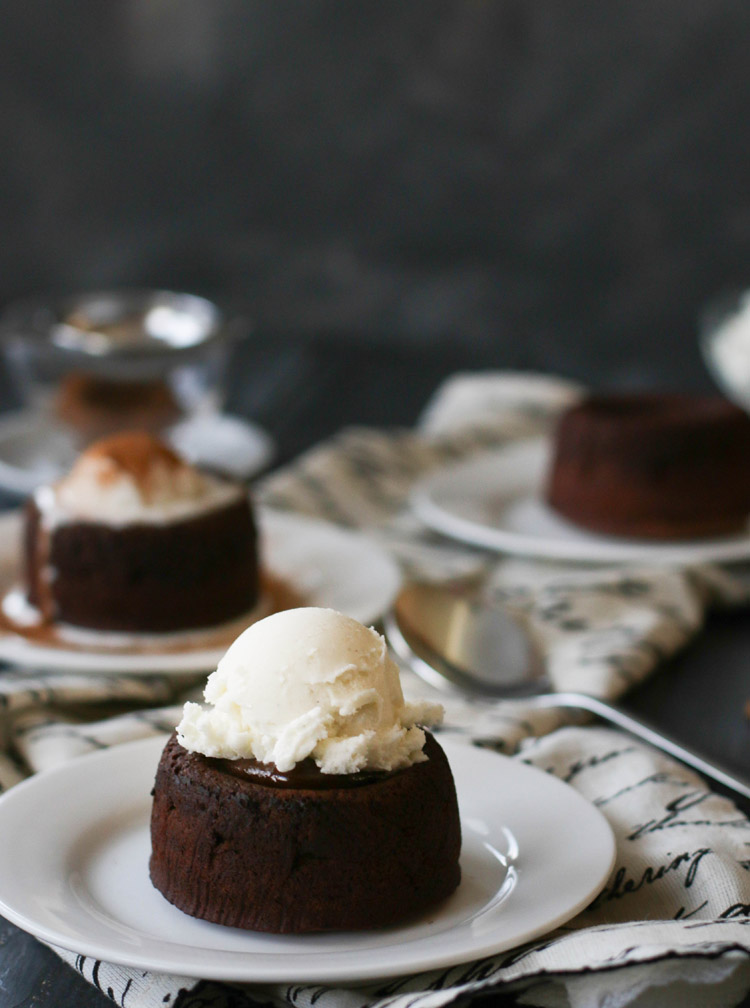
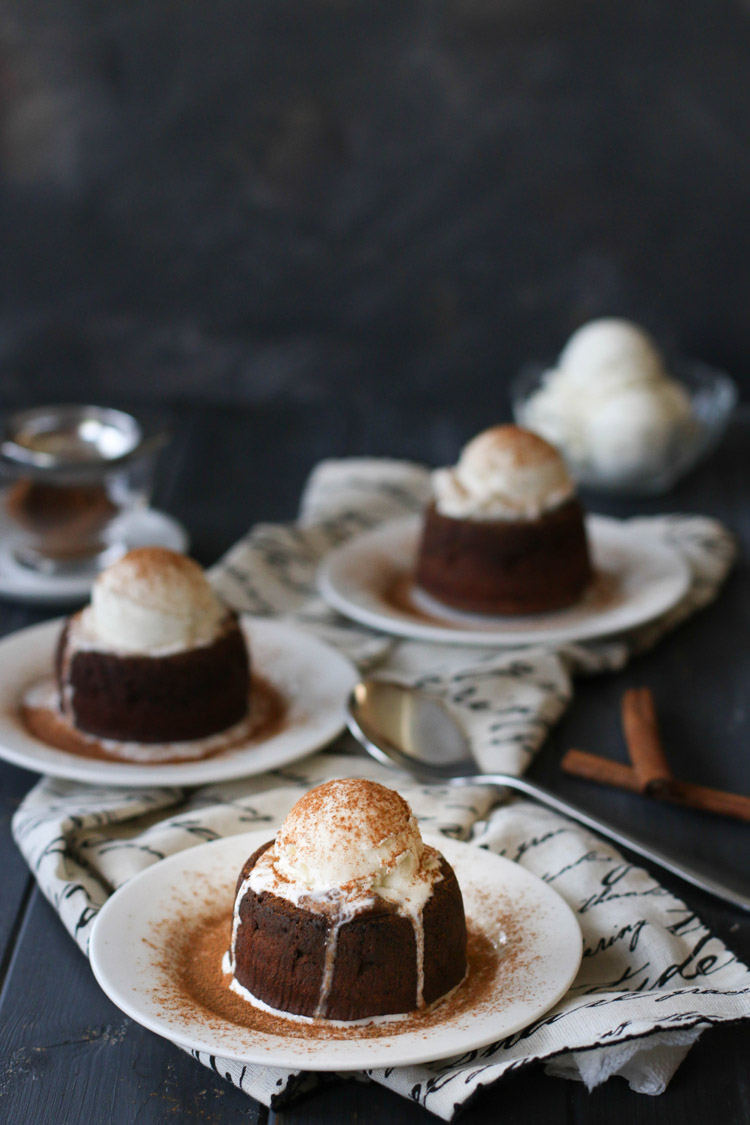
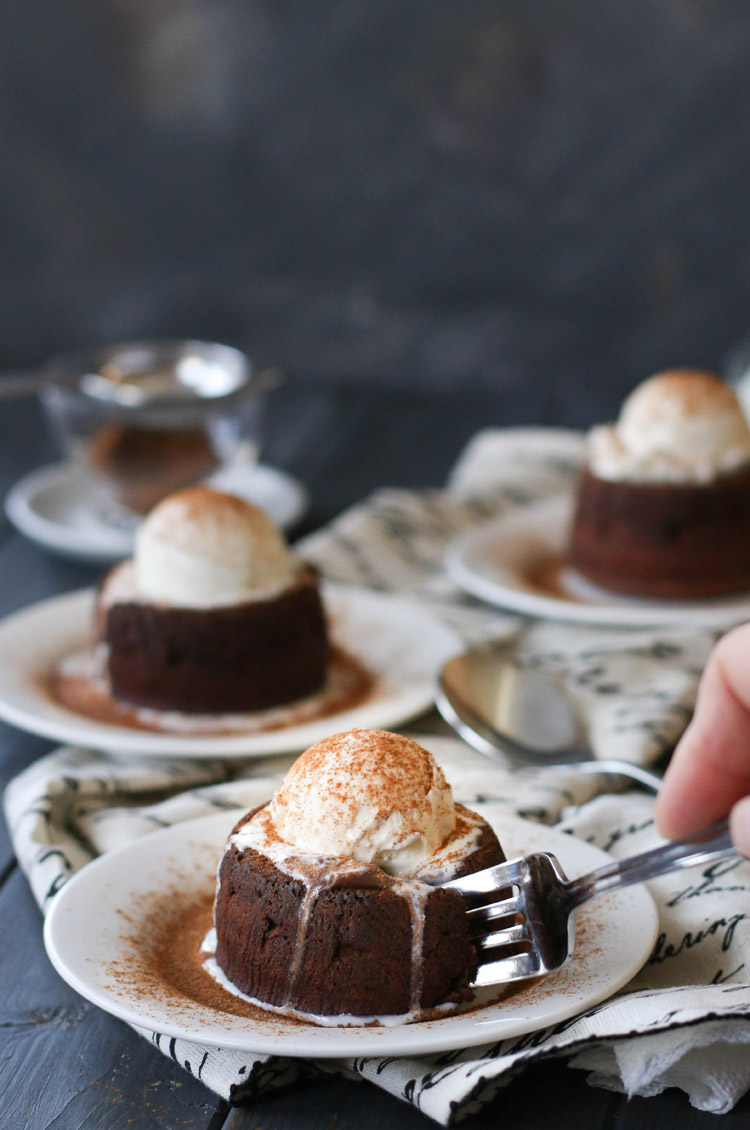
While they are quite delicious on their own, they are even better with a dollop of whipped cream or ice cream.
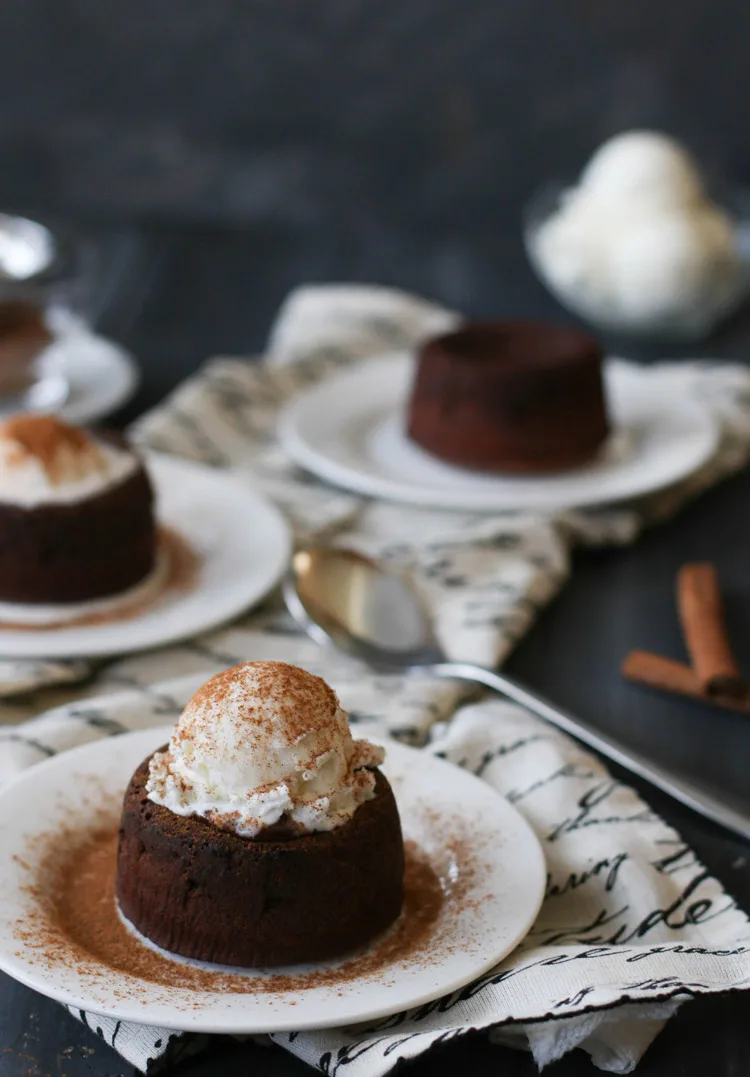
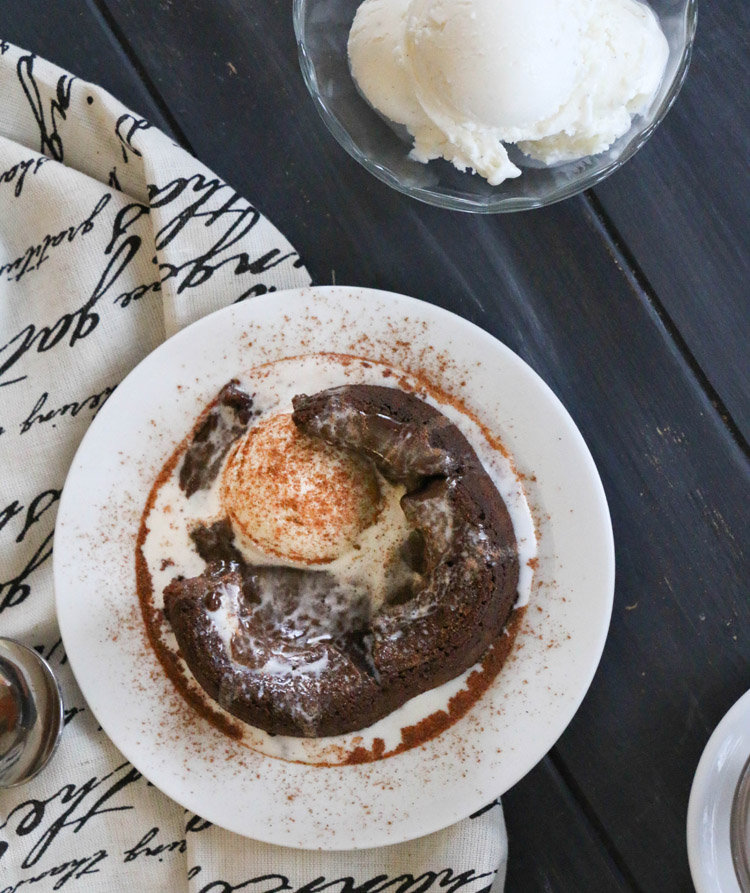
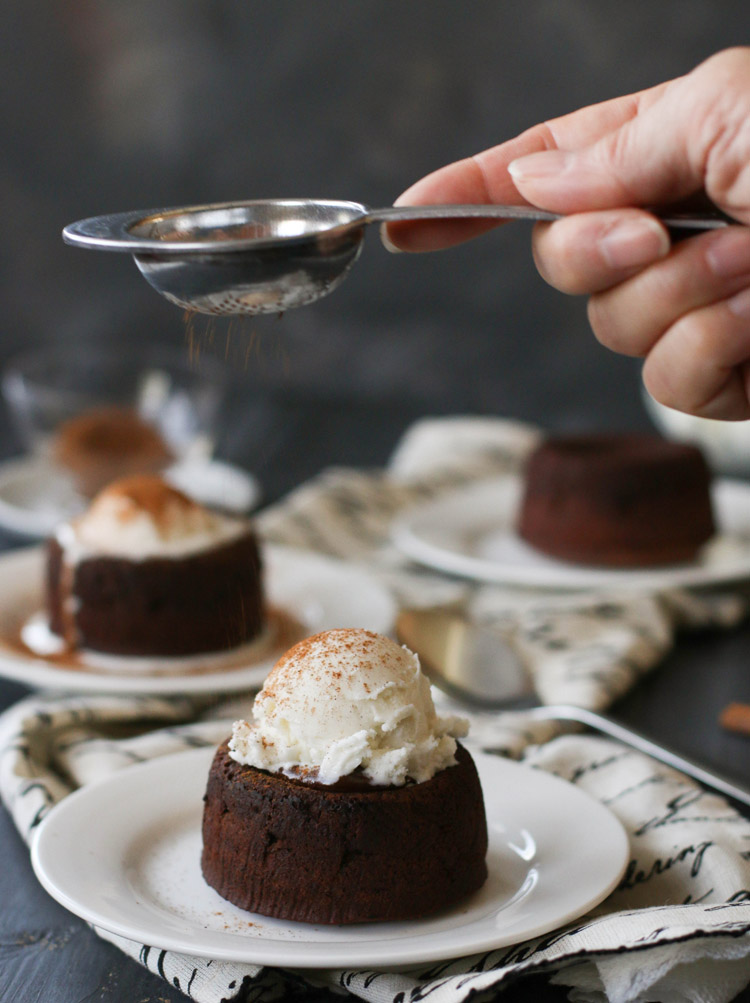
I happen to love them best with a small scoop of vanilla ice cream and a dusting of cinnamon to bring all that lovely spice together.
Then, when the ice cream melts with that molten chocolate center…it becomes downright swoon worthy! After that, grab a spoon! You’re not going to want to leave any of that luscious “lava” on the plate!
Spicy Molten Chocolate Lava Cakes
Spicy Molten Chocolate Lava Cakes get a kick of spice with just enough cinnamon and cayenne to keep the deep dark chocolate flavor lingering deliciously on your palette.
Ingredients
To prep ramekins:
- 1 Tablespoon unsalted butter
- 1 Tablespoon cocoa powder
For the cakes:
- 11 Tablespoons unsalted butter
- 5 ounces chopped bittersweet chocolate (can use bittersweet chocolate chips)
- 1/2 teaspoon vanilla
- 1/4 teaspoon salt, rounded
- 1/2 teaspoon cinnamon
- 1/4 teaspoon espresso powder
- 1/4 teaspoon ground cayenne pepper
- 3 large eggs, room temperature
- 3 large yolks, room temperature
- 1 1/2 cups confectioner's sugar
- 1/2 cup all purpose flour
To Serve:
- Vanilla ice cream
- Cinnamon
Instructions
- If baking immediately, preheat oven to 450 degrees F. In a small bowl, mix the melted Tablespoon of butter and cocoa powder until a paste forms. Using a pastry brush, a piece of waxed paper or your hands, generously coat sides and bottom of each ramekin with the paste. Set aside.
- Melt 11 Tablespoons of butter with chopped chocolate. I do this in a medium glass mixing bowl in the microwave, stirring after every 30-60 seconds. You could also do this on the stove top either in a double boiler or in a heavy sauce pan over low heat. Once melted, remove from heat (if melted on stove top) and add vanilla, salt, cinnamon, espresso and cayenne and whisk until well combined. Set aside to cool. (If you melted in a sauce pan, transfer melted mixture to a mixing bowl to cool.)
- In a separate medium bowl, whisk eggs and yolks. Then, whisk the confectioner's sugar into the eggs until fully combined. It may be lumpy at first. Just continue whisking until the lumps are incorporated. Add the egg/sugar mixture to the cooled chocolate mixture and whisk again until fully combined.
- Sprinkle the flour over the chocolate mixture and whisk until fully combined.
- Divide batter evenly among the prepared ramekins and set on a baking sheet for easy transport. At this point you can bake immediately, or cover and refrigerate until ready to bake.
- If baking immediately, bake for about about 8-12 minutes or just until cakes puff and rise around edges leaving the center soft and just a bit wobbly. If baking after refrigerating, bake for about 12-15 minutes, watching for the same visual cues just mentioned. You can also use a toothpick to check by inserting it into the sides. The cake should be set and you should get just a few moist crumbs clinging to the toothpick. The center of the cake should have baked enough to create a set top, but when you insert a toothpick, it will emerge with the fudgy chocolate center clinging to it. I like to make sure I have at least a 1/2" of firm cake around the edges. Take care not to overbake or you'll lose the molten center.
- After baking, remove from oven and let rest for 2 minutes. Run a knife around edges to insure they aren't sticking. Then, using a towel or oven mitt to protect your hands from the hot ramekins, place a serving plate on top of the ramekin and flip over. Slowly lift the overturned ramekin up to remove it from the cake.
- Serve immediately with a scoop of vanilla ice cream and a dusting of cinnamon.
Notes
- A rounded 1/4 teaspoon of salt simply means the salt can be mounded above the edge. We aren't looking for heaping, but just a bit more than a flat 1/4 teaspoon. You can make the batter for the cakes a day or two ahead, filling each of the ramekins and covering tightly with foil or plastic wrap.
- It's very important not to overbake the cakes or you will lose the molten center. The bake time is short so keep an eye on the cakes since your bake time might vary. See post for more discussion on visual cues for doneness and the importance of ensuring that you're baking at the right temperature.
- If you don't have espresso powder, you can substitute instant coffee granules or simply omit it. Espresso enhances the chocolate flavor, but you can make this without it.
- If you use salted butter, omit the 1/4 teaspoon of salt and just throw in a small pinch.
- Baked cakes can be stored covered, in the refrigerator, and then gently warmed in the microwave for a few seconds, just until warm enough to bring the centers back to lava stage. If you microwave for too long, you'll lose the lava center but you'll still have a tasty cake.
- Instead of the 6 ramekins, you can bake 12 smaller cakes in a muffin tin. Just divide the batter evenly among the cups. Baking time will be less. Again, just watch for the visual cues.
- Recipe adapted from Gale Gand.