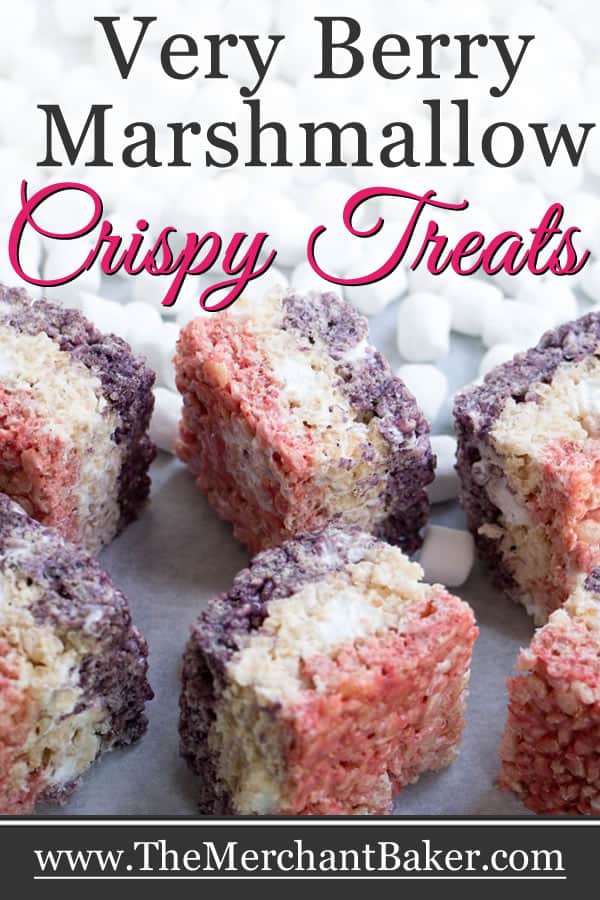


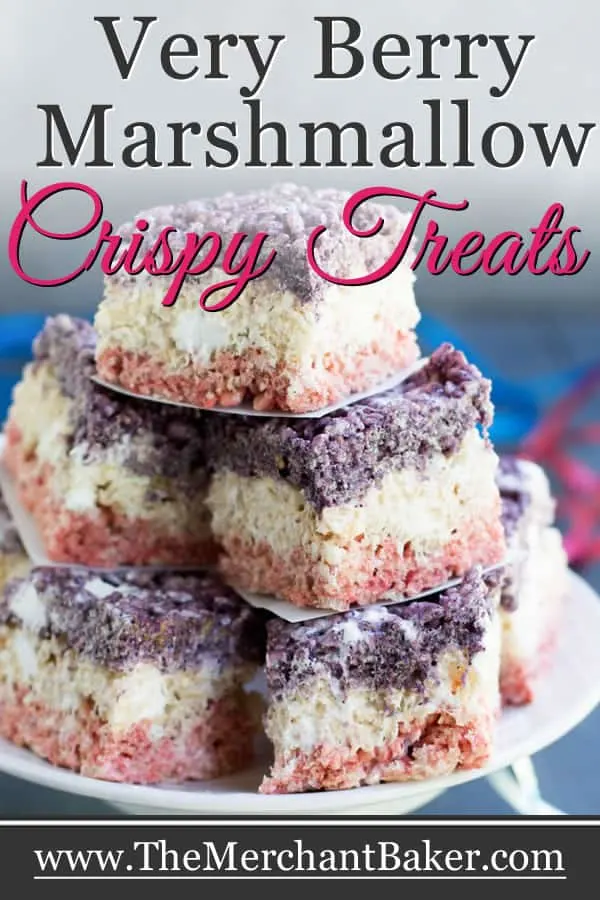

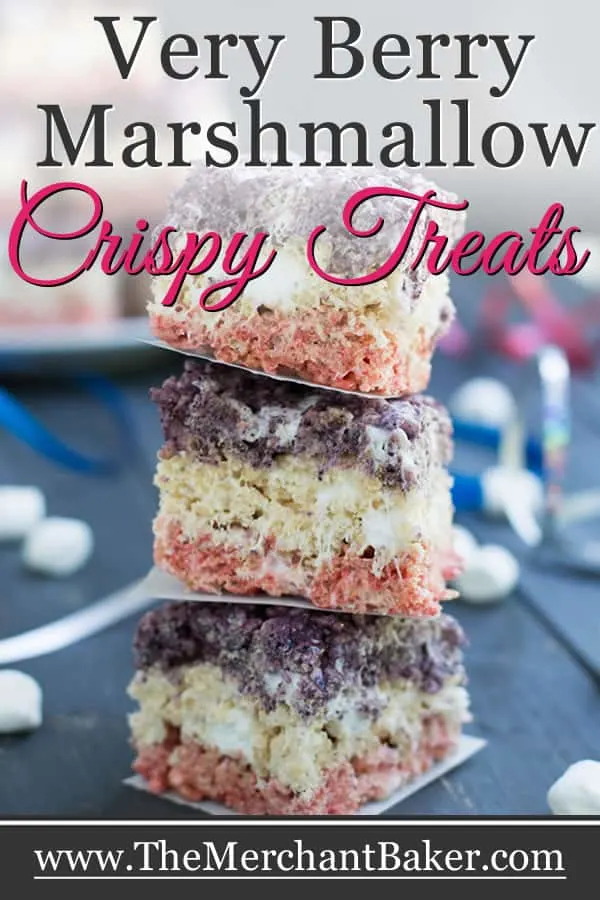

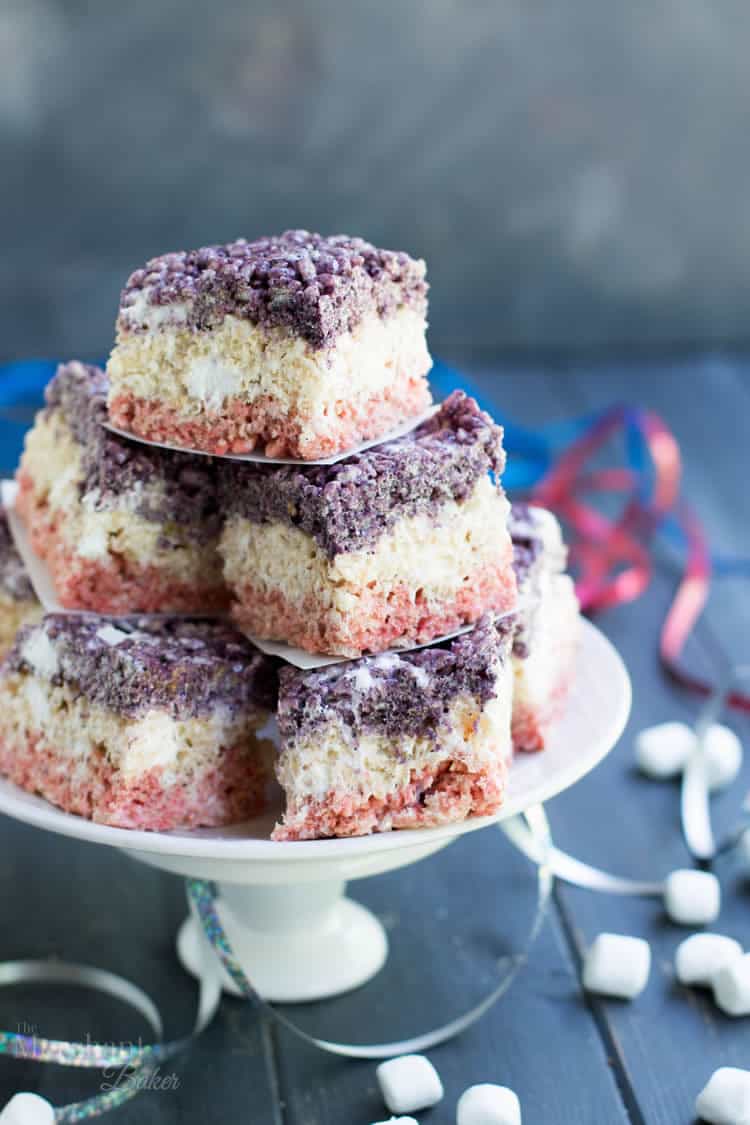
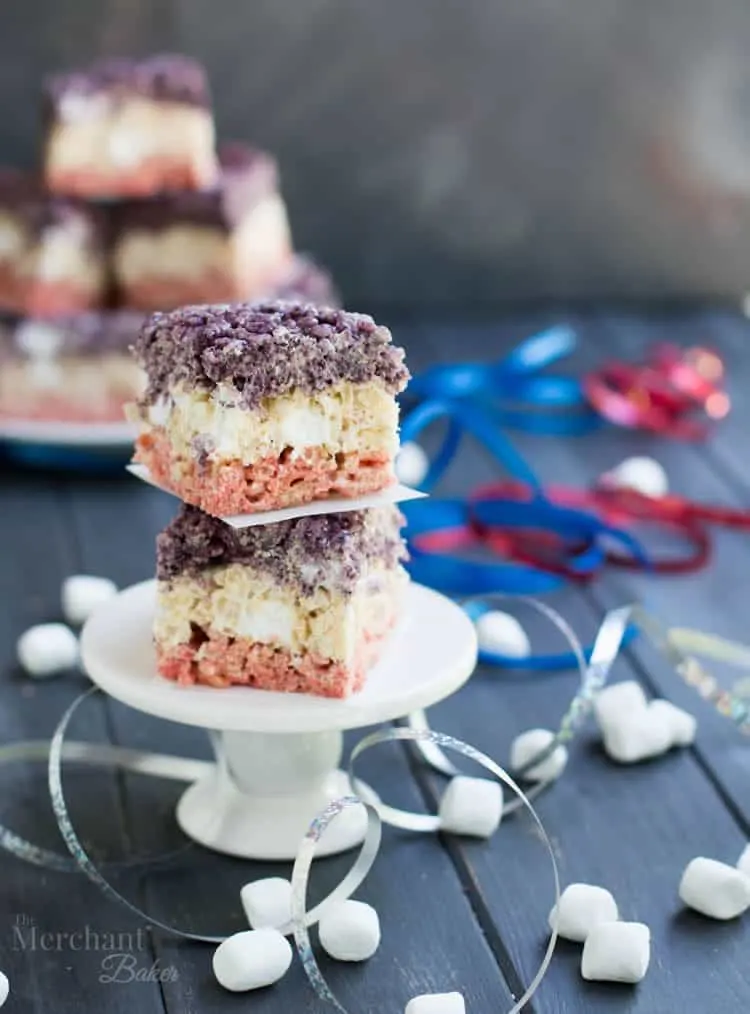
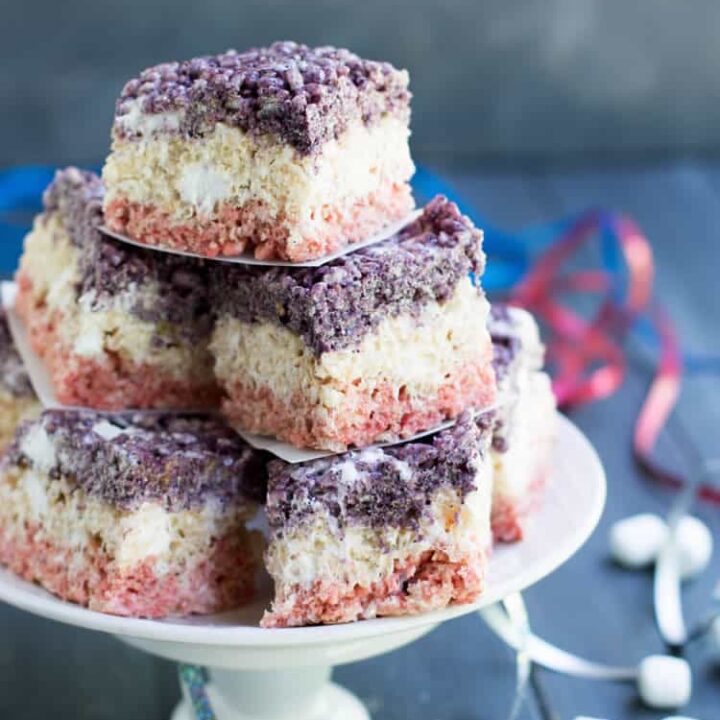
Very Berry Marshmallow Crispy Treats are a triple flavor treat. There are three delicious layers, all naturally flavored and naturally colored using freeze dried fruit powders. You’ll love these strawberry, blueberry and white chocolate, pillowy soft crispy treats. Great for the fourth of July!
Made any marshmallow crispy treats lately? Well, today I’m going patriotic and making a red, white and blue version for you, aka Very Berry Marshmallow Crispy Treats.
They’re a triple threat of flavorful marshmallow treats and they’re amped up in more ways than one.
Let’s start with some basics of marshmallow treat making. Me? I haven’t made marshmallow crispy treats in forever.

I think the last time I made them was for an elementary school fall event. We needed some treats for the event and I was asked to make marshmallow treats.
I remember thinking, “Wait! What? Really? Marshmallow treats? But, I’m the mom who likes to bake. I could bake something really fun…like Peanut Butter Cut Out Cookies.” Just kidding. We all know that school is basically a peanut free zone.
(Don’t get me wrong, I had plenty of years to make all kinds of fun fall festival treats and decorations and Halloween costumes and all of the games to go with them. Yes. I’m “that” mom. To know me is to love me.)


Ok. Sure. I can make marshmallow treats. Plain old crispy treats weren’t going to cut it for me though.
So, I made orange colored treats, shaped them into ball shaped pumpkins and put a stick in the top of them like a stem. Then, I melted chocolate and piped on some fun jack o’lantern faces.
I wrapped them up in cellophane bags and tied them with some curly green ribbon. They were really cute.
And, that’s how you turn a very simple job of making a quick treat, (that really would have taken about 15 minutes) into a much longer project.
Maybe I should’ve taken the easy road, but my creative side always takes me down a the longer, more complicated road. And my husband? He’s no help. He happily skips down that road with me.
So that was the last time I made crispy treats. And, whenever I have made them, I simply used the recipe on the box with a few slight variations here and there.
You know the drill. Melt butter and marshmallows, add the rice cereal. Let a little panic set in while you try to get the sticky mass into a buttered dish before it gets too stiff to work with.
This time, however? I wanted to get serious with the marshmallow crispy treats. The whole ratio used in the original recipe got thrown out the window.
I was looking for a more pillowy, buttery, marshmallowy treat. In other words, more butter and more marshmallows. (There’s an extra bonus to this ratio that I’ll cover later in the post.) Ooh, and I wanted them nice and tall for a good hearty bite.


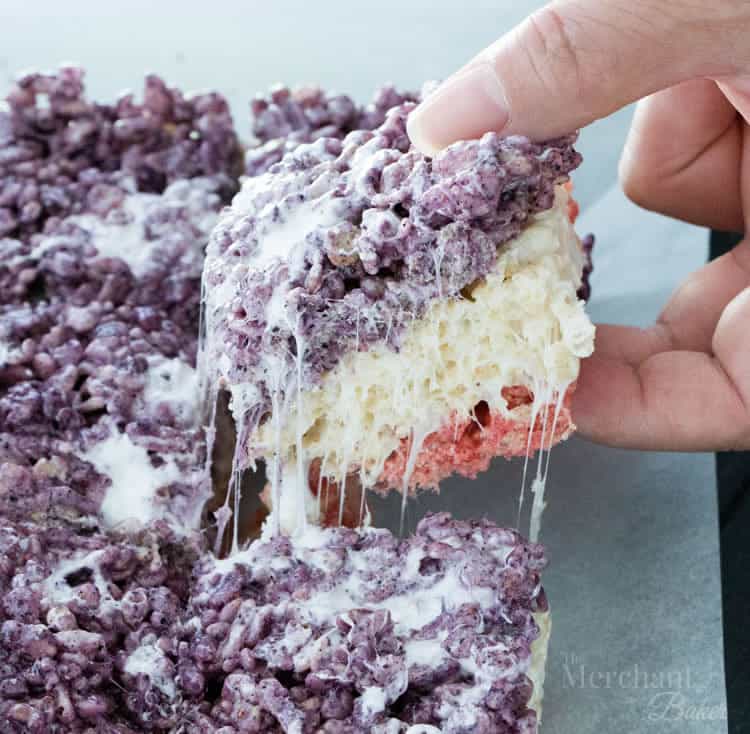
I also needed them to be tall because I was going to make flavor layers. That’s what started this whole treat odyssey, the flavors.
Actually, they started as one flavor, strawberry. I thought, wouldn’t it be fun to see how freeze dried fruit would work in a crispy treat?
By now, you know my love for the flavor bomb that freeze dried fruit brings. I won’t go into all the details again, but man, just grind that stuff up and put it in everything.
I’ve used it in these cookies, and these cookies and these brownies. It’s great wherever fresh fruit might not work or where you just want some intense real fruit flavor.
In any case, I had planned to make strawberry and drizzle it with white chocolate. I had that plan for weeks, but then I kept changing my mind. One flavor? Two flavors? Three flavors?
Three flavors that could be red, white and blue?!? Yeah…that sounds good…


But, I thought to myself…would anyone (besides me) actually want to make three layers of crispy treats? After all, crispy treats are supposed to be the quick and easy treat. Three flavors would make it a little more time consuming.
Aaaand, there would be more dishes to wash. Ugh! What to do? What to do?
I decided to make them. What the heck. The fourth of July is coming and this could be a really fun treat. I mean, it’s still just a marshmallow crispy treat. There’s no baking involved.
And if you’re not taking photos of every. single. step. like I did…I imagine it will go pretty quickly for you :)
I named them Very Berry for a few reasons. First, that’s the flavor you’re getting with these babies. It’s very berry, two berries to be exact, strawberry and blueberry.
In fact, the very first words that came from two separate people who tried them were, “Oooh! Fruity!”
And, yes, we did consider the whole rooty tooty fresh and fruity angle, but, outside of the fact that it’s a registered trademark, very berry is simply more specific.

Second, red, white and blue don’t necessarily conjour up flavors, just colors. I think that’s why people were surprised when they bit into them. They probably weren’t expecting the burst of berry-licious flavor.
Finally, the blue layer isn’t a true blue now, is it? It is made with blueberries, but they tend toward the purple side once they’re all mixed in. Hopefully, that purple color gives the hint that these bars do not rely on food dye for their color.
Nope, all the color here is au natural, straight from the fruit. Of course, if you must have true blue, I suppose you could add a drop or so into the batch. I didn’t feel any need to.
Bottom line? Don’t knock me on the purple. If you serve them on the fourth of July, I’m pretty sure everyone will get the idea.
(Oh and if crispy treats aren’t your thing, here’s an easy and delicious fresh fruit dessert idea for the fourth…try my Red, White and Blue Cheesecake Dip. The blueberries make a really great “blue” statement in that dish :)
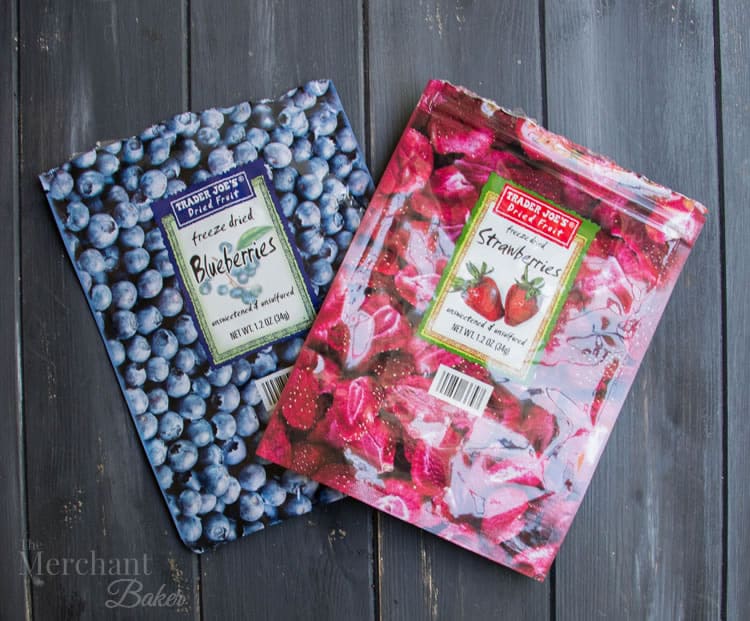

Ready to get into this? First, buy thee some freeze dried fruit. I get mine at Trader Joe’s, but a lot of grocery stores carry it now. I’ve seen them merchandised with fresh produce, in the cereal aisle and with the dried fruit and nuts.
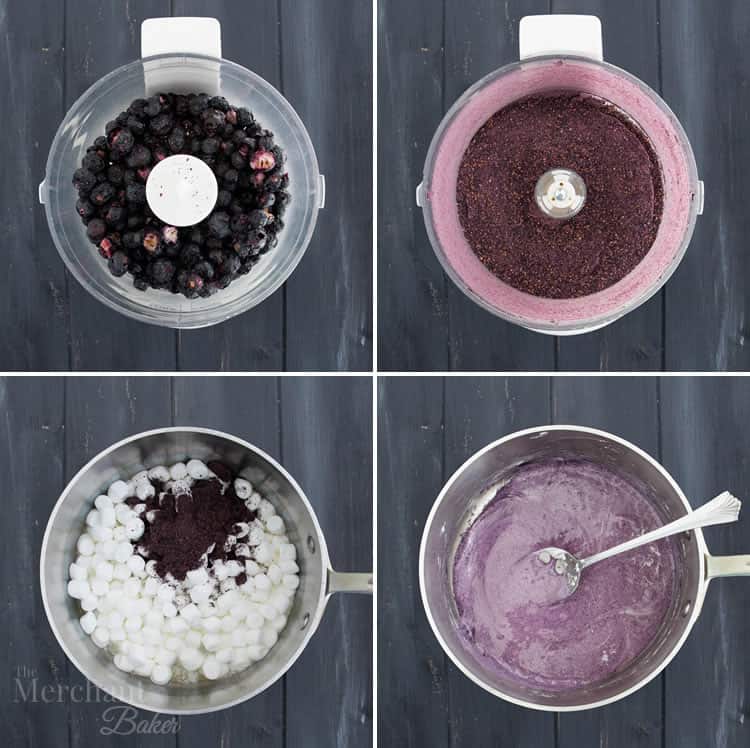
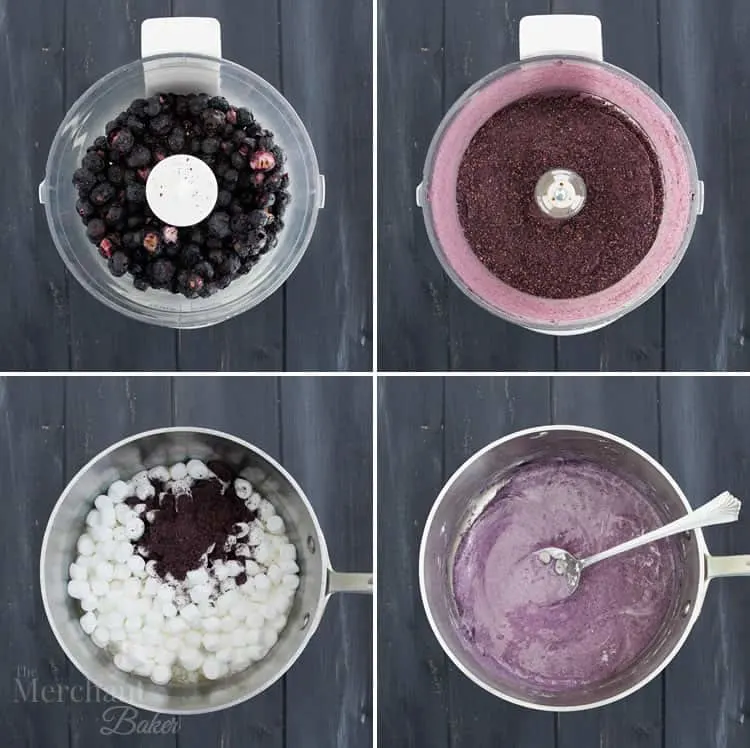
Grind up the fruit in a food processor. (Don’t forget to remove the little preservative packet. You definitely don’t want to grind that up with the fruit.)
Once you have your fruit powders, you are ready to begin. If you don’t want to wash dishes in between, you’re going to need either 3 pans or 3 bowls. If you’re making this on the stove top, you’ll need the pans.
If you’re making this in the microwave, you’ll need bowls. If you don’t have enough of either, make some flavors on the stove and others in the microwave.
You only need heat to melt marshmallows and butter. That can happen in either place, so do whatever works best for you.
The process is basically the same as the traditional recipe with a few tweaks. Melt the butter with the marshmallows.

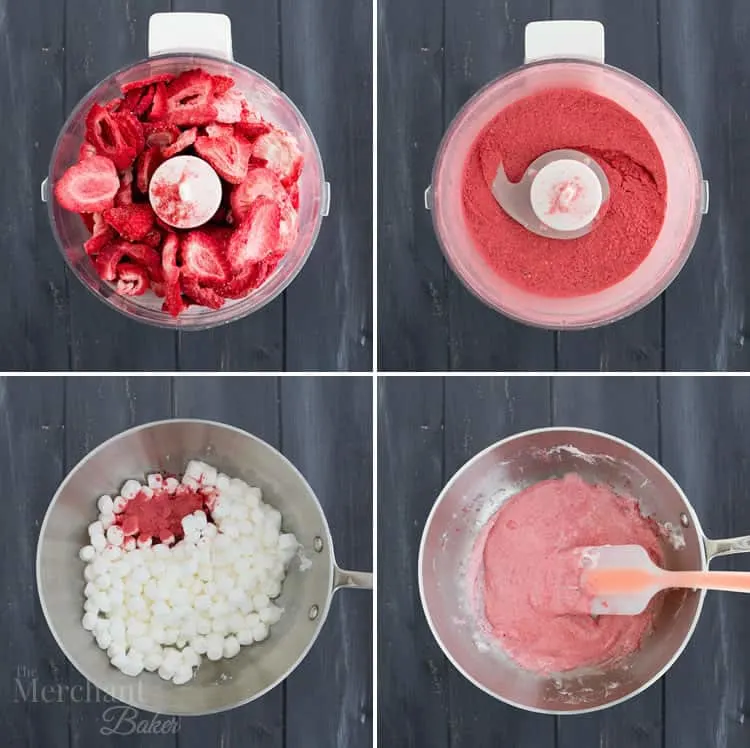
Your marshmallows for each flavor batch will be divided into two groups. The first group of marshmallows gets melted with the butter.
Once everything is all melty, stir in your strawberry fruit powder until well combined. (This is where I taste tested for flavor. I just dragged a toothpick through the mixture for a tiny taste. If you want to add more powder, now’s the time.)
Then, remove it from the heat, pour in the cereal and the second group of marshmallows. I like to do it in exactly that order.
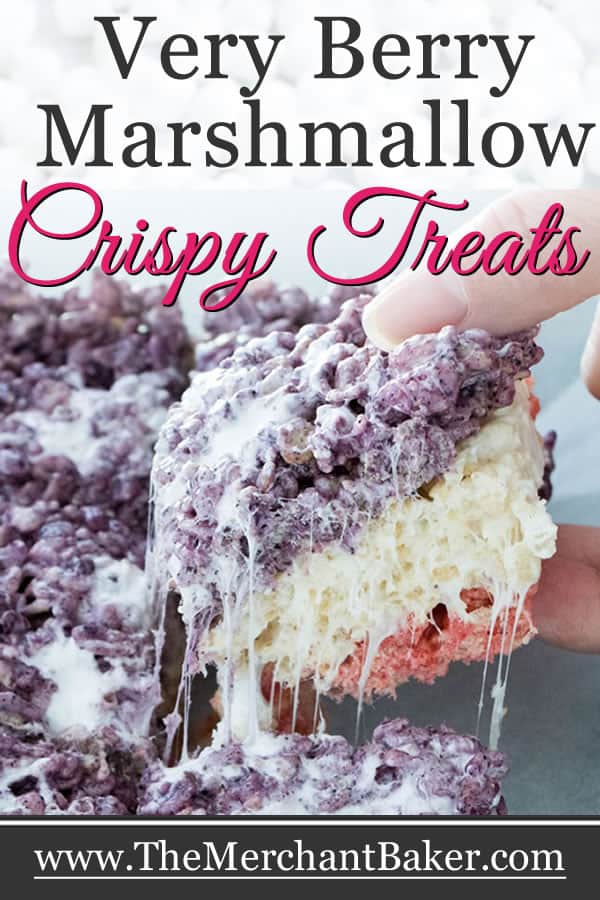
Putting the cereal in first acts as a little heat buffer to the second group of marshmallows. We don’t want them to melt in with the rest of the already melted marshmallows. Their purpose is to create pockets of marshmallow throughout the mixture.


Stir it all up and pat it gently into a prepared pan. Please don’t compress the lofty mixture into a solid mass. Just press it in until it’s basically even. Buttered hands work best for this.


Then, we’ve got the white chocolate layer. Yeah, that’s right. You thought it was a plain layer, didn’t you? I thought a little white chocolate would add a feeling of berries and cream.
Again, melt your butter and first group of marshmallows. Remove from the heat. Pour in the cereal to create that little heat buffer. Then add the second group of marshmallows and the white chocolate chips. Stir. Pour on top of the strawberry layer and gently pat into an even layer.
Finally, we’ve got the blueberry layer. Same drill as the strawberry layer. Melt. Mix. Pat. I used more blueberry powder because it wasn’t as strong in flavor as the strawberry. Next time, I’ll probably use even more.
Once you’ve got it all layered up, it needs to cool before you cut it into bars. (I sprayed a sharp knife with cooking spray to help keep it from sticking while cutting.)


After I cut them, we taste tested them. First, wow! Real flavor blast. There’s no denying those very berry flavors! Yep, definitely worth making three layers of flavor. And they were so pillowy!
I dropped a bunch off for a friend. She’s got kids. I figured they’d enjoy them. She sent me a text later. “Those Very Berry Marshmallow Treats were AMAZING! So fruity!” I texted back that I thought the kids would like them.
Her next text? The kids didn’t get any. She gave one to her husband and ate the rest! Lol! I don’t think that was her plan. Apparently, “It just happened.” :)
Needless to say, I was shocked. I never see her eat many sugary treats and seriously, she’s about the size of my pinky. I took her enthusiastic text as a big win.


And really, what’s not to like? They were crispy and pillowy and soft and yummy and full of fruity flavor.
Oh, and I promised you a bonus with the new marshmallow/butter ratio. You know how marshmallow crispy treats can get hard pretty quickly?
It’s one of the reasons I don’t make them very often. I mean, who can eat a whole pan of those treats in one day? Or, er, let me re-phrase that…Who should eat a whole pan of those in a day?
Well, these pillowy, buttery Very Berry Marshmallow Crispy Treats last much longer. Once I had them cut into squares and everyone got to taste one, I wrapped the rest up individually in plastic wrap.
Even on day three, they still had a soft, pillowy bite! I think that’s good to note. You know…

just in case you decide not to share them :)

Very Berry Marshmallow Crispy Treats
Ingredients
For the fruit powders:
- 1 1.2 ounce bag of freeze dried strawberries
- 1 1.2 ounce bag of freeze dried blueberries
For the strawberry layer:
- 2 Tablespoons salted butter
- 3 cups mini marshmallows
- 3 Tablespoons strawberry fruit powder
- 2 1/2 cups crisp rice cereal
- 1 cup mini marshmallows
For the white chocolate layer:
- 2 Tablespoons salted butter
- 3 cups mini marshmallows
- 2 1/2 cups crisp rice cereal
- 1 cup mini marshmallows
- 1/4 cup white chocolate chips
For the blueberry layer:
- 2 Tablespoons salted butter
- 3 cups mini marshmallows
- 4 Tablespoons blueberry fruit powder
- 2 1/2 cups crisp rice cereal
- 1 cup mini marshmallows
Instructions
- Line a 9" square pan with parchment paper allowing excess to hang over edges. I used binder clips to hold the paper in place. Spray the paper with cooking spray. (I use parchment so that I can lift the whole batch out for cutting.) Alternatively, you can just spray or butter the pan without the parchment paper and cut the bars in the pan. Set aside.
To make the fruit powders:
- In a mini food processor, grind up the freeze dried strawberries to a fine powder. Transfer to a fine mesh strainer to remove any larger seed pieces and discard them. Some seed bits will be too small to strain. Don't worry about them. Set strawberry powder aside.
- Clean the food processor, making sure it's thoroughly dry before proceeding. Grind up the freeze dried blueberries to a fine powder. There's no need to strain any seeds for the blueberries. Set aside.
For the strawberry layer:
- In a medium pan, melt butter and the 3 cups of marshmallows. Add 3 Tablespoons of the fruit powder and stir until thoroughly combined. Remove pan from heat. Add the rice cereal, then the remaining 1 cup of marshmallows and stir until combined. Pour into prepared pan and, using buttered hands, press gently into an even layer. Set aside.
For the white chocolate layer:
- In a medium pan, melt butter and the 3 cups of marshmallows. Remove pan from heat. Add the rice cereal, then the remaining 1 cup of marshmallows and white chocolate chips. Stir until combined. Pour into prepared pan and, using buttered hands, press gently into an even layer. Set aside.
For the blueberry layer:
- In a medium pan, melt butter and the 3 cups of marshmallows. Add 4 Tablespoons of the blueberry fruit powder (or to taste, see notes) and stir until thoroughly combined. Remove pan from heat. Add the rice cereal, then the remaining 1 cup of marshmallows and stir until combined. Pour into prepared pan and, using buttered hands, press gently into an even layer.
Cutting and storing:
- Allow mixture to completely cool in pan. If you used parchment, use the edges to pull the mixture out of the pan. Spray a sharp knife with cooking spray and cut into squares. Or, if you didn't use parchment, cut the bars while they're in the pan.
- To store, I wrapped any leftover bars individually with plastic wrap and let them sit at room temperature. Even on day 3, they were still as soft and "biteable" as they were on day 1.
Notes
*You can also make this in the microwave. Just put the marshmallows and butter into a microwave safe bowl and microwave on high, stirring at one minute intervals until melted. Remove from the microwave and continue following recipe directions. This might be a good option if you don't have enough pans. Or, you could microwave some flavors and use the stove top for others. The microwave will give you options.
*You're going to need three pans or three bowls to make this recipe or you'll have to wash the pan/bowl in between each flavor. Use pans/bowls big enough to give you room to stir the mixture. I used a smaller sauce pan for the white chocolate batch and it was a little tricky to get it mixed up properly.
*You can taste test the marshmallow mixture after you stir the fruit powder into it. If you want even more flavor, feel free to add more powder. The strawberry flavor was stronger than the blueberry which is why you see a larger measurement for the blueberry. I might try adding the whole amount of blueberry fruit powder next time.
*There's a little preservative packet in the bag along with the fruit. Make sure you remove it before grinding up your fruit.
*If you use my measurements for the fruit powder, you will have leftover powder. Store it in an airtight container. Stir it into yogurt. Sprinkle on cold cereal or hot oatmeal.
*If you're using unsalted butter, add a pinch of salt to each flavor batch while you're melting the butter.
*I divided up the measurements for the mini marshmallows so that you don't accidentally add the whole amount during the melting phase. For the entire recipe, you'll need 12 cups of mini marshmallows. I bought 3 (10 ounce) bags to make sure I had enough.
*You'll also need a total of 7 1/2 cups of rice cereal. A 12 ounce box has over 10 cups in it, so you should be fine with that size.
*Definitely use mini marshmallows for this recipe. You want bits and pieces of marshmallow throughout and that's more difficult to achieve with the larger marshmallows.
*When you're transferring the marshmallow mixture to the pan, try to distribute it around the pan instead of just making one big pile in the middle. It will be easier to press into a layer if you're also not trying to move it all around the pan.
*Use gently pressure when pressing the mixture into the pan. You don't want to compress it into a solid mass. It's better to keep it a little "airier" for better texture when you bite into a bar.
_The Merchant Baker Copyright © 2018_
Ed
Friday 19th of July 2019
This is brilliant! Using the freeze dried fruit as a coloring & flavored powder! I have a child who is allergic to food dyes and this idea is awesome!
Ramona
Friday 19th of July 2019
Thanks, Ed! Once we started experimenting with freeze dried fruit, it's been kind of hard to stop! We've added it to all kinds of things and experimented with all kinds of flavors. We love it!
Stephanie
Sunday 10th of June 2018
Oh! They are so pretty! I wonder how a banana chip/peanut butter version would be!
Ramona
Monday 11th of June 2018
Stephanie, I think a banana chip peanut butter version would be delish! Of course, I'd want to add chocolate to that flavor combo as well :) Maybe some mini chocolate chips for extra texture? Yum! Truly, when you start using freeze dried fruit to add flavors to things, you pretty much can go where your imagination takes you! My husband is working on another flavor version (not for the blog) that suits his own tastes. If it turns out well, I may have to do a post about it someday:)
Kunal Pahuja- Handmade Chocolates
Saturday 9th of June 2018
Amazing Recipe. I’ve tried it at home. Everyone liked it so much. Thank You so much!!
Ramona
Sunday 10th of June 2018
Yay! So happy to hear it!