


Use up leftover stuffing in a new way with this Leftover Stuffing Breakfast Skillet! It’s a really delicious idea to reinvent those leftovers, and an incredibly flavorful and different way to make eggs. No need for toast, this stuffing’s got you covered!
I’ll start with an apology for delivering this idea to you today instead of last year. But, to be fair, I created it after Thanksgiving and was busy posting cookie recipes last December. I’m pretty sure you were well passed the leftover stuffing stage by then…
But let me tell you that we fell IN LOVE with this whole idea, I mean we were making quick stuffing from boxes in the spring just so that we could have this for breakfast. Yeah, boxed stuffing. We don’t usually do that.
I’m not going to spring for the whole homemade stuffing process just so that I can have leftovers for breakfast.


Although, we did that too, lol! I would plan a dinner meal that included stuffing so that we could eat the leftovers for breakfast.
It might seem a bit strange, but the inspiration for this idea came from the dish, shakshuka.
Shakshuka is a Mediterranean dish of eggs poached in a warm spiced tomato/pepper sauce. It’s been around for centuries.
Apparently, it took us that long to discover it. We only started eating shakshuka in the past couple of years and fell in love with it. We’d been eating it in restaurants, but never made it at home.
It’s been on my list to find or create a recipe that would meet our shakshuka expectations, but, I confess, it’s still on the to do list.

Anyway, my husband loves the stuff. He also loves eggs in a frame (also known as egg in the hole, egg in a basket…) That’s simply a buttered piece of bread with the center cut out. The bread is fried in a pan with an egg dropped into the center hole.
You end up with a golden piece of buttery toast with egg all in one. Delicious!
There’s something wonderful about an egg cooked in something full of flavor, whether that be a spicy tomato, pepper and garlic concoction or a buttery piece of bread.
We had quite a bit of stuffing left over from a Friendsgiving celebration last year and everyone was getting tired of the leftover Thanksgiving food.
I made breakfast with it! Full disclosure…This isn’t really a recipe. It’s just an idea. Just a really delicious idea.
Even better? There’s nothing to make! Two ingredients is all you need and they’re both ready and waiting for you to use them. Just stuffing and eggs.


Prepare the eggs
I know my photo shows each of my eggs nicely prepared in its own bowl. That’s eight bowls of eggs.
And no, it’s not necessary for you to use all of those dishes. However, it should drive home a few points:
- It’s good to have the eggs already cracked and ready to go. If you do this in advance, you won’t have to worry about fishing out shells or accidentally cracking a bad egg into the middle of your delicious stuffing.
- It’s easier to control pouring an egg from a bowl than it is to crack it directly in the pan.
- You can insure your yolks aren’t broken before they go into the pan.
- If you want your eggs to cook pretty much to the same doneness, you don’t want to take too long from when the first egg goes in to when the last egg goes in.
Finally, I’m a food safety freak and since I have no desire to be dealing with raw egg hands while I’m also cooking at the same time, getting the eggs cracked into bowls in advance is quite helpful.
In reality, I’d probably just get someone to crack the eggs into a bowl or two for me and then I’d pour the egg into the pan.
You do what works for you.
How much stuffing do I need?
As I said earlier, this is more of a an idea than a recipe. So, really, you can make just about anything work. I mean, you could probably push all the stuffing to the side and cook all of the eggs in the middle, if that was your thing.
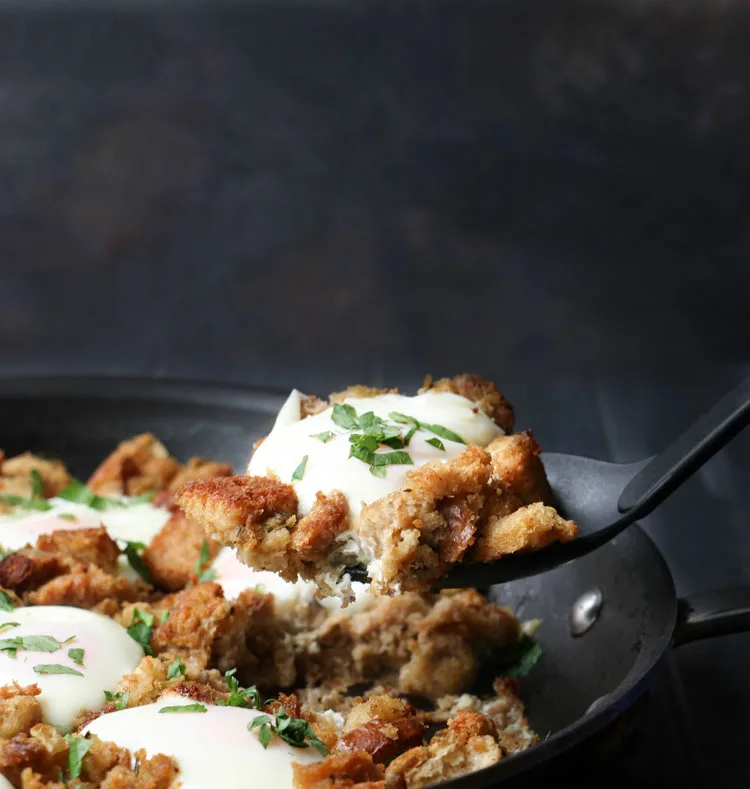
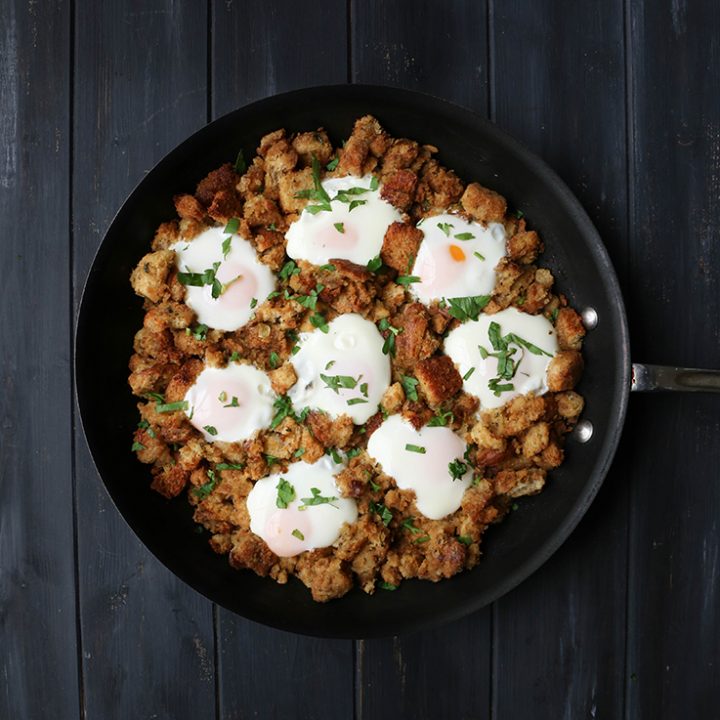
I happen to like the idea of a nest of stuffing surrounding each egg.
The amount of stuffing you need is going to depend on the amount of eggs you want to cook and how large your pan is. (I used leftovers from Classic Herb Stuffing)
Your pan needs to be large enough to house your eggs without them overlapping and running into each other. I like to make 4 servings, which means 8 eggs. I used a 12″ skillet.
Then, as far as stuffing, I used about 6 loosely packed cups. You simply need enough to create a thick layer in your skillet.
Again, you can make anything work. At the end of the day if you end up with eggs running all over the place on top of delicious stuffing, it’s still going to taste great, my friend.
Use a non-stick pan
This is important if you want to easily remove your eggs when it’s time to serve. Because the stuffing absorbs most of the fat in the pan, it’s just easier to use non-stick.
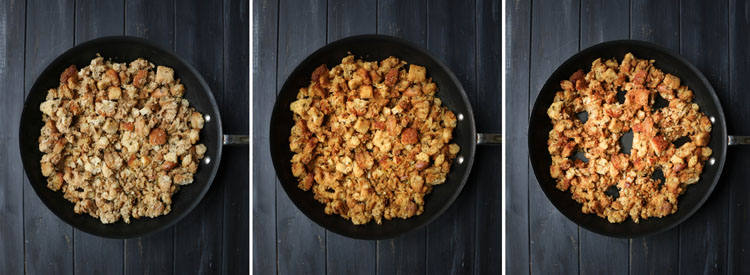
Reheat the stuffing
Your stuffing is probably a cold solid mass from hanging out in the fridge. So, before we start cooking the eggs, we need to reheat the stuffing.
I start by adding some butter to the pan. There’s generally butter in the stuffing, so I stick with that fat. Feel free to use olive oil or any other preferred choice.
The butter will help the non-stick pan do it’s job and also help to create a bit of a crusty bottom on the stuffing.
While you’re reheating, break up all of those solid clumps so that those bread cubes each get some time with the hot pan.
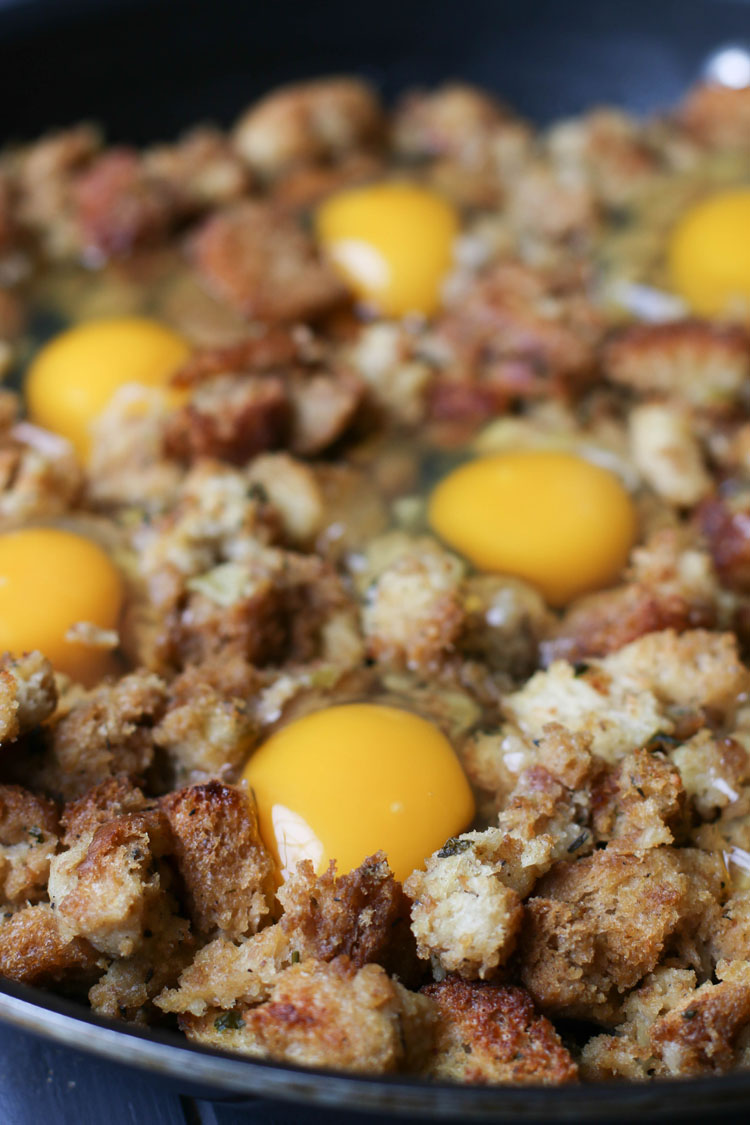
Once the stuffing is hot, spread it out evenly in the pan and start making the wells.
Create wells for the eggs
This is pretty simple. I used two spoons to separate the stuffing and create the wells. Each well should be wide enough and deep enough to hold an egg securely. Don’t forget to build up walls on the edges so that your eggs don’t touch the sides of the pan. You want a nice nest of stuffing completely surrounding each egg.
Add butter to the wells
This step is optional and really more about adding a bit of non-stick insurance. It can also be about flavor.
So, if desired, go ahead and add a small pat of butter to the bottom of each well before adding the egg.


To season or not to season?
My stuffing is full of flavor, so I don’t bother seasoning the eggs. I might give them a grind of fresh pepper, but that’s about it. As far as I’m concerned, the stuffing has plenty of seasoning for everything in the pan.
If anyone needs to add a sprinkle of salt at the table, they are welcome to do so.
Adjust as necessary based on your particular recipe of stuffing.


Finishing the eggs
Now that you’ve got your eggs in the skillet, you can choose how you want to finish cooking them.
First, I like to give them a couple of minutes to heat up in the pan and let the bottoms cook.
Then, you can either cover the skillet and let the eggs cook to desired doneness. Covering them keeps the steam in and helps to cook the eggs. This will keep your stuffing moist as well.
Or, if you have an oven safe skillet, you can finish them off, uncovered in a 350 degree oven. This will help crisp up your stuffing on top, as well.
We like a firm white and a soft yolk. There’s nothing better than having that yolk break over the delicious stuffing. So good!

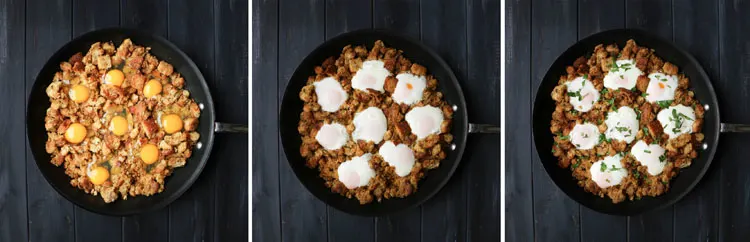
Garnishing the skillet
Just because we’re making breakfast in a skillet doesn’t mean we have to skip a little garnish. Because there’s fresh parsley in my stuffing, I inevitably have some extra on hand. So, I just chop some up and finish off the dish with a sprinkle of herbs.

Other options:
Take this whole idea and run with it. Top the eggs with some crumbled up bacon. Sprinkle shredded cheese over all.
The flavors in your stuffing should guide you in the variations you can create.
When all is said and done, you’ll end up with one delicious way to use up that left over stuffing. And if you love it as much as we do, you’ll start making sure you have leftover stuffing just so you can use it to make this Leftover Stuffing Breakfast Skillet.
By the way…if you’re looking for an idea to use up left over turkey? Try Creamy Chicken and Biscuits. Just sub out the chicken for your leftover turkey and you are good to go!
Happy Thanksgiving!

Leftover Stuffing Breakfast Skillet
Use up leftover stuffing in a new way with this Leftover Stuffing Breakfast Skillet! It's a really delicious idea to reinvent those leftovers, and an incredibly flavorful and different way to make eggs. No need for toast, this stuffing's got you covered!
Ingredients
- 6 cups leftover stuffing (loosely packed or enough to fill your skillet)
- 8 large eggs
- Butter for the pan
- Chopped fresh parsley
Instructions
If you're going to finish the eggs in the oven, preheat oven to 350 degrees F. and make sure you're using an oven safe non-stick skillet.
Reheat the stuffing:
- Melt a couple of Tablespoons of butter (or use olive or vegetable oil) in a large, non-stick skillet over medium high heat. (I used a 12" skillet)
- Add stuffing to pan breaking up clumps. Saute the stuffing, stirring it to distribute the heat until the mixture is hot.
- Spread it into an even layer in the pan.
- Create 8 wells in the mixture insuring that each well is surrounded by a wall of stuffing on all sides. Add a small pat of butter to each well to help prevent egg from sticking.
- Crack one egg into a small bowl and use the bowl to carefully pour the egg into the well. Repeat until all wells are filled.
Finish the eggs:
- Cover the skillet and cook eggs to desired doneness. I like to cook until the egg whites are opaque on the top but the yolk is still soft.
- For a crispier stuffing, I like to start the eggs in the skillet and then finish them in the oven, uncovered, at 350 until the whites are firm and the yolks are still soft.
- Sprinkle with fresh parsley and serve.
Notes
*It's important to use a good non-stick skillet for this recipe to insure your eggs release from the pan. And, it should be oven safe if you're planning on finishing the eggs in the oven.
*The amount of stuffing you need isn't an exact measurement. It will depend upon how many servings you make and how large a skillet you cook it in. You need enough to fully fill the skillet and deep enough to create a well for the egg to sit in without overflowing into the rest of the dish.
*I like to crack the eggs into separate bowls so that they're ready to pour into the skillet. That gives me time to remove any bits of shell and prevents me from accidentally cracking a bad egg into my skillet. You want to cook your eggs for the same amount of time, so having them ready gets them into the skillet quickly.
*I may season the tops of eggs with pepper, but I forgo the salt. I find there's so much flavor in the stuffing, the eggs don't need additional, but feel free to season to taste. It will depend largely on how seasoned your stuffing is and your personal taste preferences.