


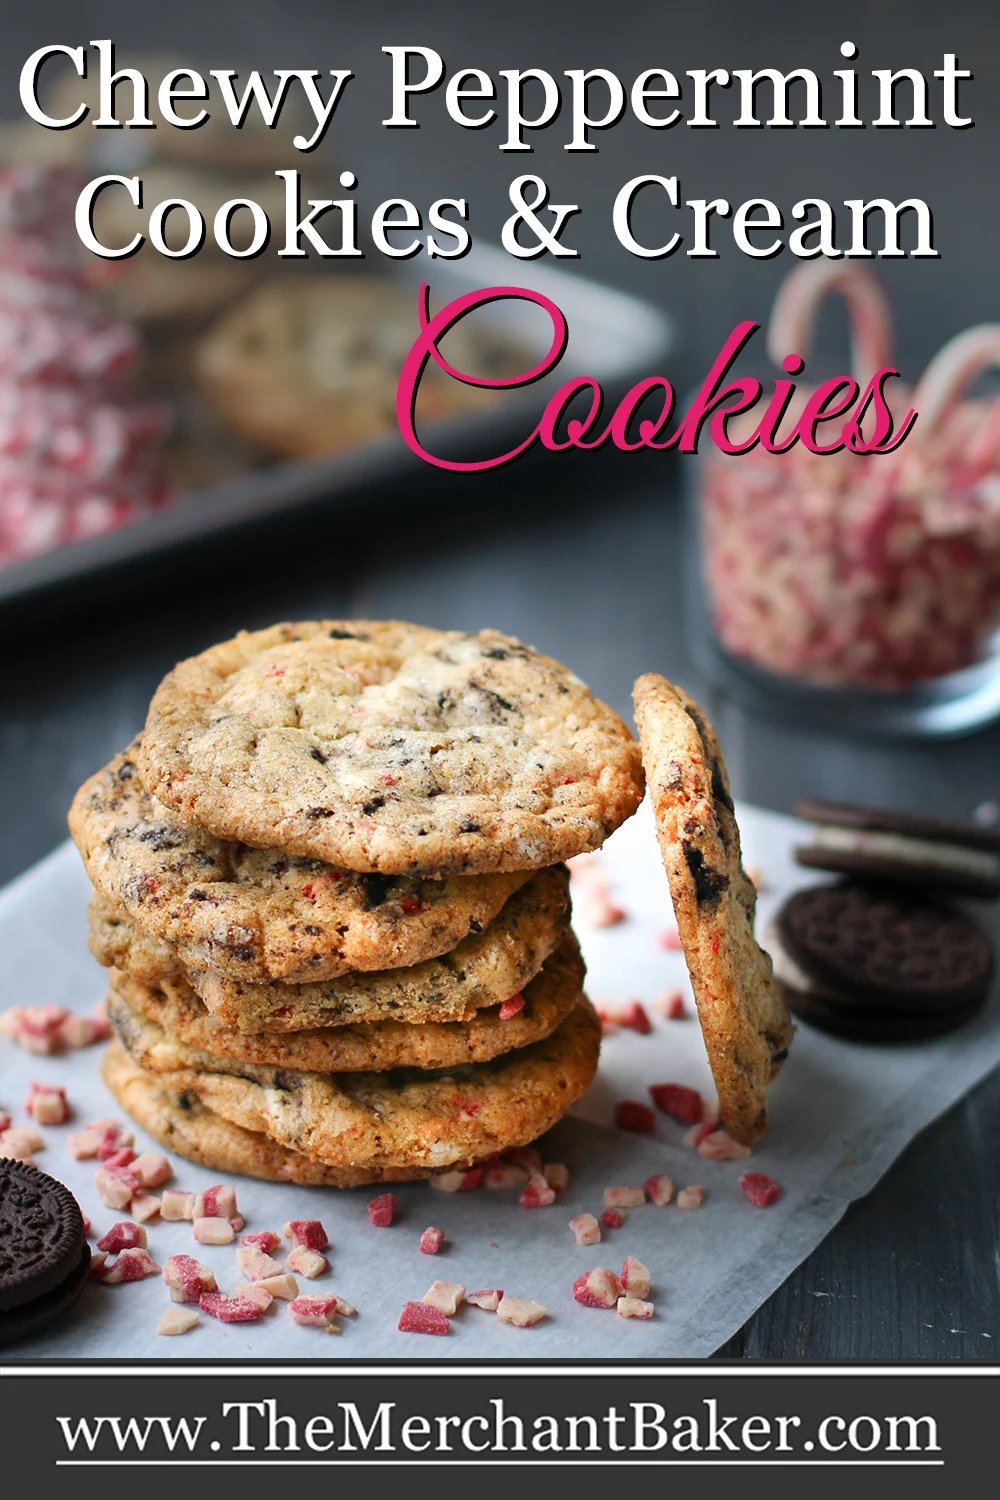
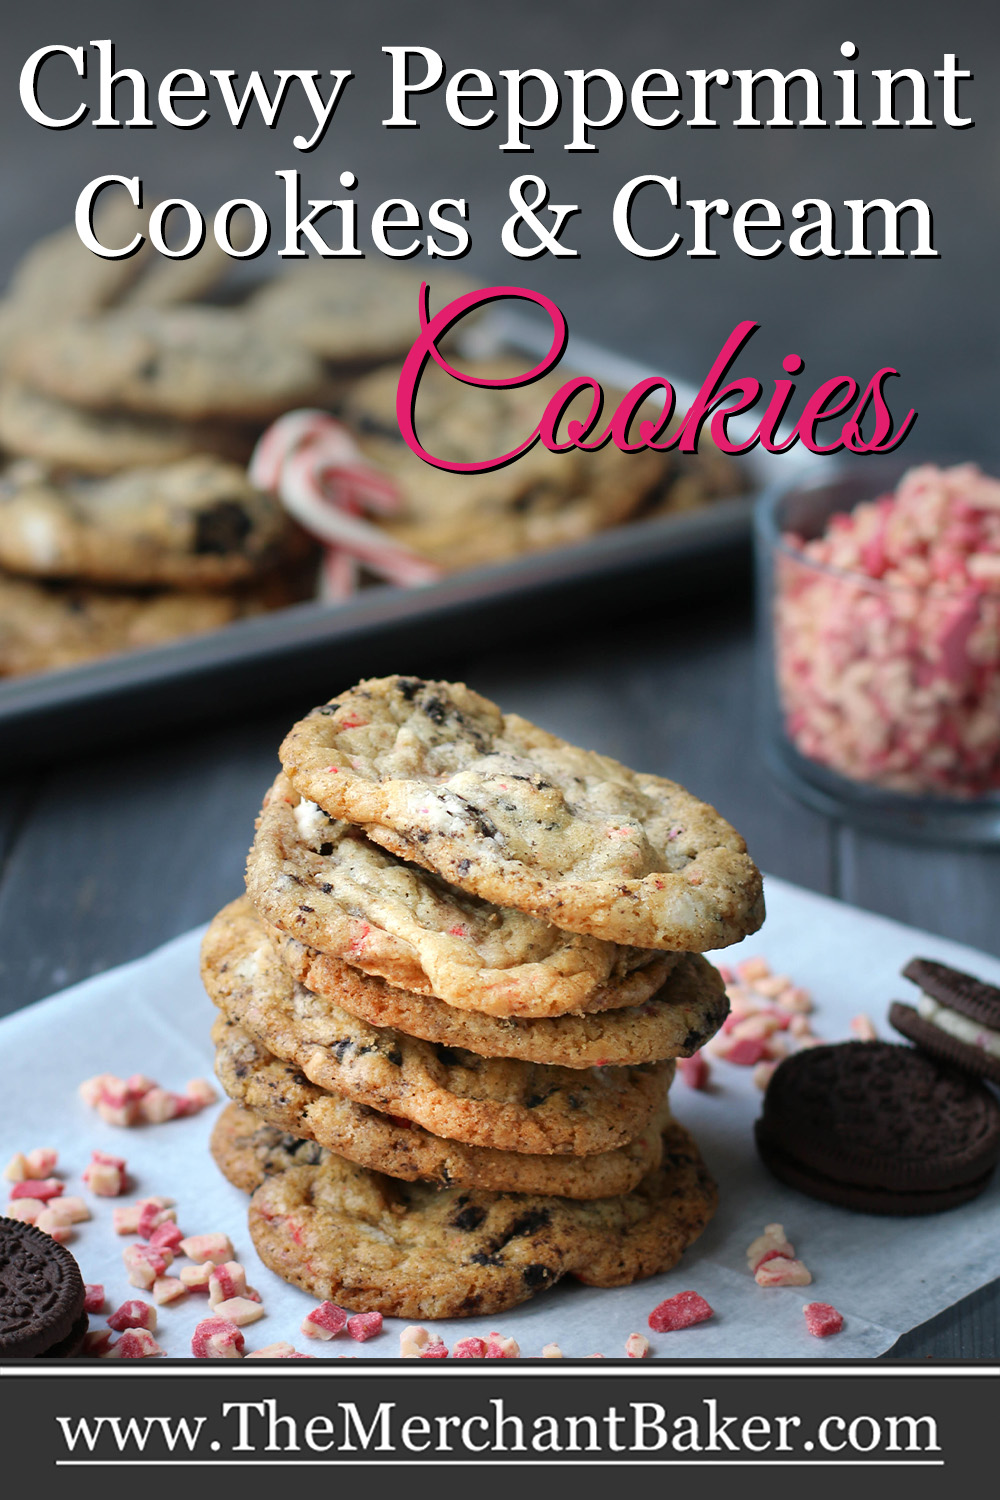


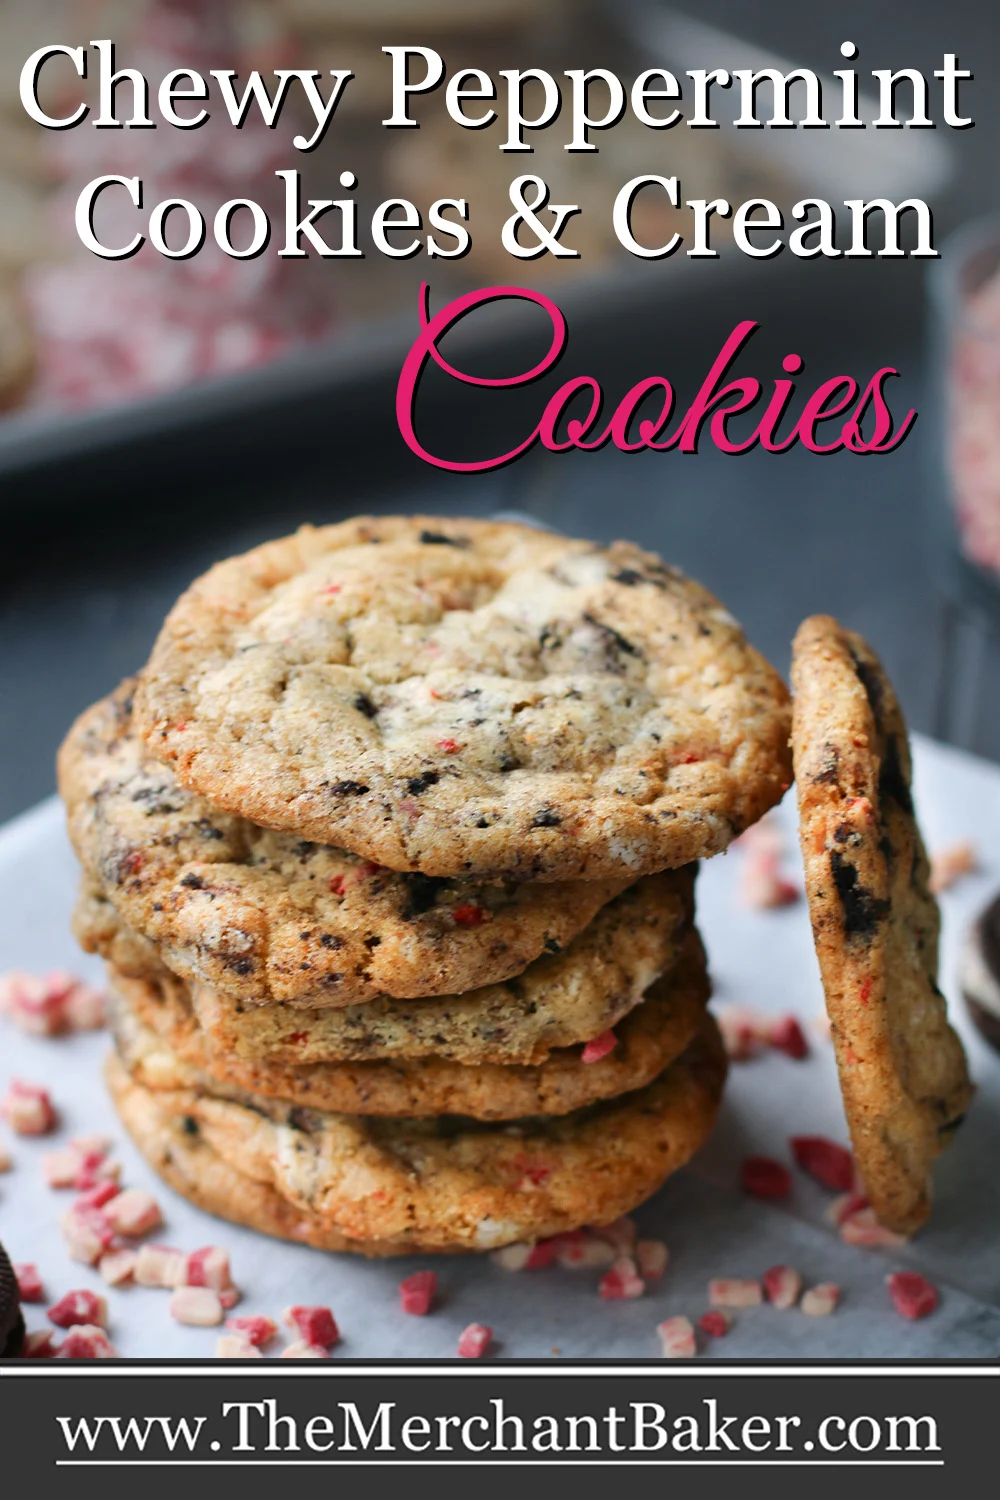
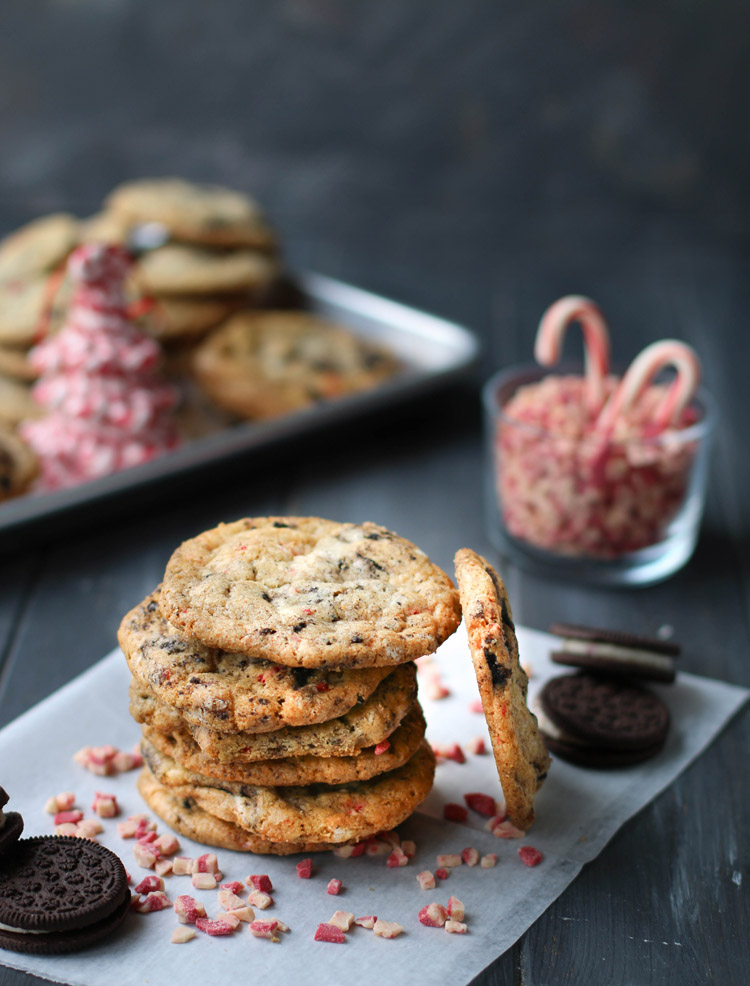
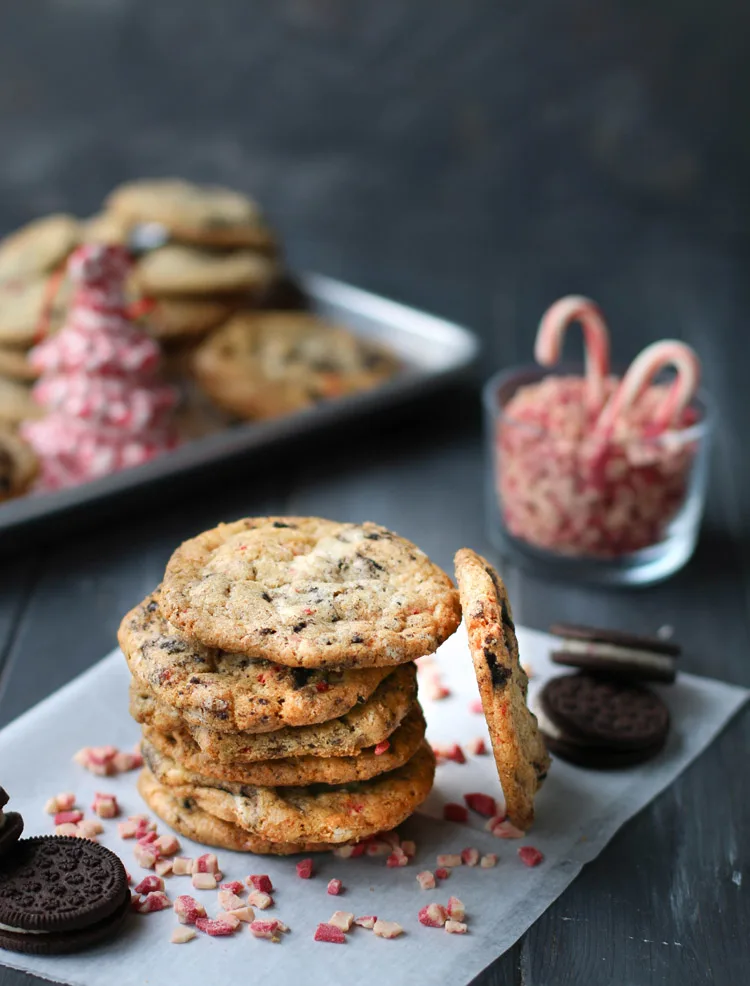
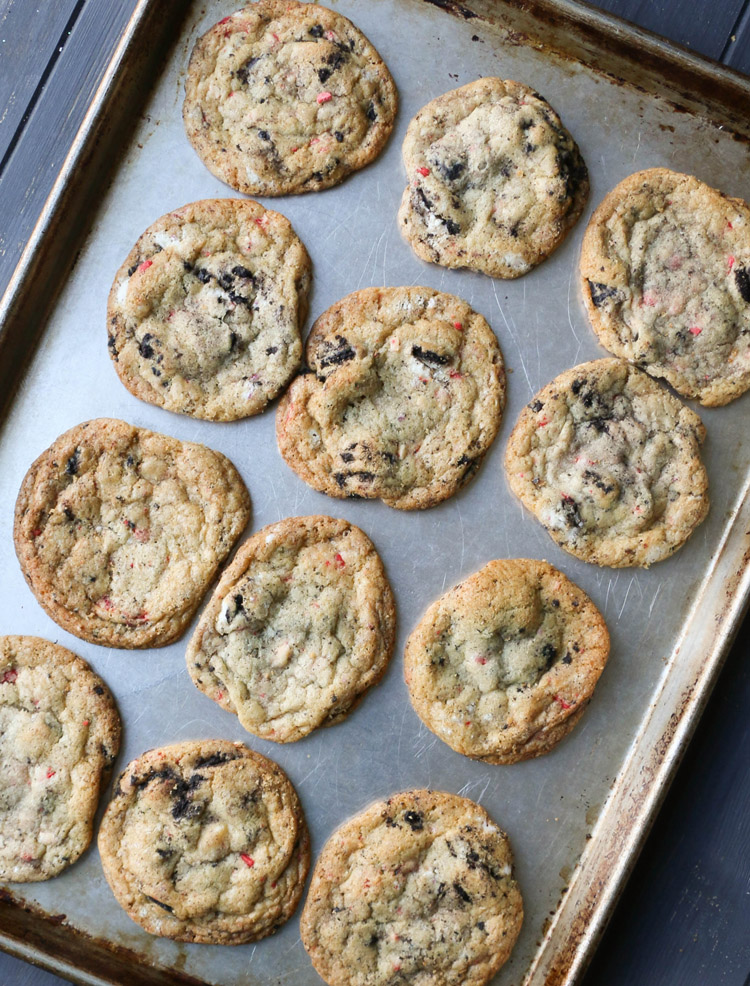
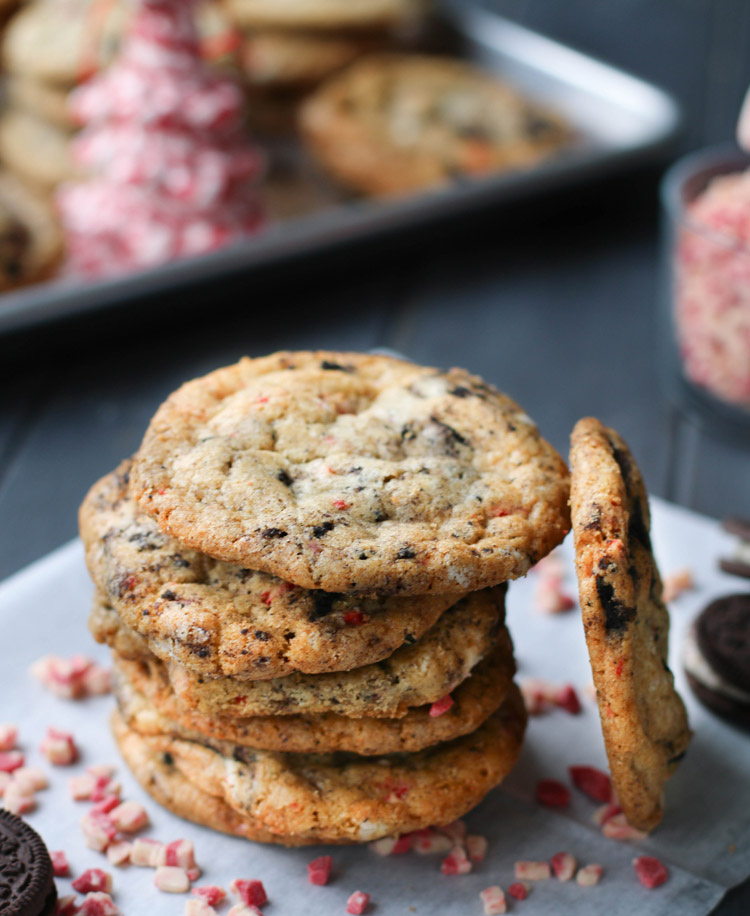
Chewy Peppermint Cookies and Cream Cookies are deliciously thin and satisfyingly chewy. They get a double dose of peppermint from Candy Cane Joe-Joe’s and Andes Peppermint Crunch Baking Chips.
A Tale of Two Cookies
It’s actually the tale of three cookies, but honestly, by the third batch, I was kind of over it. I hardly want to count that one
It all started when I spied a box of Trader Joe’s Candy Cane Joe-Joe’s. ‘Tis the season at Trader Joe’s and what fun it is to check out old and new faves in the novelty food section.
We like Candy Cane Joe-Joe’s and usually pick up a box. Occasionally, we’ll pick up the ones that are enrobed in chocolate, but I was thinking more about recipe development than splurgey treats.
Anyway, as soon as I saw the box, I knew I wanted to chop them up for a cookie I had been thinking about…a Chewy Peppermint Cookies and Cream Cookie!
Creating a New Peppermint Cookie
I love minty cookies and I wanted to add something new to that cookie category. Here’s the list I’m adding to:
- Andes Mint Chocolate Chip Cookies
- Minty Cocoa Fudge Sandwich Cookies
- Minty Cocoa Snowballs
- Peppermint Chocolate Cookie Bark
I had a few other ideas, but I thought creating a cookies and cream cookie would be easy and fun. I also wanted to try to add olive oil to the cookie.
My thought process was the olive oil would add extra moisture. I figured the cookie pieces would absorb liquid from the cookie; I didn’t want to end up with a dry cookie.
Plus, olive oil…why not? You know how much I love my Orange Olive Oil Cake.


The first batch was a fail…or was it?
When the first batch came out, I was disappointed. They were flat. I hadn’t planned them to be flat. Were they going to be pretty to add to a cookie tray? I didn’t think so :( I set them aside and moved on to batch two.
For, batch two, I simply increased the amount of flour. They came out less flat. Some of my taste testers liked them better, but I found them lacking something. I thought the flavor of the first batch was better.
In fact, I kept going back to the first batch to munch on them, you know, breaking off a quarter of a cookie, only to return to claim another quarter and another…You know how it goes.
For the third batch, I took a completely different approach, got rid of the olive oil, added some cream cheese and changed the flour ratio again.
My husband said it was a nice mix of the first batch and the second, but I wasn’t sold. I was still loving the thin and chewy batch. You know, the “failed” batch. The one that had the best flavor and texture. Go figure.
After three batches of cookies, the first one was undeniably the best. There is just something so appealing about a cookies and cream type cookie that is thin and chewy. So, that’s what we’re going with here.

Ingredients
- Unsalted butter-I always specify salted or unsalted butter. You can use salted butter, just decrease the salt by 1/4 teaspoon.
- Olive oil-Yep. Olive oil. It works. Don’t question it. I use a mild olive oil because I’m not looking for an olive flavor. You can sub whatever liquid oil you prefer (canola, vegetable, avocado…)
- Brown sugar-I used light brown since I wasn’t looking to amp up a molasses flavor.
- Granulated sugar
- Eggs
- Vanilla extract
- All Purpose Flour
- Cornstarch-this makes cookies tender
- Baking Soda
- Baking Powder
- Salt-Sweet needs salt, but we don’t need as much in a peppermint cookie as we do in a chocolate chip cookie, so take note of whether or not you’re using salted or unsalted butter. Make adjustments as noted above.
- Candy Cane Joe-Joe’s- You can find these at Trader Joe’s.
- Andes Peppermint Crunch Baking Chips-These are like peppermint white chocolate mixed with bits of peppermint candy. I usually find them at Target, but see substitution ideas further in the post if you need them.
How to Make Chewy Peppermint Cookies and Cream Cookies
Melting the Butter
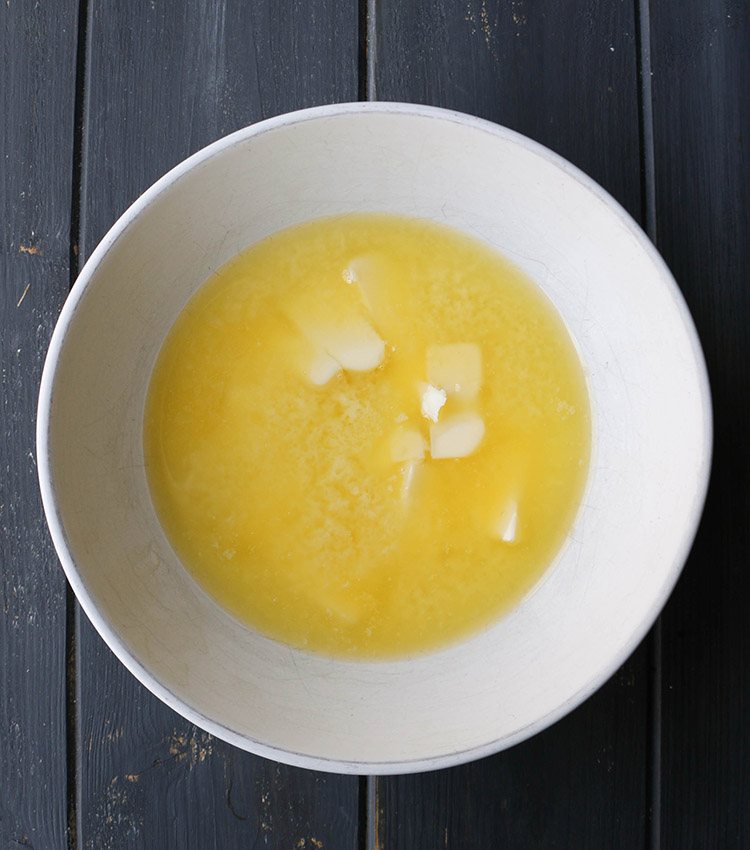
The melted butter needs to be cooled, so get this done first so the butter has time to do that.
I cut the butter into smaller chunks and then heated the butter in the microwave for about 30 seconds, adding 10 seconds as necessary.
I wanted to just start the melting. As soon as it was mostly melted, I took it out of the microwave. I still had chunks that needed to melt, but the residual heat from the melted butter and a little bit of stirring would take care of that.
Going easy on the melting will keep you from boiling the butter and raising the heat so much that it takes a long time to cool down.
The other issue is evaporation. There’s water in butter. You don’t want to boil the butter and lose that moisture.
Can I substitute the olive oil?
You can substitute the olive oil for any oil that is liquid at room temperature. So, you could use canola, vegetable, corn, avocado, grapeseed or any other mild flavored oil.
If you need or want to substitute the oil with butter or coconut oil, I would increase the amount to 4 Tablespoons. However, please be aware that the texture (and or flavor) of the cookie will be different than if you used a liquid oil.
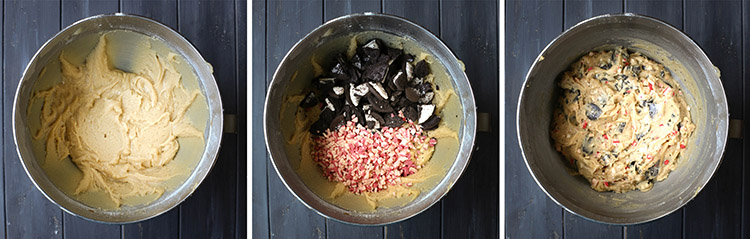
Beat the butter, oil and sugars until lighter in color and fluffy in texture
It may seem like everything is all mixed up and ready to go after about a minute of beating. I let my mixture beat for about 5 minutes to insure the sugar was dissolved. It also gave me a slightly fluffy mixture.
It’s important that your butter be melted but cooled during this process. If the butter is hot or warm, then your sugar will melt. We don’t want it to melt, we want it to mix.
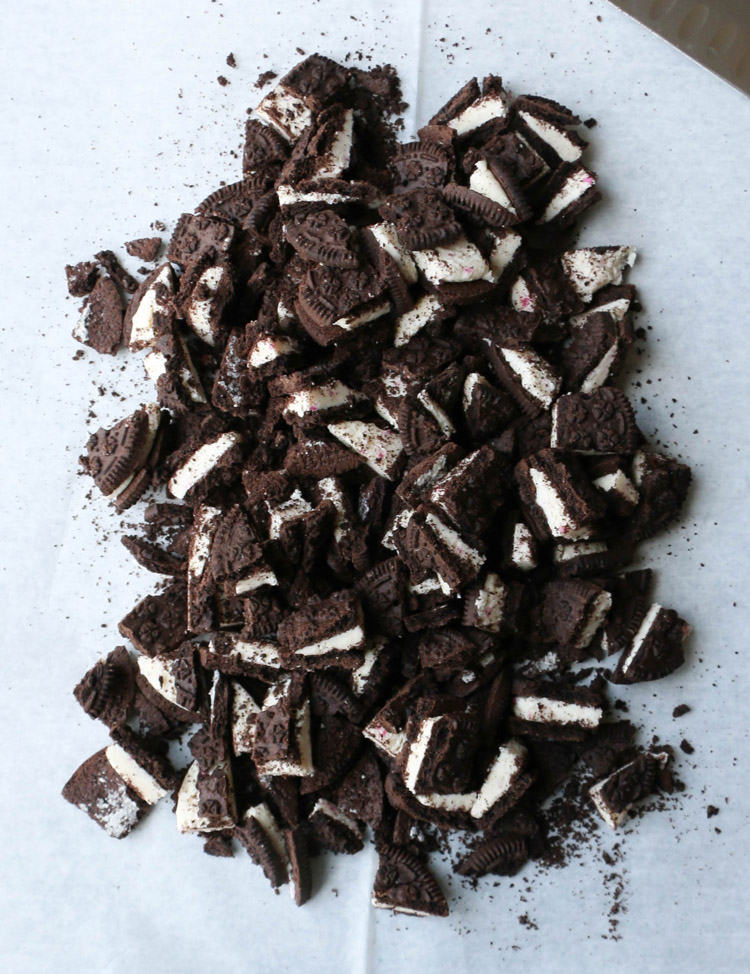
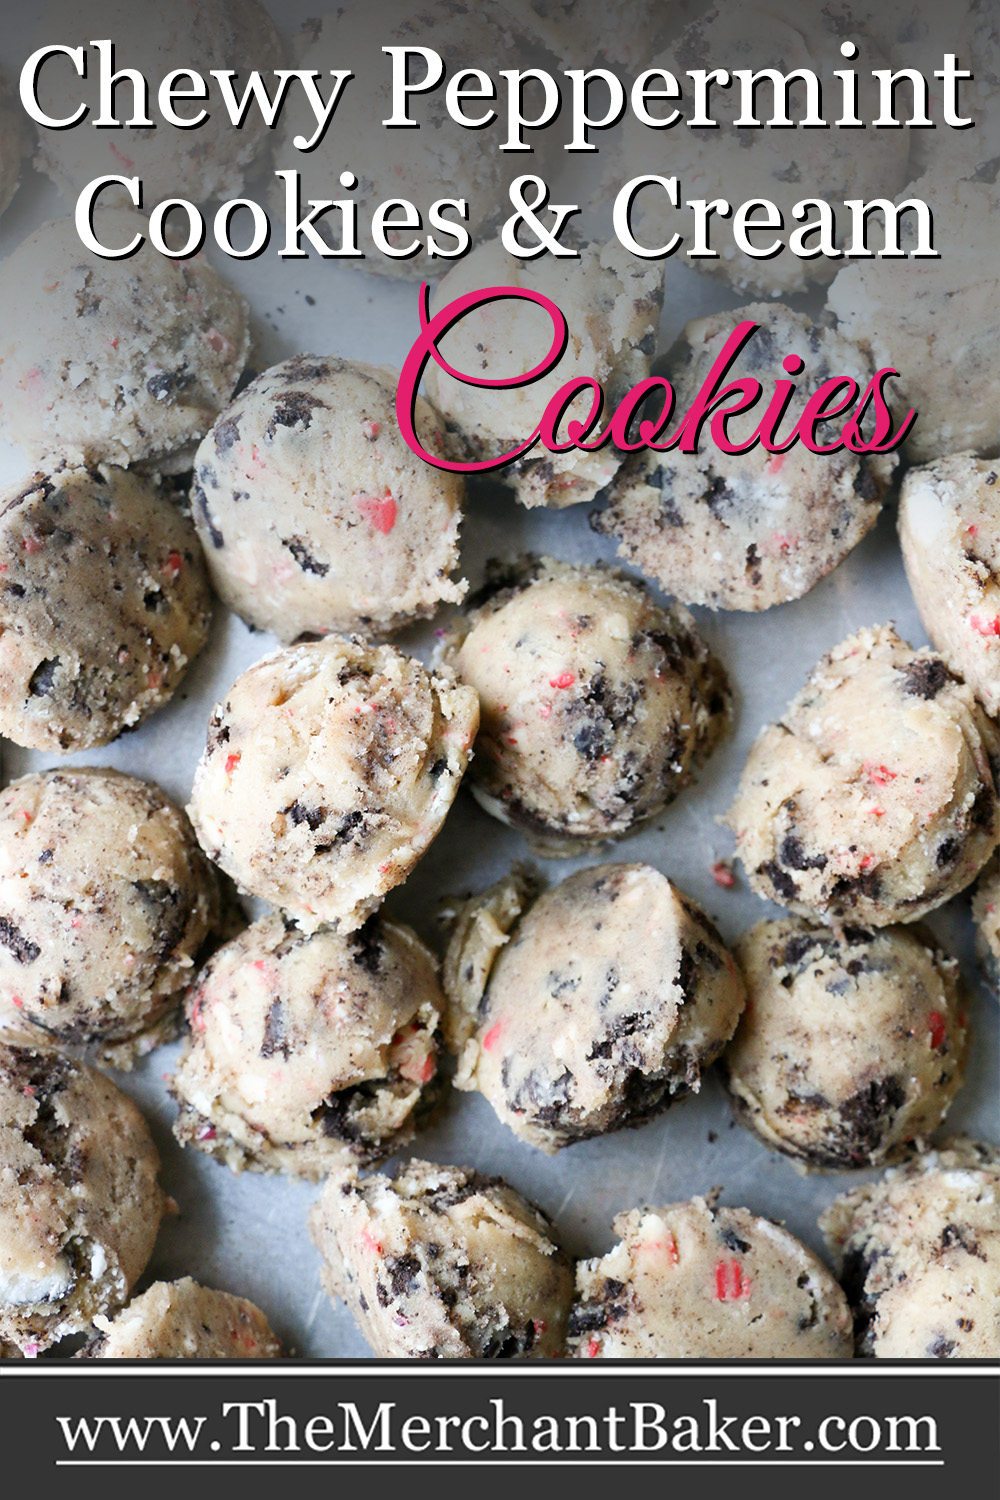
Chopping Up the Cookies
If you chop them too finely, you’ll lose them in the cookie. You want to be able to see and taste the chunks of cookie.
I chopped the cookies into about 6 pieces each using a chef’s knife. The larger knife which gave me good balanced weight across the cookie.
You can absolutely break them up with your hands. And don’t worry about tops separating from bottoms. It all good.
The following paragraphs contain affiliate links. We are a participant in the Amazon Services LLC Associates Program, an affiliate advertising program designed to provide a means for us to earn fees by linking to Amazon.com and affiliated sites.
Where can I find Andes Peppermint Crunch Baking Chips?
Here’s the thing about these seasonal chips, you have to grab them early in the holiday season. I usually find them at Target. You can also find them on Amazon, {aff. link} but the price for a bag there is often 2-3 times what you’d pay in store for the same amount.
You could substitute Ghiradelli Peppermint Chunks. They’re different in that they are creamier without the hit of the peppermint crunch. They are also larger, so you might want to chop them down a bit.
To that end, you could also use white chocolate chips and some finely chopped peppermint candy.
All substitutions will render you a slightly different outcome, but they all will taste good.
Plan ahead to refrigerate the batter!
Because we’re using melted butter and liquid oil, the batter is going to be very soft. It will need some chill time for the butter to firm up and become scoopable.
For best flavor, I recommend an overnight chill. This gives the flour a chance to soak up the moisture from the wet ingredients and concentrate the flavor.
Full disclosure, I didn’t allow an overnight chill for my second and third trials and I think that worked against their flavor and texture. So plan for the overnight chill.
The problem with a long chill time is that the batter becomes much too difficult to scoop and then you have to let it warm up enough to use it. But, I have an answer for that…
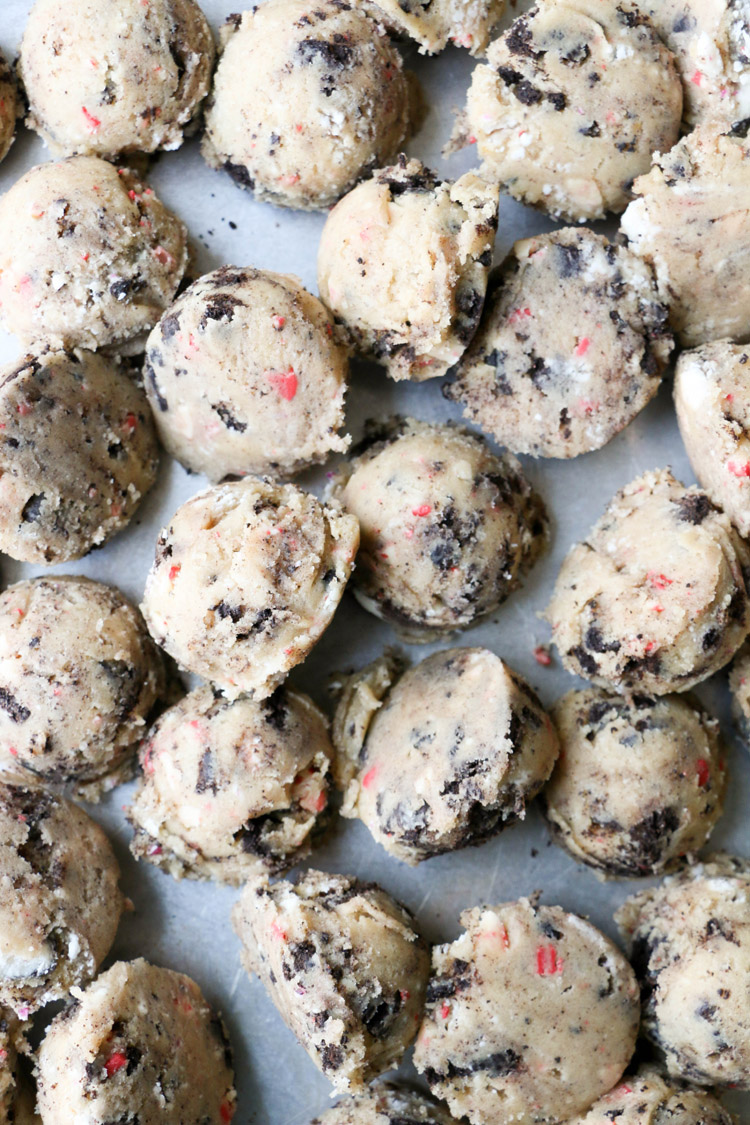
Chill, scoop, chill and roll
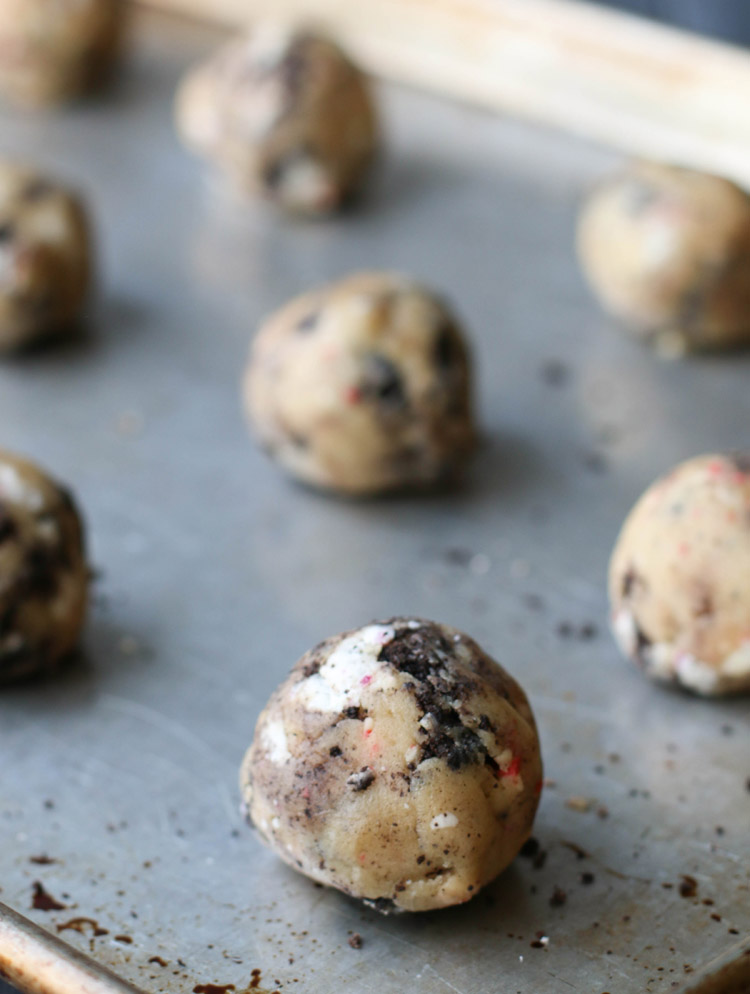
Here’s what I do…I refrigerate the dough just until it’s firm enough to scoop easily. Then, I scoop out all of the dough onto a cookie sheet or into a container placing the scoops of dough very close together.
If you need to create more than one layer in your container, just separate the layers with a sheet of plastic wrap.
Another sheet of plastic wrap goes right on the surface of the scoops to to protect them from drying out.
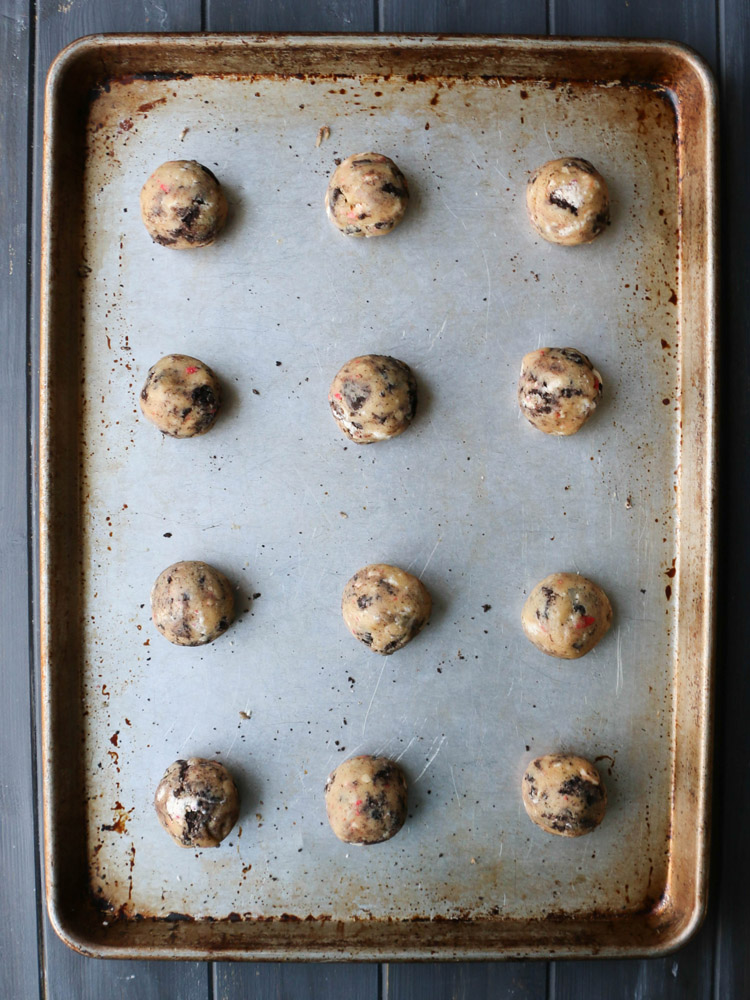
Then, when it’s time to bake, I just roll the scoops into balls and place them a few inches apart on an ungreased cookie sheet.
How to tell when the cookies are done
The cookies will flatten out considerably during baking. When they have a deep golden edge and the tops are set and a lightly golden, they are done.
The baking time might vary pretty widely here based on your oven and how cold your cookies are when you bake them. It can also depend on how many cookies are on your cookie sheet and what kind of cookie sheet you use.
I always use these half sheet pans {aff. link}. I have 6 of them and use them for all of my cookie baking, sheet pan dinners and for tons of roasted vegetables.
I would check them at 8 minutes, just to see how they’re progressing. Then, I’d check them every 2 minutes until they’re close to done. They should take between 10-14 minutes. I let them cool on the baking sheet.
Thin and Chewy!
The cookies will be thin and chewy, with bits of peppermint crunch, hits of a now softened chocolate cookie and schmears of peppermint cream filling.
The cookie base itself will have a rich flavor, just a little caramelly from that overnight stay in the fridge.
They say, “Third time’s a charm!.” In this, case the first time was a charm. I just needed some convincing :)
Chewy Peppermint Cookies and Cream Cookies
Chewy Peppermint Cookies and Cream Cookies are filled with candy cane Joe-Joe's and Andes Peppermint Crunch Baking Chips. They bake up thin with a satisfying chew!
Ingredients
Dry Ingredients
- 2 1/2 cups all purpose flour
- 2 teaspoons cornstarch
- 1 teaspoon baking soda
- 1 teaspoon baking powder
- 1/2 teaspoon salt
Wet Ingredients
- 12 Tablespoons unsalted butter, melted and cooled (1 1/2 sticks)
- 3 Tablespoons olive oil, canola oil or oil of choice
- 1 cup packed brown sugar
- 1/2 cup granulated sugar
- 2 large eggs, room temperature
- 2 teaspoons vanilla extract
Mix ins
- 15 Peppermint cream filled sandwich cookies (I used Trader Jo's)
- 3/4 cup Andes Peppermint Crunch Baking Chips
Instructions
- In a medium bowl, whisk dry ingredients together (flour, cornstarch, baking soda, baking powder and salt) until well combined. Set aside.
- In a large bowl, with an electric mixer, beat melted and cooled butter, olive oil, brown sugar and granulated sugar for 5-6 minutes until light in color and fluffier in texture.
- Add eggs, one at a time, beating thoroughly after each. Add vanilla while you're adding the eggs.
- To prevent flour from flying everywhere, add the flour mixture gradually, folding into the wet batter with a rubber spatula until it's about half mixed in. Finish incorporating the mixture with the electric mixer until no flour streaks remain, scraping sides and bottom of bowl as needed.
- Chop up the sandwich cookies into about 6 pieces each. You want them to bake up as noticeable chunks in your cookies.
- Add the chopped up cookies and peppermint baking chips to the cookie dough and mix just until evenly distributed.
- Cover surface with plastic wrap. (Wrap should be touching the top of the batter.) Refrigerate dough for 1 hour or until firm enough to scoop.
- Scoop cookie dough (my scoop was about 2 Tablespoons) onto a cookie sheet or into an airtight container, separating any layers of scooped dough with plastic wrap. The scoops should be close together and touching. Place another layer of plastic wrap directly touching the top layer of dough and close the lid or cover securely to prevent drying out. Return scoops of dough to the refrigerator to chill overnight.
- Preheat oven to 350 degrees F.
- Remove dough from refrigerator. roll scoops of dough into balls and place about 2-3 inches apart on an ungreased baking sheet.
- Bake for 10-14 minutes or until edges are golden brown and centers are set. Allow to cool on cookie sheets.
- Store baked cookies in an airtight container for up to 3 days. Freeze for longer storage by placing into a zip top freezer bag.
Notes
*If you can't find the peppermint baking chips, you could sub in Ghiradelli Peppermint Chunks or white chocolate chips and crushed peppermint candy. See post for more details.
*Chilling the dough twice might seem like an extra step, but if you chill a whole bowl of dough overnight, you have to wait until it warms up enough to scoop. I find it's easier to give it a quick chill, scoop the dough and then send it back to the fridge to chill overnight so that it can develop the flavors.