


This Triple Layer Pumpkin Nutella Cheesecake was originally going to be a simple pumpkin cheesecake.


But, having just made a classic pumpkin pie with no major bells or whistles, save for the brown sugar cinnamon whipped cream, I thought I should step it up a bit. You know, make this cheesecake just a little more special.
It is the holidays, after all. It’s the time when aaaallll the food gets dressed up and ready to wow. That’s what makes it kind of fun, anyway, doesn’t it? It’s what separates celebration dinners from the every day dishes we see the rest of the year.

I decided that a whole pumpkin cheesecake was going to be just too much pumpkin if it were sitting next to pumpkin pie and the inevitable pumpkin rolls that we all love. So I mixed it up a little. I decided that I wanted layers of flavor.
At first, I thought I’d go with just two layers, pumpkin and plain. But, hey, go big or go home. Right? Right!

So, having already planned pumpkin and plain, I decided to go with Nutella as the third flavor. I do love pumpkin, Nutella and cream cheese together. That flavor combo is amazing in my Pumpkin Muffins with Nutella Cream Cheese Swirl.
Then, because of the Nutella, which we all know is a chocolate hazelnut spread, I decided to add hazelnuts to the crust. But I didn’t just go with a graham cracker crust, much as I love it. I went with a speculoos cookie crust!
The following paragraphs contains affiliate links. We are a participant in the Amazon Services LLC Associates Program, an affiliate advertising program designed to provide a means for us to earn fees by linking to Amazon.com and affiliated sites.


What’s a speculoos cookie? It’s a traditional spiced cookie from Belgium. They’re crispy, rich in color and have a caramelized flavor to them.
You might be most familiar with the brand that makes Biscoff cookies. I happened to use Trader Joe’s version for this recipe, but both are good.
Just use a food processor to grind the cookies and nuts to fine crumbs. (There’s some brown sugar in there as well, it just didn’t make the photo.) Add the melted butter, process and you’re ready to get the crumbs into the pan.


(As with many cheesecake recipes, I’m using a spring form pan. Spring form pans are wonderful because the sides remove from the base, making it easy to remove the cheesecake from the pan.)
See how neatly my crust has been pressed into the pan? I didn’t use my hands to press the crust. I used the bottom and side of a metal measuring cup. It makes the process so much easier!
Once the crust has been evenly and firmly pressed into the pan, it gets pre-baked, just for 8 minutes.
When it came out of the oven, I decided to add a bonus layer of straight Nutella. I just dolloped spoonfuls of it right onto the hot crust. After a minute or two, once the Nutella had time to soften, I gently spread it over the crust.
You do need to be careful at this step. You don’t want to disturb the bottom crust. I learned that as I was spreading. I did break through a couple of times and panicked a little.
But, I just put the bit of crust back into place and gently plastered over it with the Nutella. No harm, no foul.
You can actually see some of those loose crumbs in my Nutella layer. Trust me, you won’t be able to tell at all once the whole thing is done.


Onto the cheesecake layers. There are some lengthy directions in the recipe, but don’t let that intimidate you. Those of you who’ve been following me for awhile know that I’m prone to detailed instructions. I try to answer questions I think you might have as I’m writing the recipe, so there’s extra information, especially for those who don’t bake often.
All you’re going to do is mix up the base cheesecake batter. Then you’re going to divide it into three bowls. One of the bowls of batter will be left plain.
One will get pumpkin puree and pumpkin spice added to it. And the third will get Nutella mixed into it. That’s it. Three flavors!
Then, because you’re going to want a fancy top at the end, you’ll reserve a little of the plain and Nutella batters.
When it came time for layering, I thought about which batter would be the heaviest and how they might sink into each other. I won’t get into the whole thought process. At the end of the day, I decided to put plain on the bottom, then the Nutella layer, then the pumpkin layer.
I just crossed my fingers and hoped things wouldn’t sink strangely while it baked. (Spoiler Alert: Everything was awesome!)


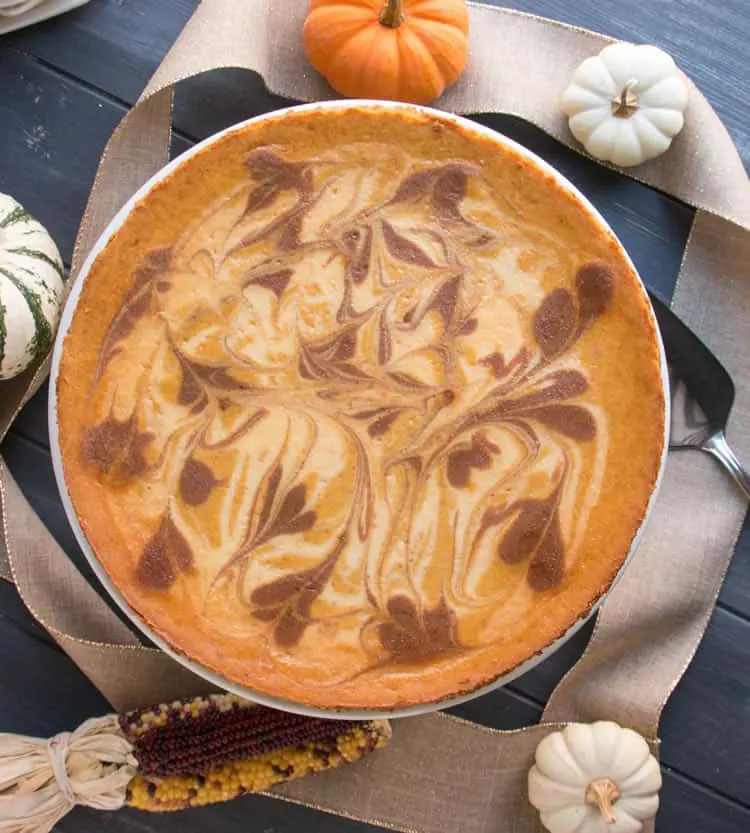
Now for that pretty marbled top. It’s so easy, anyone could do it. And honestly, since daylight for photography was quickly fading on me, I just did a simple swirl design.
I started with the plain batter and just drizzled ribbons of it randomly over the top. Then, I dropped small spoonfuls of the Nutella batter randomly in little puddles.
The next part is the fun part. Just use a tooth pick or the tip of a sharp knife to pull and swirl the design. If you’ve never done this before, start by pulling the tooth pick through one of the Nutella puddles.
You’ll see the batter quickly turn into a heart like shape. That’s the basic idea. Just drag your toothpick in swirls around the top of the batter while making sure you pull through all of the Nutella puddles.
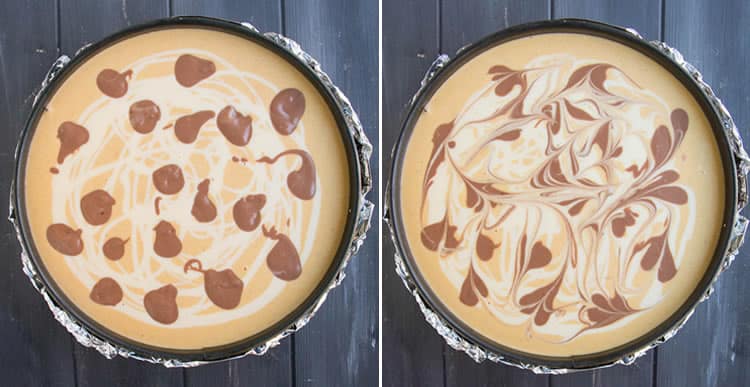

This is going to be so much fun, you might not want to stop. But, restrain yourself and stop as soon as it looks good to you. Continuing to swirl and swirl is simply going to mix it up. Eventually, you will lose the definition of your swirls. So don’t do that.
I have to say, though, since I’ve made this Triple Layer Pumpkin Nutella Cheesecake, I’ve had so many other far less random ideas for designing the top! It’s making me crazy! I want a do over!

And yet, I have absolutely no need to make another big cheesecake…just to make a new design on top.
See? This is why my recipes are never ever permanently “done.” There’s always another idea, a variation or a twist that I want to try.
But you? You still have a chance ;) Don’t get me wrong. I love how pretty the swirl design is. It’s just that now I have a whole different idea!
If you want some inspiration, look up some of the simpler designs people do with steamed milk in coffee drinks. Or write your name on top or something. You know, get creative!
The baking process is pretty cool. I got it from Ina Garten’s cheesecake recipe. I’ve made that recipe to rave reviews many times. But, one of the things I love about it is the baking process.

I love that the process does not require a water bath. You just simply bake it at a high temperature for 15 minutes. This sets the top. Then you reduce the temperature pretty significantly and bake it low and slow for another hour and fifteen minutes.
Finally, you turn the oven off, open the door and let the cheesecake cool down gently in the still warm oven.
That’s it! The cheesecake doesn’t sink. It doesn’t crack. It bakes up perfectly! No fuss. No worry!

Then it has to completely cool before you refrigerate it. Cover it and serve it the next day or even two days later. I actually think it tastes better two days later. So, yes. This is a perfect make ahead dessert!
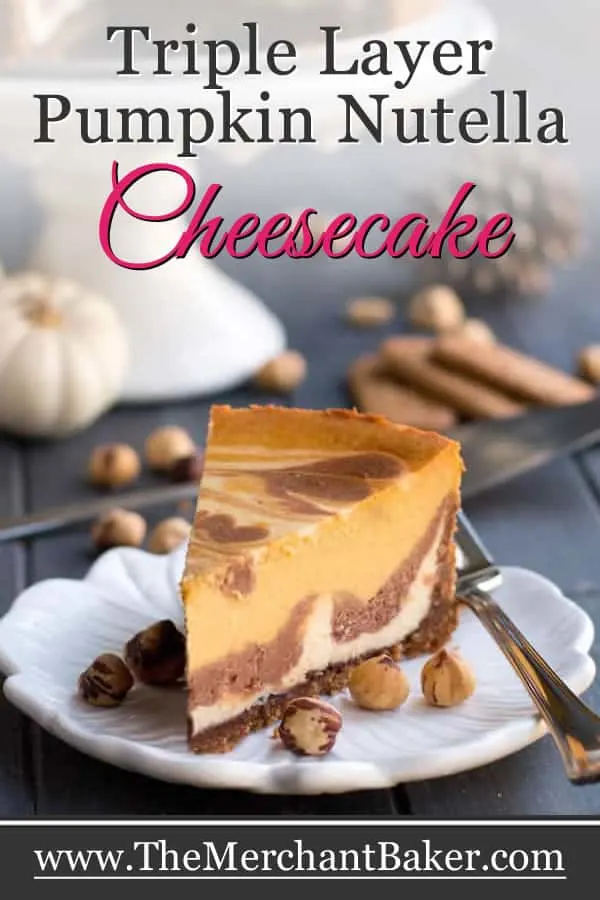
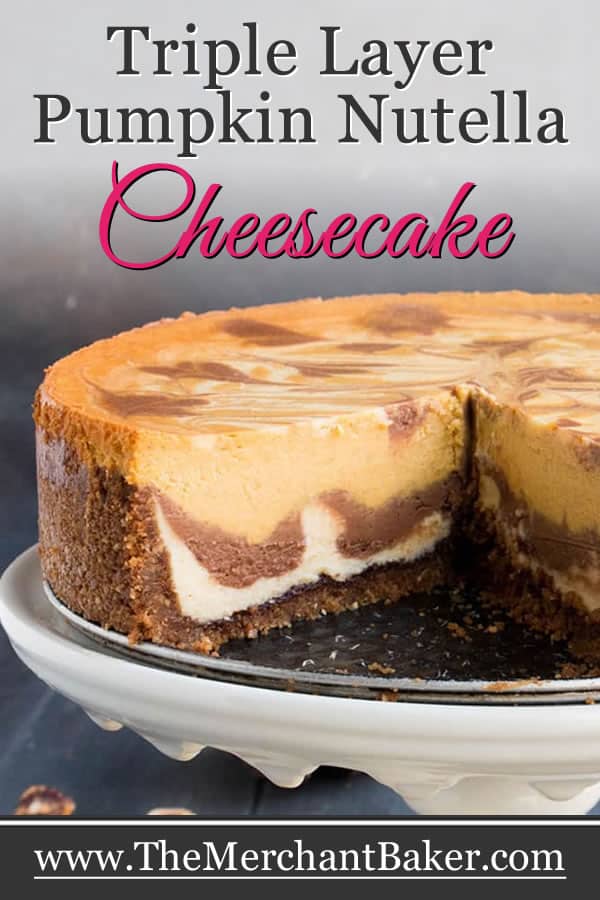
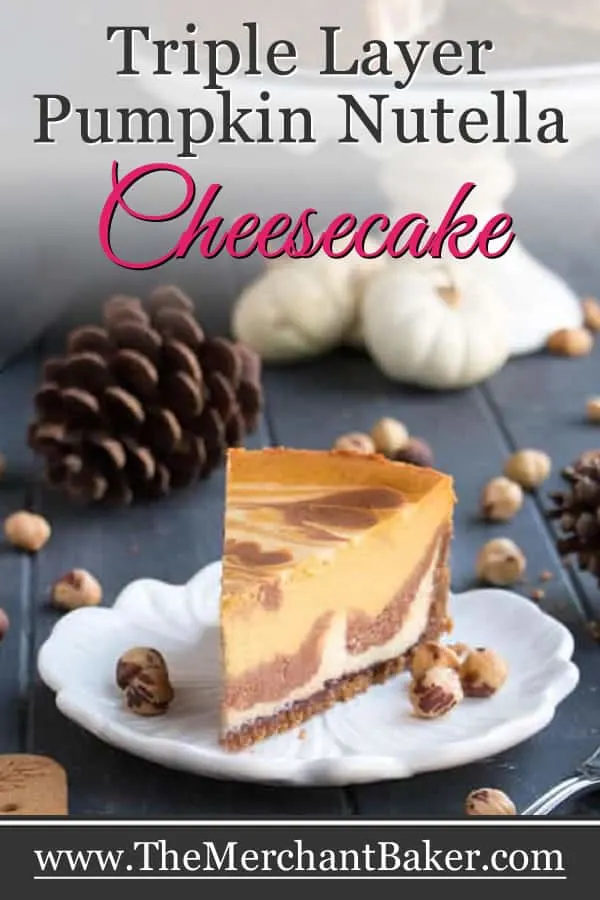
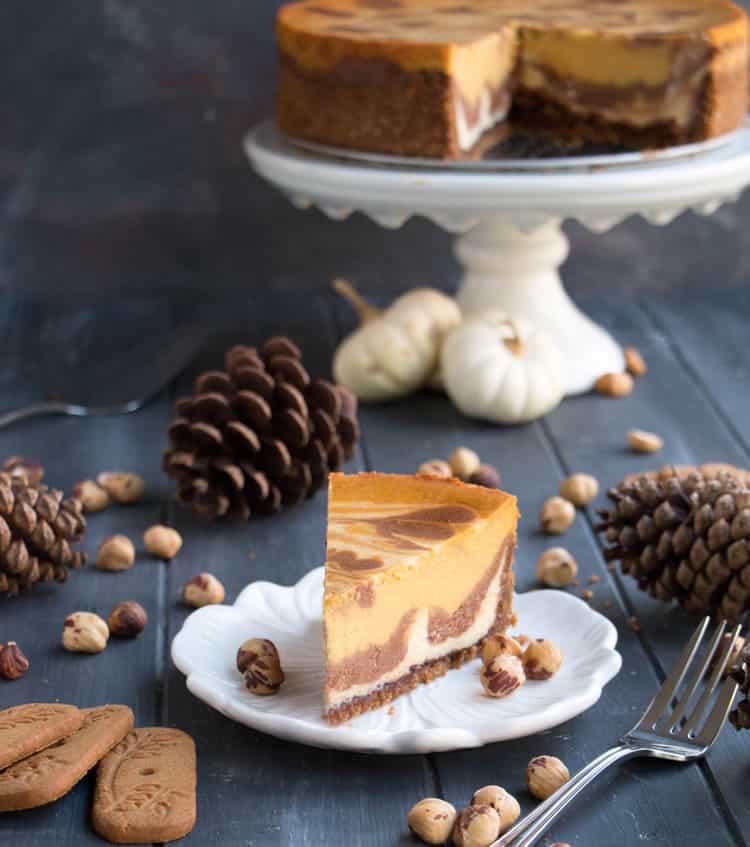
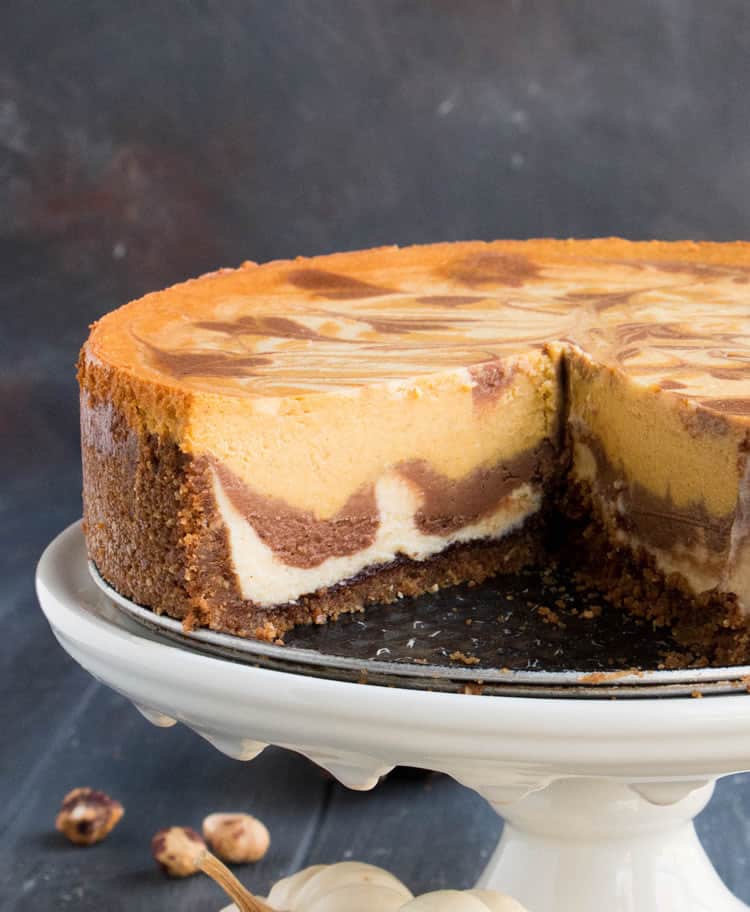
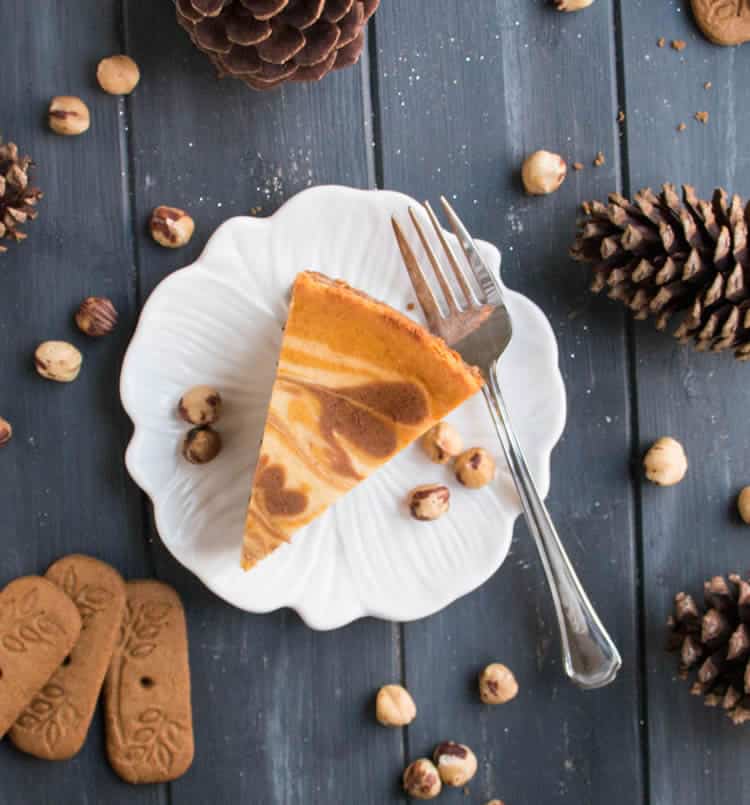
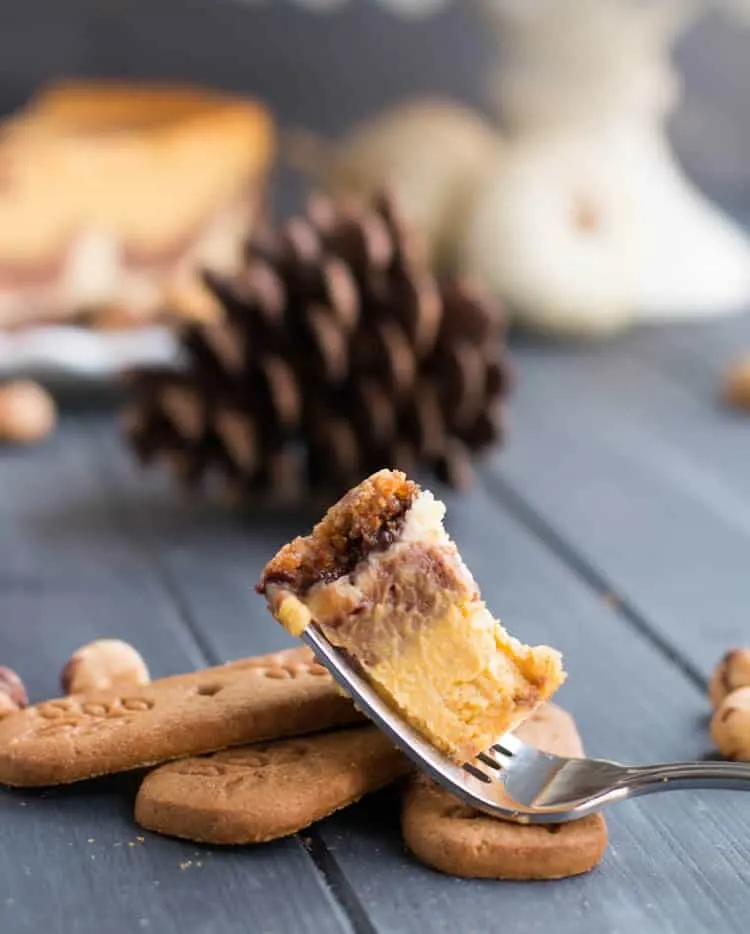
You can see from the photos how beautifully this Triple Layer Pumpkin Cheesecake turned out! From the pretty design on top to all of the layers beneath it. There’s a nice little rippled effect from how the layers baked up, nicely mimicking the swirly top.

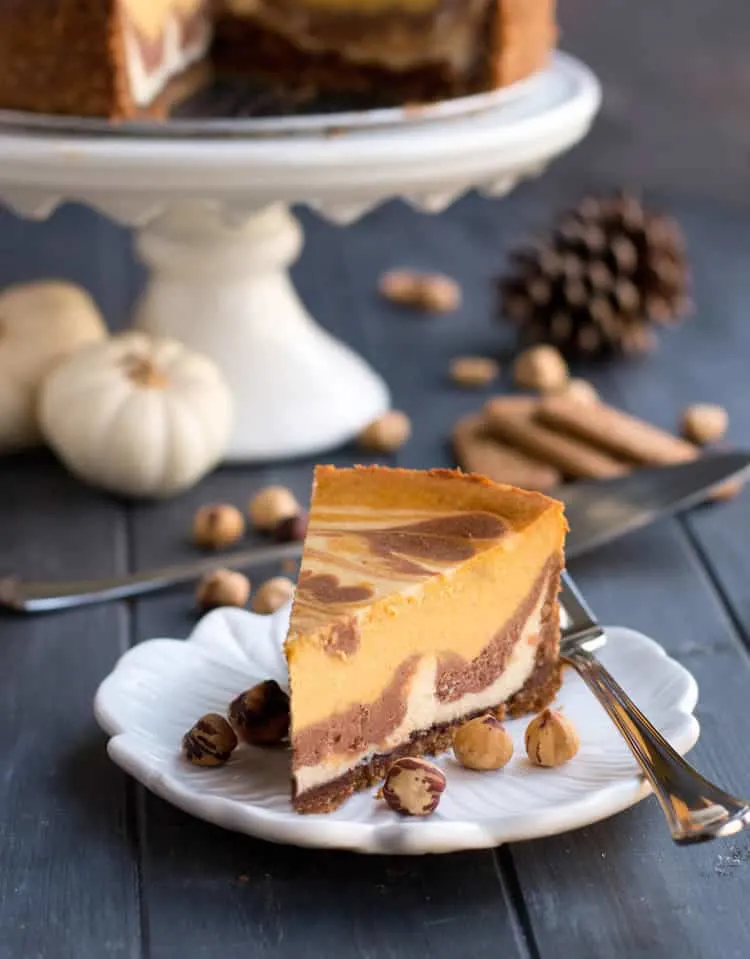
And the flavor? Smooth and creamy. There’s not too much of any one flavor. Just enough pumpkin for that hit of seasonality, just enough plain to ground it and just enough Nutella to make it different.
There’s even that thin bonus layer of pure Nutella on the bottom! All of that sits on a nutty spiced cookie crust.
Yep, it’s special from top to bottom. And it tastes as good as it looks.
So, it’s time to call it. One dressed up pumpkin cheesecake for Thanksgiving?

Mission accomplished!

Triple Layer Pumpkin Nutella Cheesecake
Ingredients
For the crust:
- 7 ounces speculoos cookies, about 24 cookies
- 1/2 cup hazelnuts, toasted
- 1/3 cup brown sugar
- 7 Tablespoons melted salted butter
For layering:
- 1/4 cup Nutella
For the cheesecake:
- 4 (8 ounce) blocks of cream cheese, room temperature
- 1 1/2 cups white granulated sugar, divided
- 1/4 cup cornstarch
- 1 Tablespoon vanilla extract
- 4 large eggs, room temperature
- 2/3 cup pureed pumpkin, not pumpkin pie filling
- 1 teaspoon pumpkin pie spice
- 1/2 cup Nutella
- 9 Tablespoons evaporated milk, I used 2%
Instructions
- Preheat oven to 350 degrees F. Wrap the bottom and sides of a 9" spring form pan with foil. (This will help guard against any leaking. I didn't have any issues but better to be safe.)
Make the crust:
- In a food processor, pulse cookies, sugar and hazelnuts to a moderately fine texture. Add melted butter and pulse until combined.
- Empty crumbs into the prepared pan. Press them firmly into the bottom and an inch or so up the sides.
- Bake crust for 8 minutes. Remove from oven and immediately place small spoonfuls of the 1/4 cup of Nutella right on top of the hot crust. Let it sit for a minute or two. The residual heat of the pan should soften the Nutella and make it easy to spread. Very gently spread the Nutella evenly on top of the crust, being careful not to disturb the crust itself. I had bits of crust pop up on me. I just pressed them back into place and gently smoothed the Nutella back over them. Set aside to cool while you make the cheesecake.
- Raise oven temperature to 450 degrees F.
Make the cheesecake:
- In a large mixing bowl, with an electric mixer, beat just one of the blocks of cream cheese for a few seconds or until creamy. Add just 1/2 cup of the sugar and all of the cornstarch and continue beating until well combined and creamy.
- Blend in the remaining three blocks of cream cheese until combined. Then blend in the remaining 1 cup of sugar.
- Add eggs, one at a time, beating well after each addition. Add vanilla and combine well.
Divide the batter to make three flavors:
- Get two bowls large enough to accommodate using your mixer. ( I use a hand mixer for mixing up the flavors)
- Remove 2 cups of batter from the main mixing bowl and place it into one of the bowls. This will be your plain batter. Set that bowl aside. Take another 2 cups of batter and place it in a second bowl. This will become your pumpkin batter. Leave the remaining batter in the main mixing bowl. This will be a smaller amount of batter than is in the new bowls and will become your Nutella batter.
- In a separate small bowl, mix the pumpkin puree thoroughly with the pumpkin pie spice. Add it to the 2 cups of batter waiting to become the pumpkin portion. Use your mixer to combine it thoroughly. Set aside. There's no need to rinse off the beaters. Just tap off the excess pumpkin batter and proceed to the next step.
- In the main mixing bowl, the one that has the smaller amount of batter, add the 1/2 cup of Nutella and beat until combined. You should now have three bowls of cheesecake batter, one plain, one pumpkin and one Nutella.
- Gather your three bowls. To each bowl, add 3 Tablespoons of evaporated milk for a total of 9 Tablespoons overall. Starting with the plain batter, using a small whisk, combine the milk completely into the batter. Without having to rinse the whisk, repeat the whisking process with the pumpkin batter and then the Nutella. We are not using the electric mixer at this stage, because we don't want to incorporate a lot of air into the batter, but we do want to completely incorporate the milk into the cheesecake batter.
- If you'd like to create the marbled design on top of the cake, take 1/4 cup of the plain batter and reserve it in a small bowl. Then, take 1/4 cup of the Nutella batter and reserve it in another separate small bowl. Set the two small bowls aside.
Prepare the cheesecake for baking:
- Pour the plain cheesecake batter into the cooled, pre-baked crust on top of the layer of pure Nutella. Spread evenly.
- Spoon Nutella cheesecake batter evenly over the plain layer. Spooning the batter instead of pouring it will prevent it from disturbing the plain layer.
- Spoon the pumpkin cheesecake batter evenly over the Nutella layer.
Make the marbled design on top:
- You can do this in many different ways. I chose to drizzle the reserved 1/4 cup of plain batter all over the top. Then I dropped small spoonfuls of the reserved 1/4 cup of Nutella batter all over the top. Then, drag a toothpick or the tip of a sharp knife through the batter to "pull" the batter into designs. Make sure you drag the tip in different curly directions to create various swirls. Stop as soon as it looks good to you. If you over swirl, you'll mix it up too much and start to lose the special aspects of your design.
Bake the cheesecake:
- Place the cheesecake on the middle rack of the oven. Place an empty baking sheet on the rack below it to catch any spills. I had absolutely no issues with over flow, but better to be safe than sorry.
- Bake the cheesecake at 450 for 15 minutes. Then, without opening the oven, reduce the temperature to 225 degrees and bake for an additional 1 hour and 15 minutes.
- When the baking time is complete, your cheesecake should be set with just a slight wobble in the center. Turn the oven off and open the oven door wide. Mine was halfway open. Let the cheesecake sit in the oven for another 30 minutes.
- After the 30 minutes, remove the cheesecake from the oven and allow to completely cool. This will take a few hours. Once cool, cover and refrigerate overnight.
Preparing to serve:
- Fill a tall mug with very hot water. Let a metal knife sit in the hot water for a minute to heat up. This is now a "hot knife." Dry the knife with a towel, then run it around the edge of the pan to help loosen the cheesecake from the pan. You don't have to run the knife all the way down to the bottom of the pan, just to where the cheesecake meets the crust. The crust should release on its own.
- Remove the ring of the spring form pan, leaving the cheesecake on the base of the pan for serving. Serve plain or with whipped cream, but don't cover up your pretty design on top!
Notes
* I use the sides and bottom of a metal measuring cup to press an even layer in the pan. It makes for a nice clean looking crust.
*Remember that you need evaporated milk, not sweetened condensed milk for this recipe.
*As you mix the batter, at whatever stage, remember that we're not trying to incorporate a lot of air into the mixture. We simply want the ingredients to be thoroughly mixed. If you over beat the batter, it will create air pockets and the cheesecake will puff up in the oven, only to sink again once cooled.
*After I did the marbled effect on top, I had all kinds of other ideas of how I could have designed it. In retrospect, I would have liked to create various leaves. It really doesn't matter though. Any marbling effect will make it look special.
*This is a great dessert to make in advance. It needs to chill at least overnight and I think it tastes better two days after I make it. So, I make my cheesecakes two days before I need to serve.
The Merchant Baker Copyright © 2017
Giulia
Friday 28th of September 2018
What's the diameter of the pan?
Ramona
Friday 28th of September 2018
Hey Giulia, I used a 9" springform pan. It's right there at the beginning of the instructions in the recipe :)
Taylor
Monday 15th of January 2018
Gave this a try and got a massive crack down the center... so it's not a fail-safe recipe in that regard... It did taste good, but I should have known my oven would be too rudimentary to have accurate enough temp for the broad oven instructions. It did get eaten, though!
Ramona
Monday 15th of January 2018
Taylor, cracks are generally caused by over baking or over beating. If you beat too much air into it, it will puff, then shrink, then crack. If, on the other hand, you have an oven that is inaccurate, as you mentioned...I strongly suggest you get an oven thermometer to check the temp. I put it off for so long because I didn't think it was worth my time and I had new ovens. But really, it's an inexpensive purchase and such an easy thing to use. Put it in your oven and you'll see the actual temperature. If it runs too hot or too cold, it's really going to make your baking more challenging, especially with things like cheesecakes and cakes. Once you know what temperature it really is, you can adjust until the thermometer reads the proper temperature. I used to get cracks in my cheesecakes. This baking process really changed everything and now, no more cracks.
Bethany
Friday 17th of November 2017
Ooh! I love the marbling in this cheesecake!
Ramona
Friday 17th of November 2017
I know, right? It's pretty and delicious! Thanks, Bethany!