


It’s July, so I decided to make a pie.


Actually, I made a Blueberry Galette. And I didn’t really make it because it’s July, but because a good friend texted me a picture of a couple of berry galettes she made last week and I instantly became obsessed with making one. Of course, that text coincided perfectly with the fact that organic blueberries are currently abundant and well priced at my grocery store and therefore, currently well stocked at my house.

I really like pie, like my Apricot Cherry Slab Pie and my Lemon Lime Cream Slab Pie, but I usually only make those for a crowd larger than my family. My friend makes LOTS of pies in the summer and I always plan to follow suit…but it never really happens. It’s the whole thing about making pie crust. I lament making pie crust, but I don’t know why. It’s really quite easy and pretty much on par with making homemade biscuits or scones, and I am a true advocate for making those often, so I don’t know what my personal fuss is all about.
What’s a galette? It’s really just a rustic, free form pie that is made without a pie pan. You simply make the dough, top it with filling and fold up the sides. Love it. You don’t have to worry about crimping or top crust meeting bottom crust or doing any trimming or worrying about not tearing the dough when you try to transfer the dough to the pan. It’s just pie in its simplest form.

I decided to try two new ideas for this post to see if they would work. I’ve been reading about how refrigerating the crust after rolling actually works. (Sacrilege!) And, then, even though I have a rolling mat and a special little pie bag to roll out my dough, I decided to try just good ole plastic wrap.
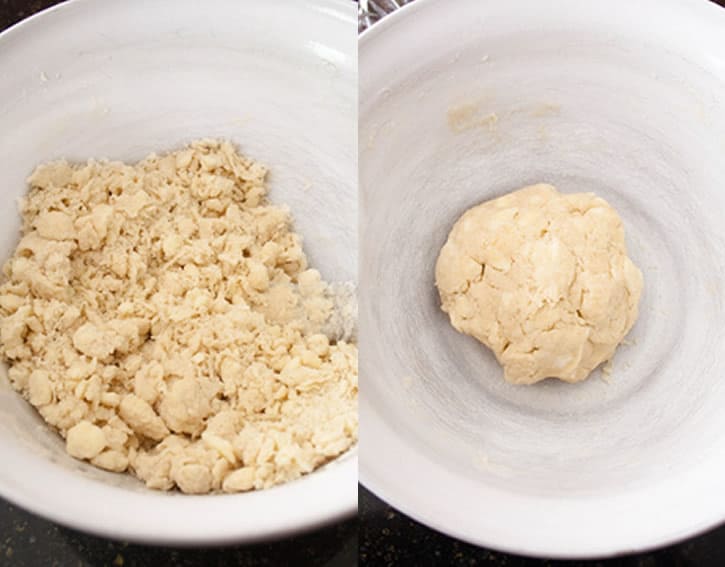
So I whisked my dry ingredients together, then cut in my butter with a pastry cutter as I would with any other biscuit or scone recipe. So far, so good. Then I drizzled in my ice cold water one spoonful at a time, tossing the mixture around after each spoonful, until it looked like the photo on the left below.
You don’t want lots of dry flour hanging around and you don’t want a super wet dough. You just want enough liquid so that the mixture can hold together. That clumpy mixture of flour and butter on the left is the same mixture, with no extra water, you see brought together in ball of dough pictured on the right.

That’s it. It took just a few minutes to mix that up. Now, instead of flattening this ball of dough into a disk and wrapping it in plastic wrap and sending it to the refrigerator for an hour, we’re going to roll it out first. Make a nice big square of plastic wrap to lay on the counter. You’ll need two sheets to accomplish this and just overlap them so they stick together.


Then you’ll place your dough in the center of the square and lay two more sheets of plastic wrap on top of it. You’ll basically have a ball of dough sandwiched between two large plastic wrap “squares.” Flatten the dough into a disk and roll it out into a 12-13″ ish circle.
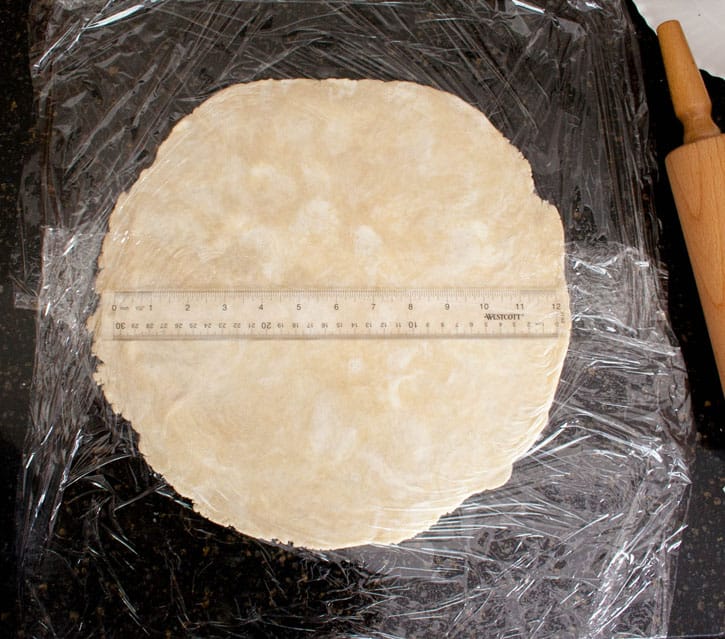

I have to tell you that this is the EASIEST time I’ve ever had rolling pie dough. It was almost as easy as if I were rolling play dough…. and there was no mess! I didn’t have to flour my counter. I didn’t have to flour my rolling pin. I could pick it up and turn it by just lifting it up off the counter and yet, the plastic wrap kept it from sliding on my counter while I rolled. Genius. Really. The combination of rolling between plastic wrap and doing it before refrigeration? I have no idea why I didn’t try this sooner.
Once you have it rolled out to the size you need, simply lift it off the counter and set it on a large baking sheet and now you can refrigerate it for about an hour or two. (The first one I made actually sat in the fridge overnight because I got busy with other things. It was ready and waiting for me the next day.) When the hour or so is up, just peel the plastic off the dough and flip it onto a parchment lined baking sheet.
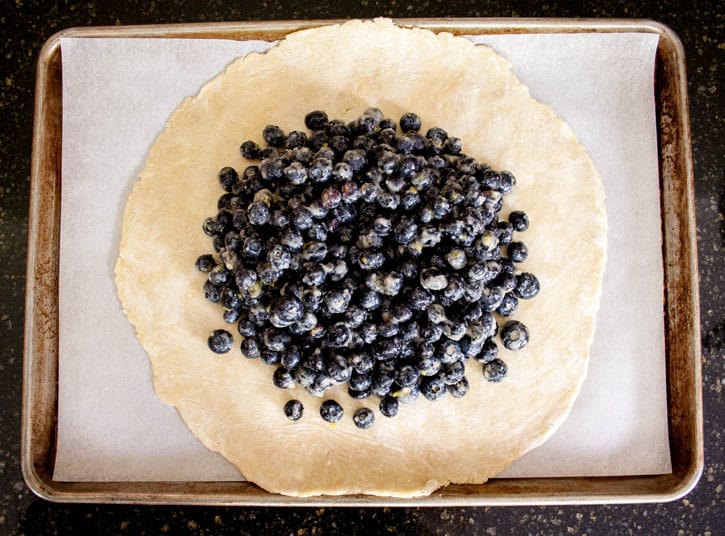

Then you’ll fill it with your fruit filling. Pie filling is another super easy thing to make, since it usually just involves the fruit, some type of sweetener, a thickening agent and flavoring, if you choose. I just tossed my berries with sugar and flour, and added some lemon zest and juice. I love how a little bit of citrus brightens up other fruits.
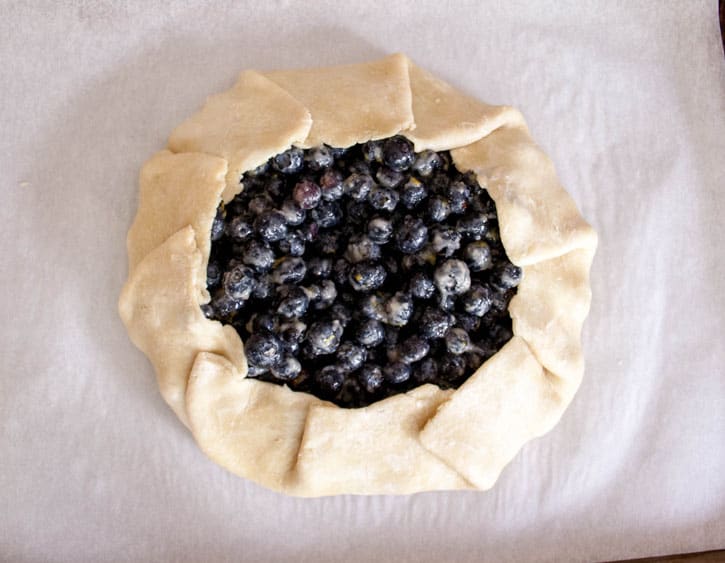

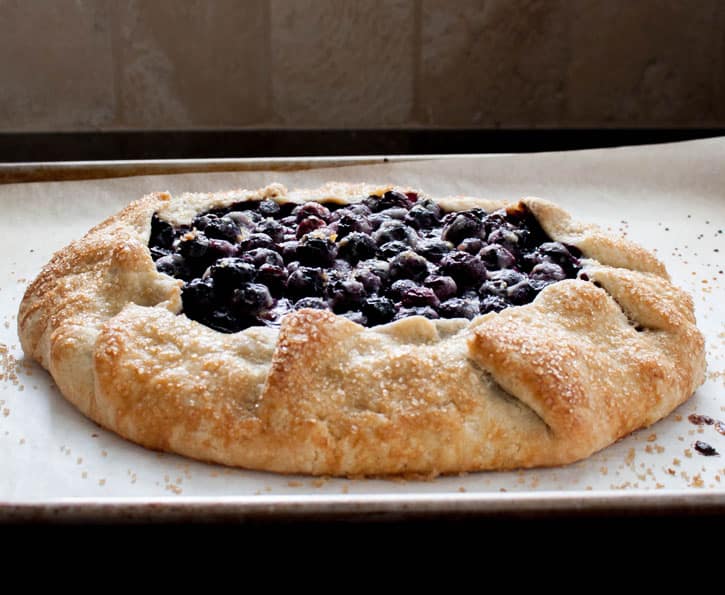
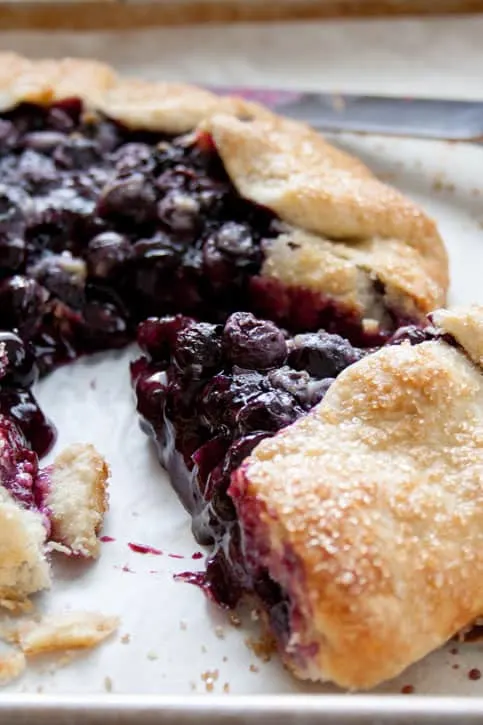
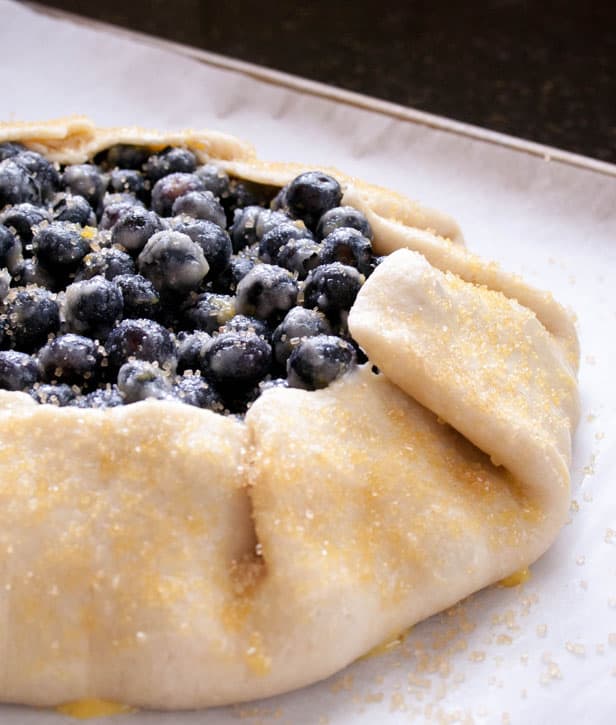
Pile the filling into the center of your dough circle. Leave yourself a border of dough to work with, then just fold up the edges until you completely encase the filling. Brush lightly with an egg, sprinkle with some coarse sugar and you are good to go.

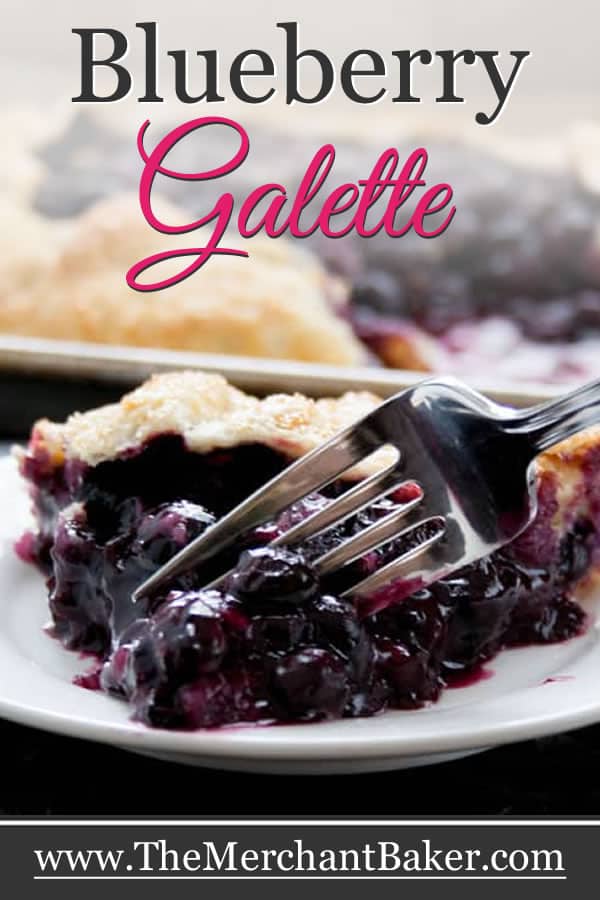
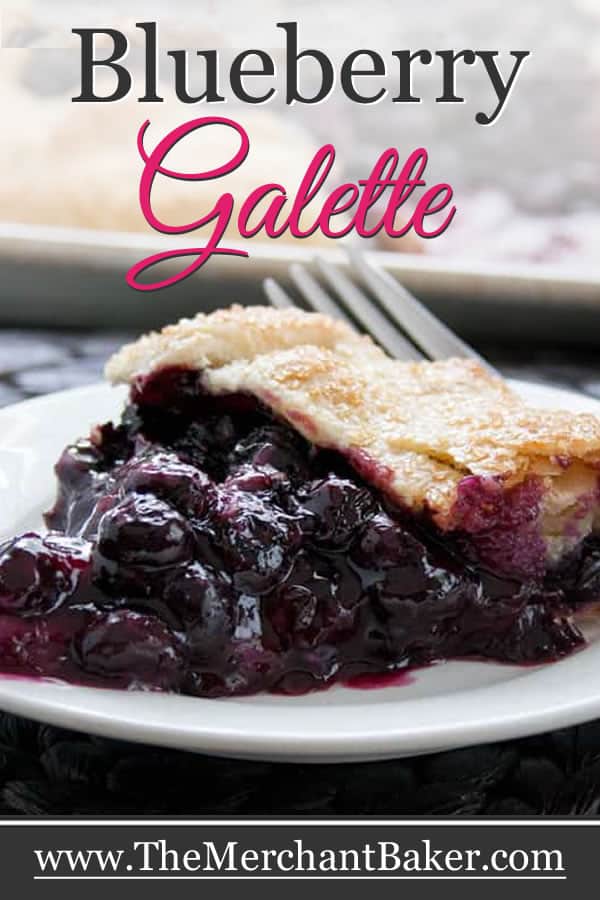
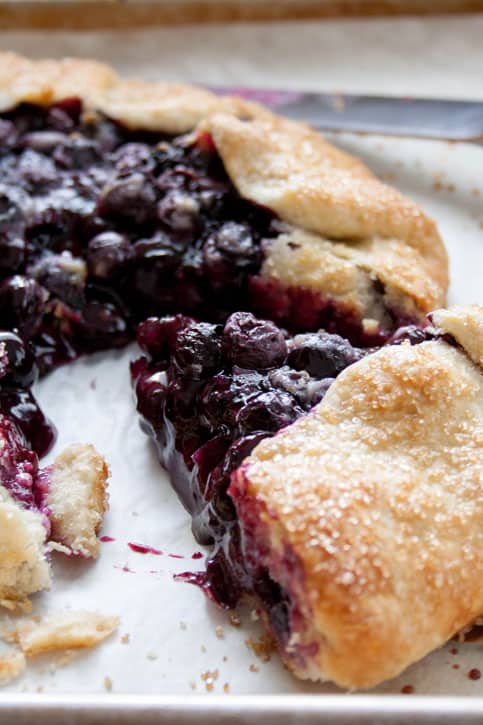
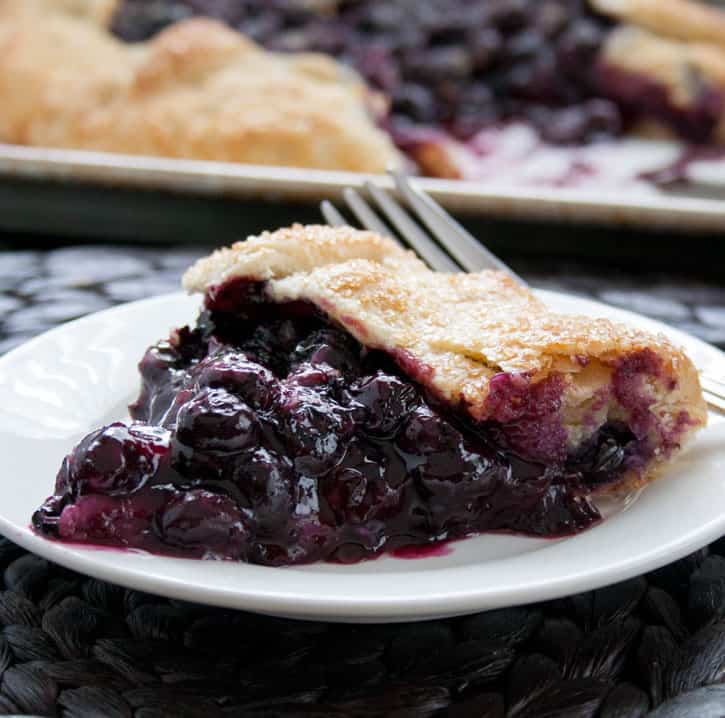
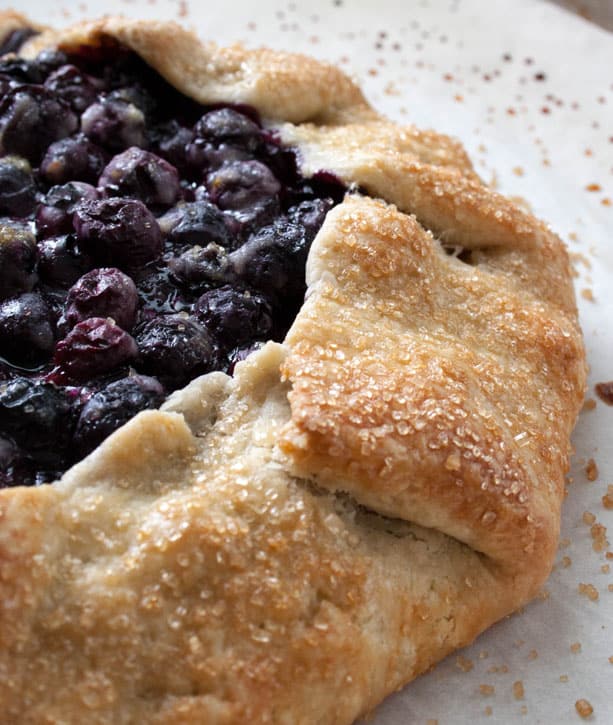
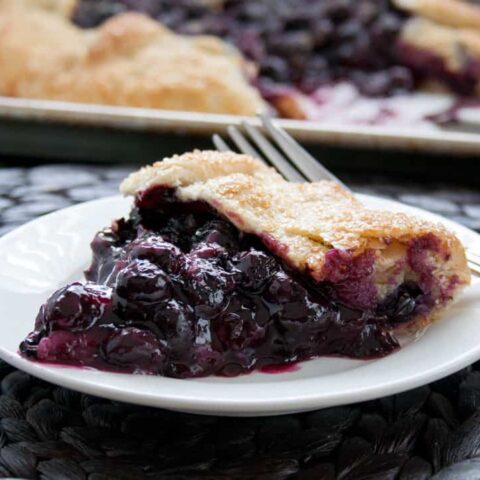
In my Apricot Cherry Slab Pie post, I talk about perfect proportions of pie crust to filling. This Blueberry Galette delivers on that for me. Just enough buttery, tender, flaky crust to balance out the filling. I also loved the crunch and added sweetness that the raw sugar topping added. And it was pretty and a little sparkly as an added bonus.

So that’s it. No more lamenting over pie. The saying “easy as pie” is no longer lost on me. This crust came together so easily, I felt like I could have made ten of them without so much as a sigh. I pictured a stack of ready to go pie dough in my refrigerator/freezer. I imagined pie as my go to dessert when I have company…I…I…I’m just happy that I made a pie this summer. A Blueberry Galette. It sounds so fancy for a rustic pie.
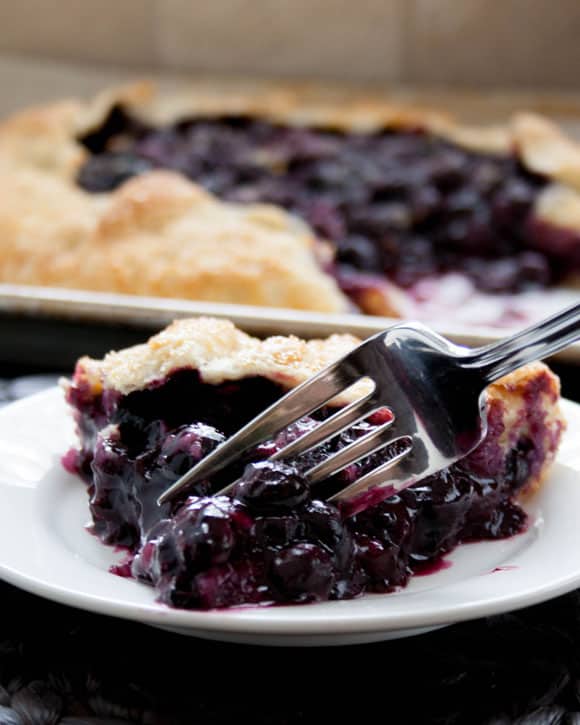

And mmmm… it was delicious.

Blueberry Galette
Blueberry Galette. Fresh blueberries baked in an all butter pie crust comes together so easily, it will change your mind about making homemade pie! crust. This really is easy as pie! You're basically just mixing the dough, rolling the dough, refrigerating the dough, then filling and baking it.
Ingredients
For the crust:
- 1 1/2 cups all purpose flour
- 1 Tablespoon sugar
- 1/2 teaspoon salt
- 8 Tablespoons 1 stick unsalted butter, cold and cut into small pieces
- 5-6 Tablespoons ice water, more if needed
For the filling:
- 4 cups fresh blueberries, washed and drained
- 6 Tablespoons sugar
- 3 Tablespoons all purpose flour
- zest from one lemon
- 1 Tablespoon fresh lemon juice
For The Topping
- 1 egg fully beaten
- raw or coarse sugar for sprinkling
Instructions
- Whisk together flour, sugar and salt. Add butter pieces and cut into the flour mixture using a pastry cutter or two knives until butter is in various sizes no larger than peas.
- Fill a cup with iced water and using a measuring spoon, drizzle a tablespoon of water over the flour mixture. Toss with a fork to distribute the moisture. Repeat this process adding a tablespoon of water at a time and tossing the mixture until your mixture looks shaggy and there's no dry piles of flour at the bottom of the bowl, but it shouldn't look wet. You should be able to grab a handful of the mixture and squeeze it in your hands and have it hold together. For me, this took about 5-6 Tablespoons of water. (See photos in post for examples of this stage.)
- Bring the mixture together in a ball.
- Tear off two sheets of plastic wrap and over lap them to make a large square. Mine was about 18". Place the ball into the center of the plastic.
- Tear off two more sheets of plastic wrap and cover the ball of dough, overlapping the plastic so that you have another big square of wrap sandwiching dough. Lightly press on the ball to flatten it into a disk.
- Using a rolling pin, roll the dough into a 12"-13" circle. Mine was about 12 1/2". Roll from the center out, easing up on the pressure as you near the edges so that you don't roll them too thin. Your rolling pin should not roll past the edge of the dough and back onto your counter. That would squeeze your dough into paper thinness. Think of the circle of dough like a clock and roll out to the 12 then pick it up and go back to center to roll down to the 6. Use the plastic wrap to pick up and rotate your dough to help you roll out to the different points on the circle. Always roll from the center out and resist the temptation to roll your pin back and forth. For this recipe, you don't have to worry that your dough is a perfect circle, but you do want it to be rolled out to a uniform thickness so that it bakes evenly.
- When you've achieved your 12-13" circle, or whatever shape you've rolled, keep the dough sandwiched in between the plastic wrap, pick it up and transfer it to a baking sheet. Refrigerate for about an hour or two or overnight.
- When you're ready to bake, preheat your oven to 350 degrees F. Line a large baking sheet with parchment.
- Once the oven is ready, combine all of the filling ingredients stirring to thoroughly combine, but being careful not to smash your berries. You can adjust the sugar to taste. I usually use about 5-6 tablespoons, but it depends on how sweet my berries are. If you like an even sweeter filling, you could increase the sugar to 1/2 cup.
- Remove the dough from the refrigerator, then peel off the plastic wrap and place the circle of dough onto your parchment lined baking sheet. Allow to sit for about 5 minutes so that you can work with it without it cracking. It should still be cold, but moldable. If it gets too warm, place it back in the refrigerator to firm up again.
- Pile your berry mixture in the center of the dough leaving about a 2 1/2" border of dough.
- Fold the dough edges up and over the berries, pleating as you go. Do not stretch the dough or press it into the berries. Just pleat it up and over the filling in whatever fashion you choose until you've completely encased the edges of your filling.
- Brush the surface of the dough lightly with the beaten egg, then sprinkle the dough and top of the filling with a coarse, raw sugar.
- Bake for 50-55 minutes or until crust is completely golden and filling is bubbly.
- Serve warm or at room temperature.
Notes
*It's very important to keep your dough cold, which is why I recommend having your oven ready to go and your filling ready to go before you remove your dough from the refrigerator. Because it's already been thinly rolled out, it won't take long for it to become pliable enough for you to work with it. My dough got a little too soft after I filled and pleated it because I was taking pictures. I just put the whole tray into the freezer for about 10-15 minutes to firm it back up again before I brushed with the egg and sprinkled the sugar. I always wait to do the egg wash/sugar step until just before I bake it.
*I've read that the longer you refrigerate, the better the flavor and texture. I did one pie overnight and the other between 1-2 hours. I didn't notice a major difference in flavor or texture.
*Store baked pie lightly covered at room temperature for up to two days. After two days, the pie can be refrigerated up to two more days. Your crust will be at it's best, however, the first day it is baked.
*You could cut in the butter with a food processor, if you'd prefer. I avoid the extra dishes, but if I did use a food processor, I would probably still toss the water in by hand, with a fork, though others do the entire process in a food processor and swear by it.
*Update 6-30-16: In addition to brushing egg wash on the outside of the crust, I now brush a layer on the crust before I fill it with fruit. It helps create a barrier between the crust and berries to help to prevent a soggy bottom crust. Also, if you prefer using cornstarch for thickening instead of flour, I would use about 3 Tablespoons.
The Merchant Baker Copyright © 2015
Jody
Sunday 4th of September 2022
I tried this for my first ever pie....I made a mistake...your instructions said add the ingredients for the filling. I assumed the egg was for the filling because it didn't delineate the use of the egg like the course sugar did. I wish it had said "fully beaten for egg wash". Oh well, I'm baking it anyway. Maybe it will be a cross between a clafoutis and a galette
Ramona
Sunday 4th of September 2022
Hi Jody, I apologize for the lack of clarification in the recipe. While I haven't had that issue raised before, I can certainly see how the mistake could happen based on how the recipe is written. I've just revised the recipe to separate out the topping ingredients to eliminate any future confusion for readers and I hope your galette is at least edible. I did a little research and some people add an egg to apple pie filling and did not report any adverse effects. I'll keep my fingers crossed that the same is true for you.
Dale
Thursday 23rd of August 2018
I recent,y made two of these with my grandchildren. Great recipe....
Ramona
Friday 24th of August 2018
Wonderful to hear, Dale! I'm glad you enjoyed it!
Alex
Saturday 17th of June 2017
Trying this for the first time tonight as a practice, I want to make these for some coworkers. I love how detailed your recipe is and the pictures definitely help. Does this recipe only yield one Galette?
Ramona
Saturday 17th of June 2017
Yes, Alex. Just one....and it will go quickly ;) You can definitely double it if you'd like to make two!
NewsCheek » 15 Dazzling Pies And Tarts Guaranteed To Make You Drool
Wednesday 4th of November 2015
[…] The Merchant Baker / Via themerchantbaker.com […]
15 Dazzling Pies And Tarts Guaranteed To Make You Drool | Roumor
Wednesday 4th of November 2015
[…] Recipe here. […]