So I had this idea to make Jammy Thumbprint Scone Bites.

They didn’t have a name at the time, but I, major scone lover, thought, what if I took some buttery scone dough, rolled it into little balls, filled them with jam and baked them? After all, I was so bold as to make Iced Vanilla Sconuts. I made those in lieu of a traditional scone shape because I wanted to jazz it up a little… you know, make the whole scone experience a little more exciting and colorful.

Not that scones need to be any more exciting for me. I am a die hard scone fan and you can read about my love for them in My Favorite Cinnamon Scones and then follow the trail of love through Fresh Strawberry Cream Scones and Brown Sugar Butter Pecan Scones.
I debated whether to use my strawberry scone base or vanilla scone base and decided to go with the slightly lighter textured strawberry scone base. They are both delicious buttery scone doughs, but the strawberry one is just a little bit lighter in texture. I wasn’t sure if it would be able to hold the shape, but I was up for trying.
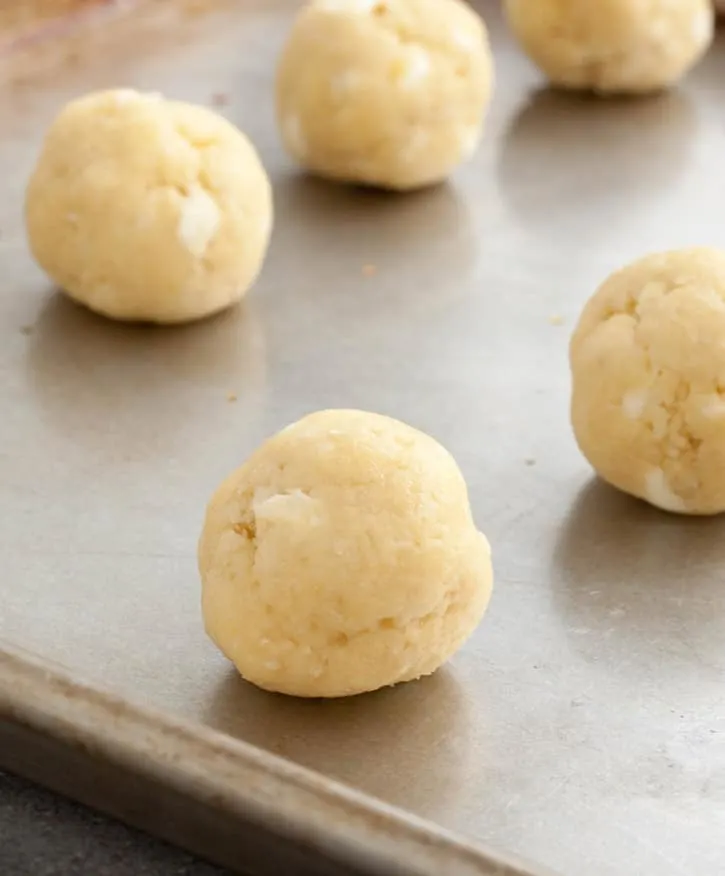
I mixed up a batch of dough, then rolled it into about 1″ balls. When you’re mixing this dough together, it’s going to seem to be too dry, but trust me, there’s plenty of butter in there to help the cream moisten and bring the dough together. Just knead it until you no longer have crumbs in the bowl and the dough is holding together.

After I rolled the balls, I needed to create the “thumbprint.” I wanted to make sure the cavity was deep enough not to get lost during baking. I also wanted a truly round cavity, which thumbs don’t easily create. So, I searched around for something with a round end and found a small rolling pin in my baking drawer. I covered the end with plastic wrap and used that to create the indentation. It worked beautifully. You could also use the end of a wooden spoon or yes, even your thumb.
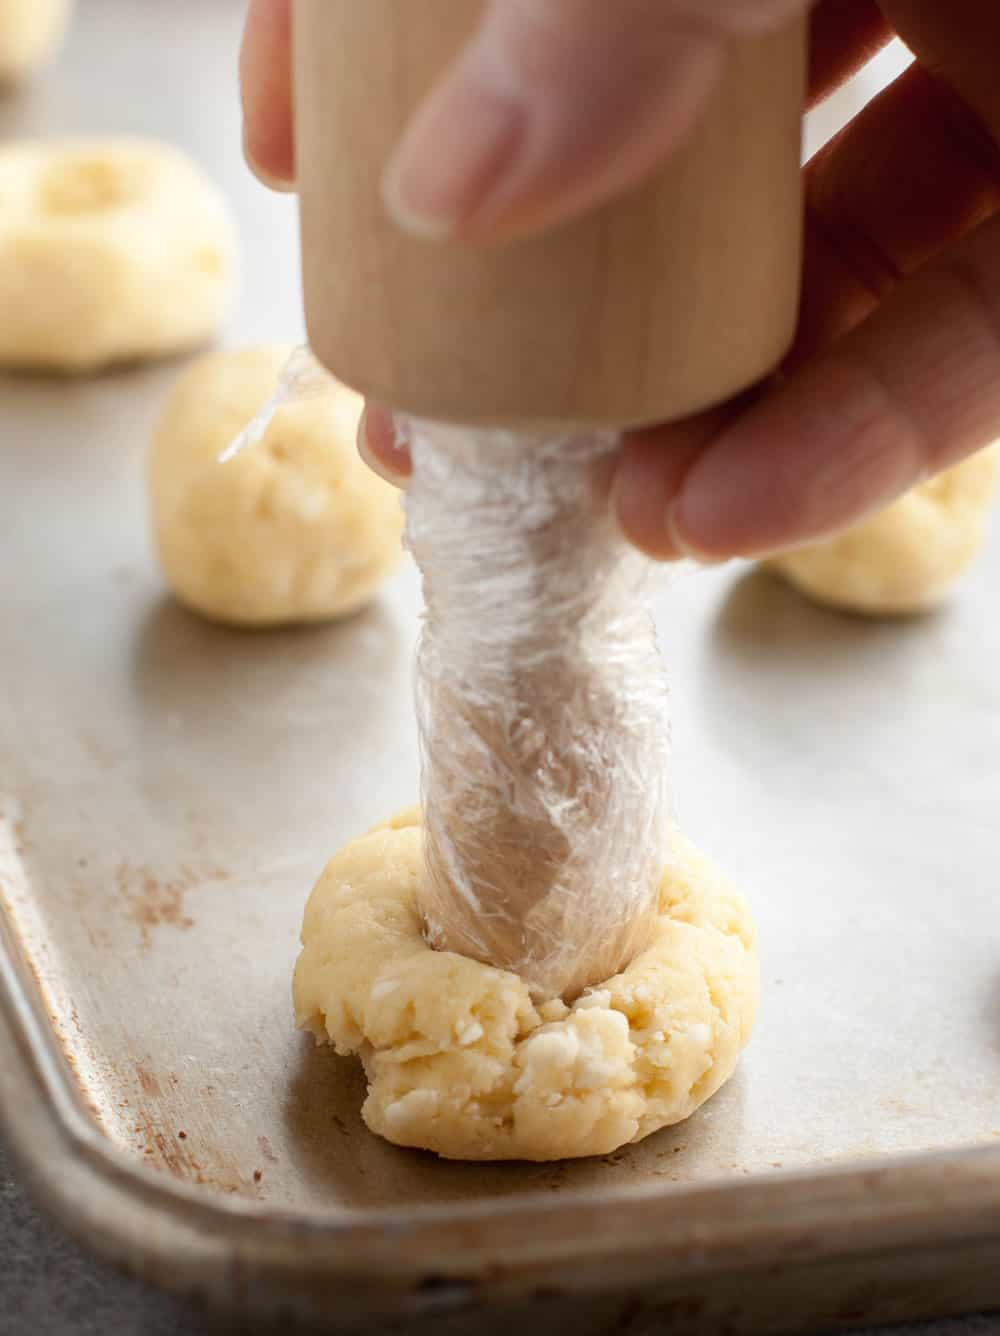

I actually took enough shots to show the full action of creating the cavity. But once my husband and I looked at it on the big screen…oh, and then he had to play it back and forth as if it were looping…well, let’s just say it made the term “food porn” just a bit too literal for this blog. Of course, it also spawned a truck load of jokes that I couldn’t even begin to share. So you’re only getting a G rated, non-moving still shot of that process, kids. Not that you needed a video tutorial about how to do that simple step. But, you know, sometimes I try to get a little fancy around here. Keeps it exciting ;)
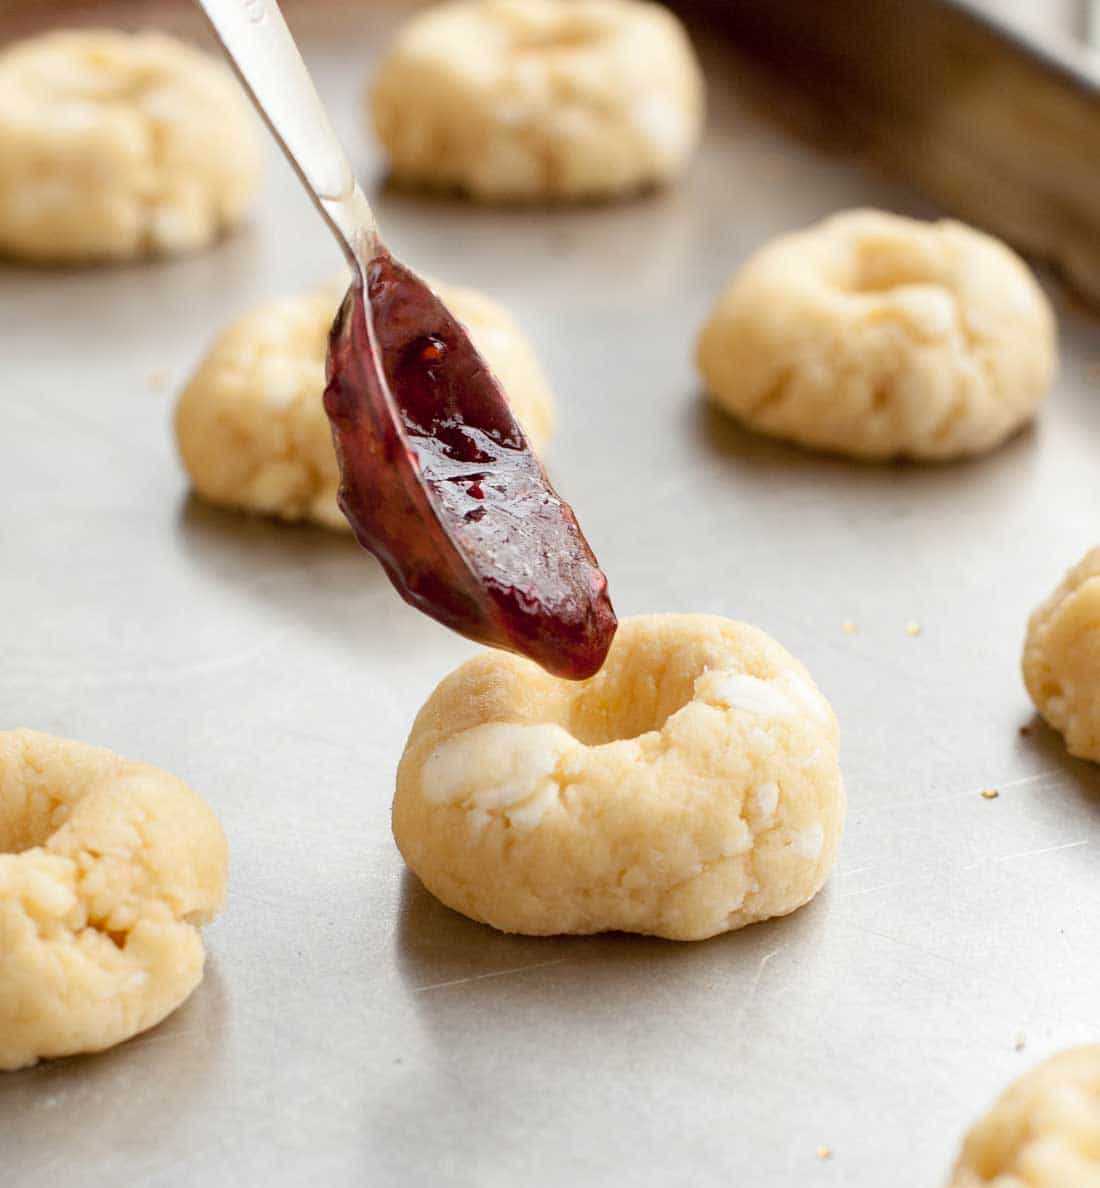
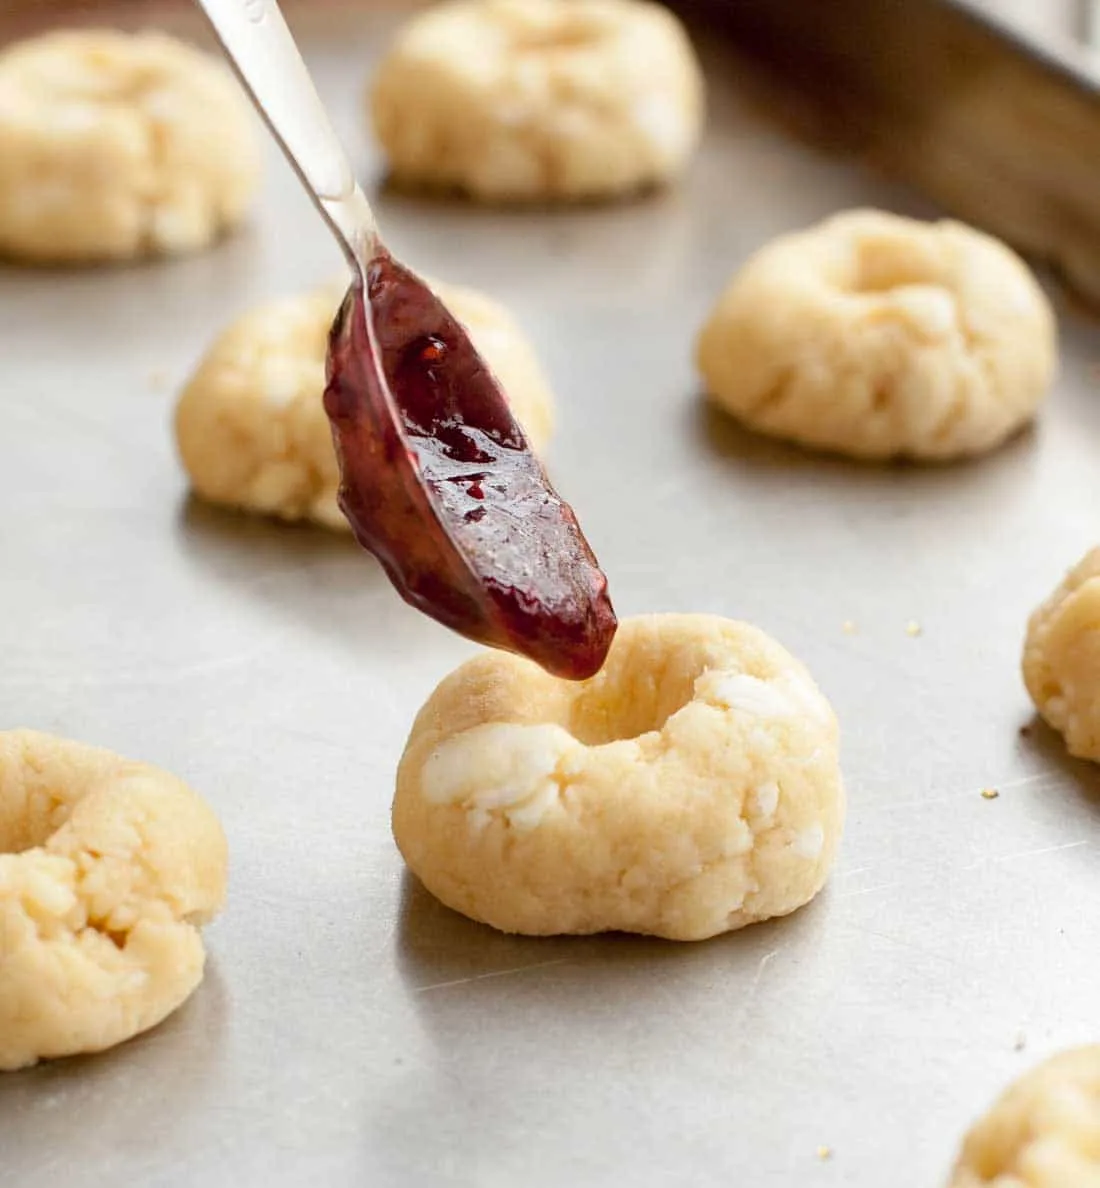
Sometimes, the edges of the cookie will crack a little when you’re pushing down on them. No worries. Once I finished, I simply went back and pressed any cracked edges together, making sure that the walls that would eventually hold jam were sturdy and wouldn’t have any spill over.
Then I stuck them in the fridge for about 30 minutes. After all of that mixing, rolling and impaling, I wanted to make sure the butter hadn’t gotten too warm. Whether it’s Fluffy Buttermilk Biscuits or my easy pie dough, you want cold butter pieces. You can see the bits of butter throughout the little scones.

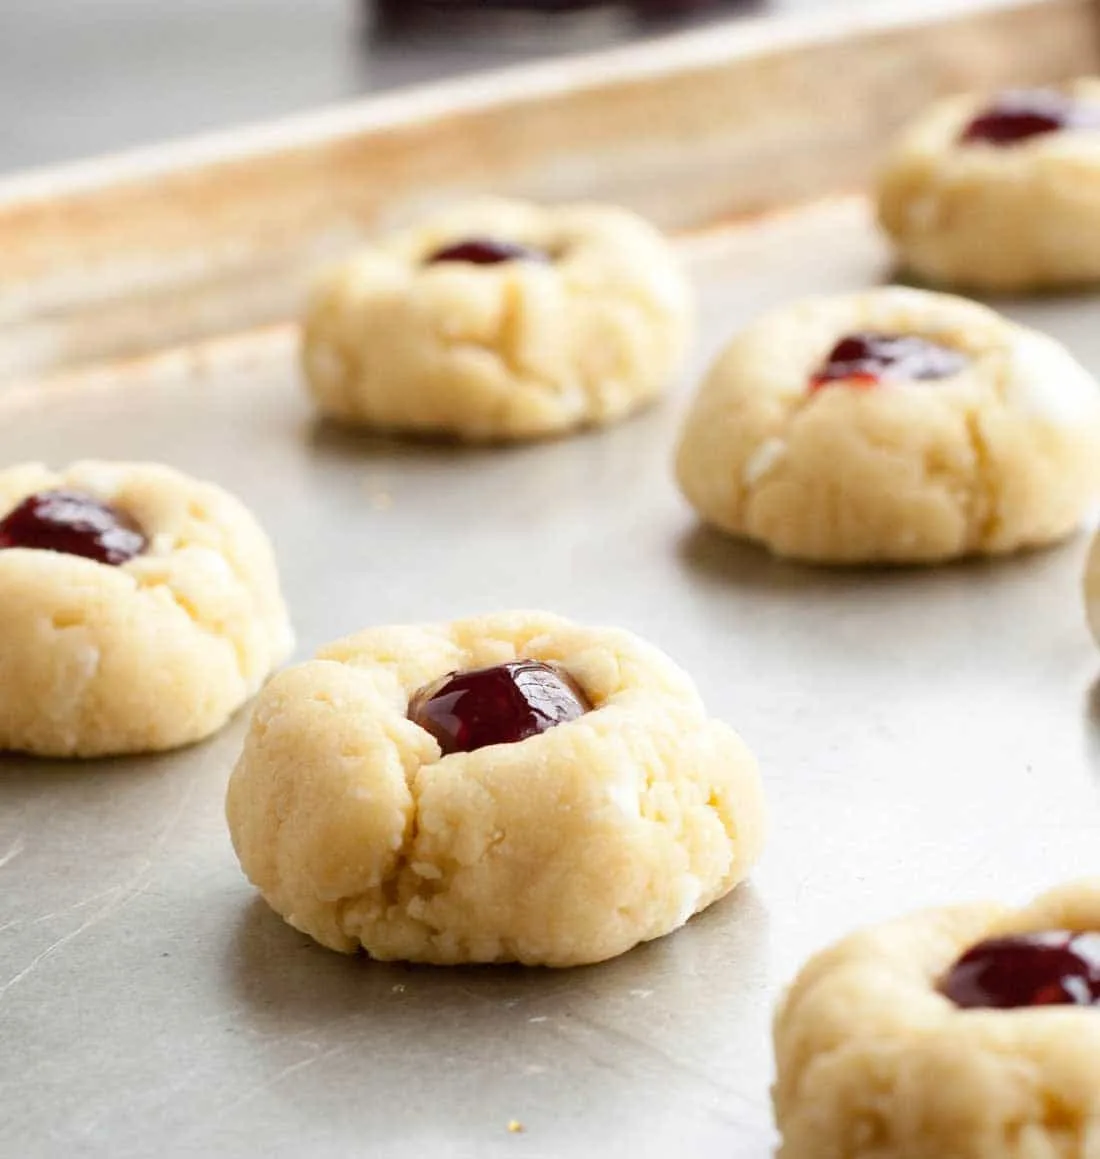
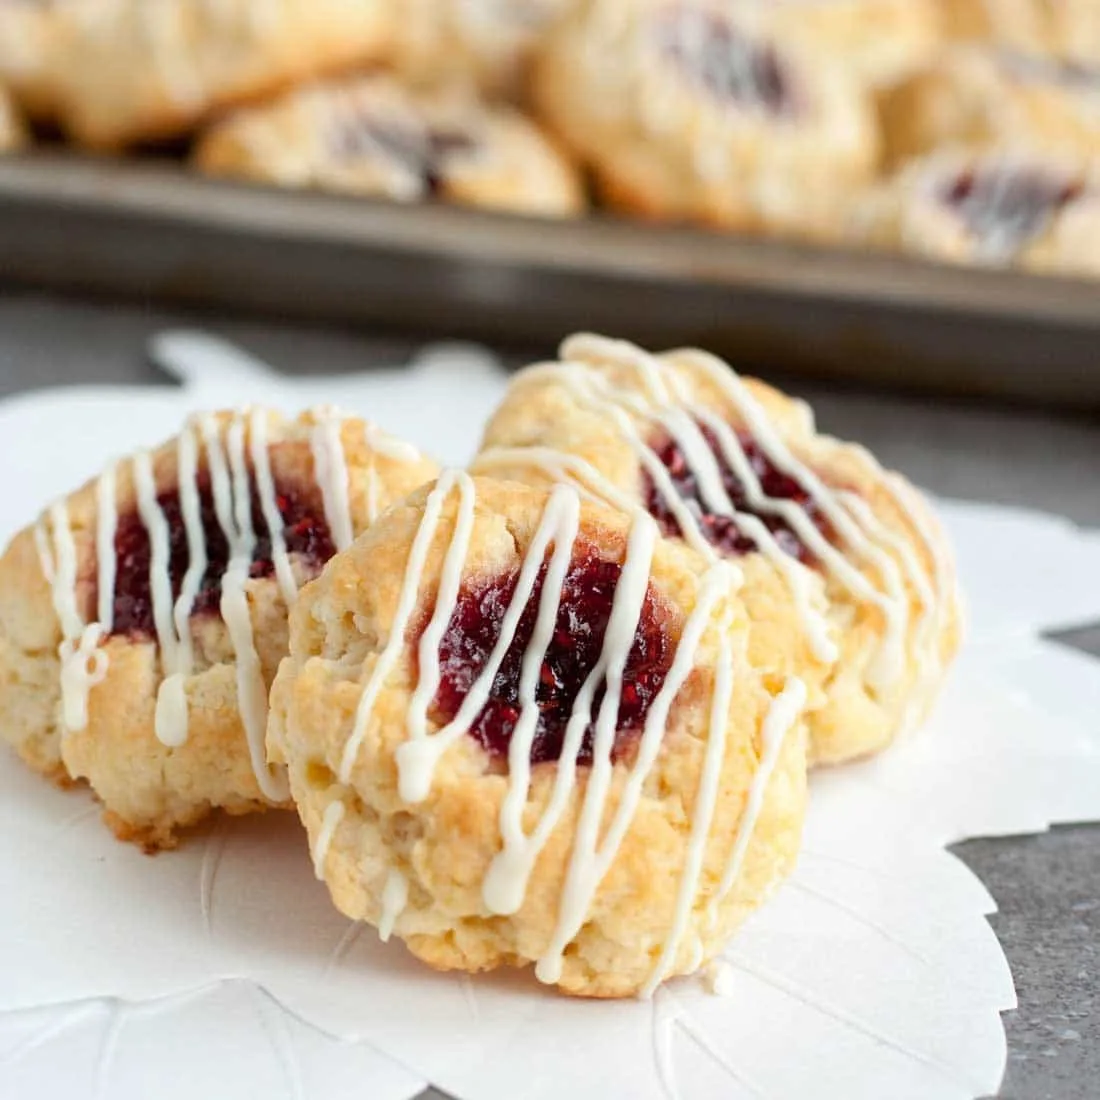
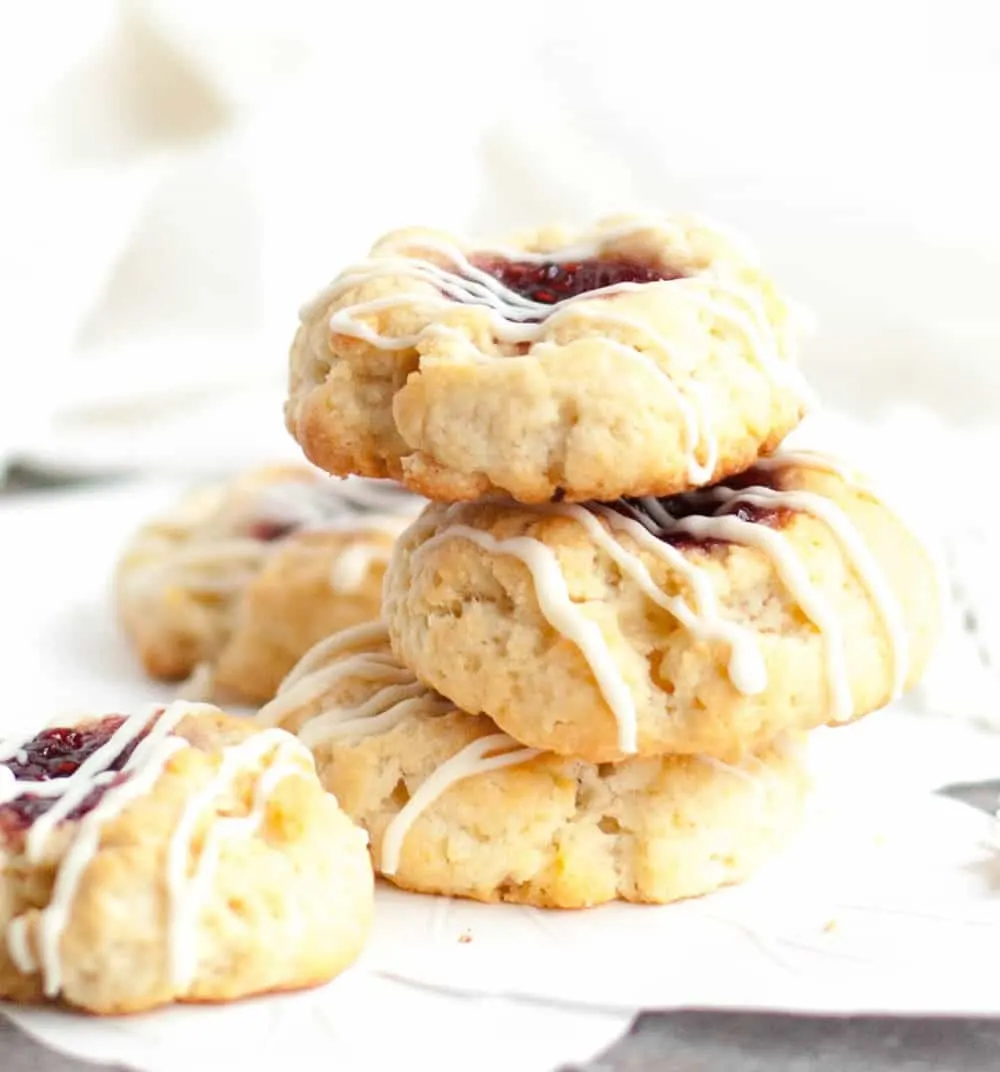
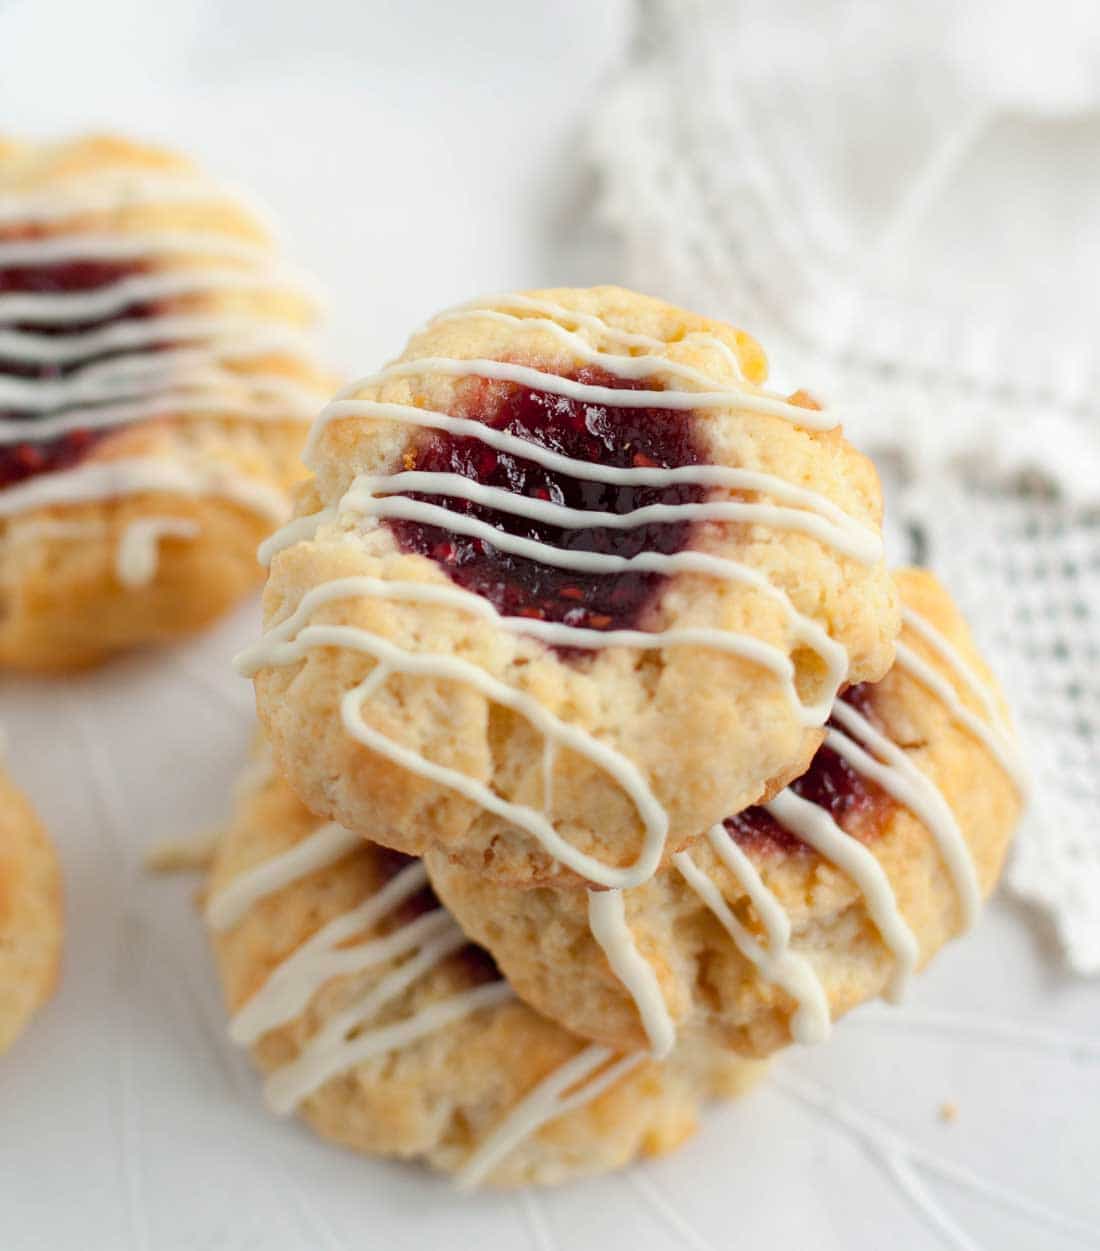
After the dough is chilled and the butter has firmed back up, each scone bite gets filled with raspberry jam. I didn’t bother with seedless jam, but it is important to pick a good jam that’s not going to melt into syrup in the oven. I used Bonne Maman. And of course, you don’t have to use raspberry. Use your favorite flavor. (But wouldn’t the raspberry be perfect for Valentine’s Day breakfast?)
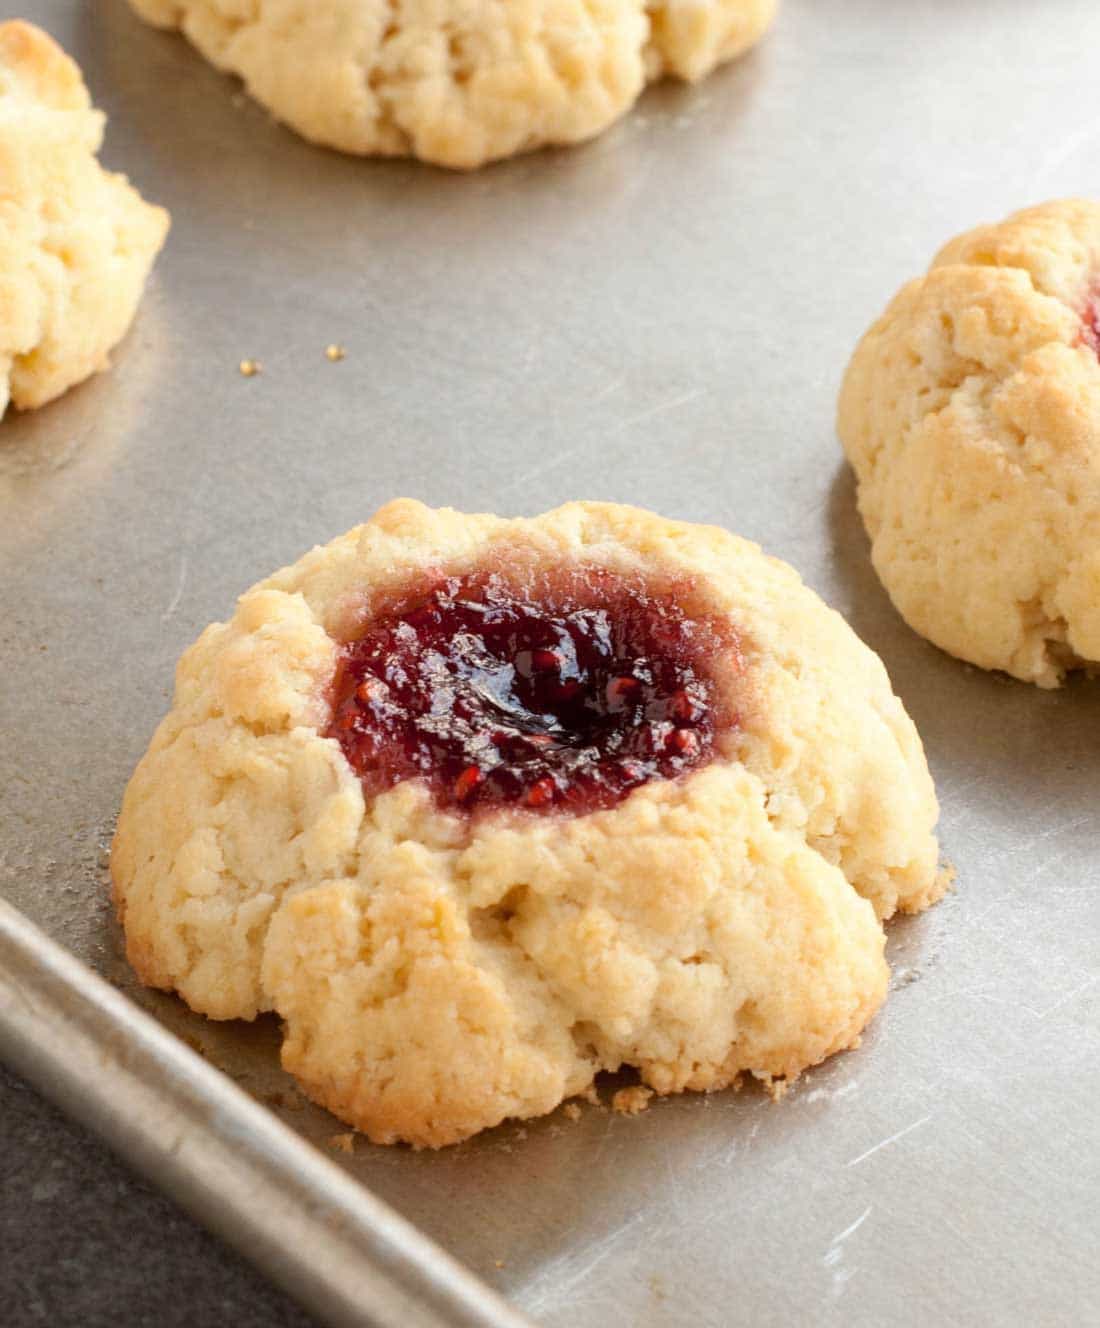

Then, they go into the the oven to bake. I crossed my fingers that they would hold their shape. And they did. (Yay!) Out came a whole baking sheet of petite scones filled to the top with raspberry jam. What next? I knew these little beauties would need a drizzle of something. I decided on white chocolate instead of making an icing.
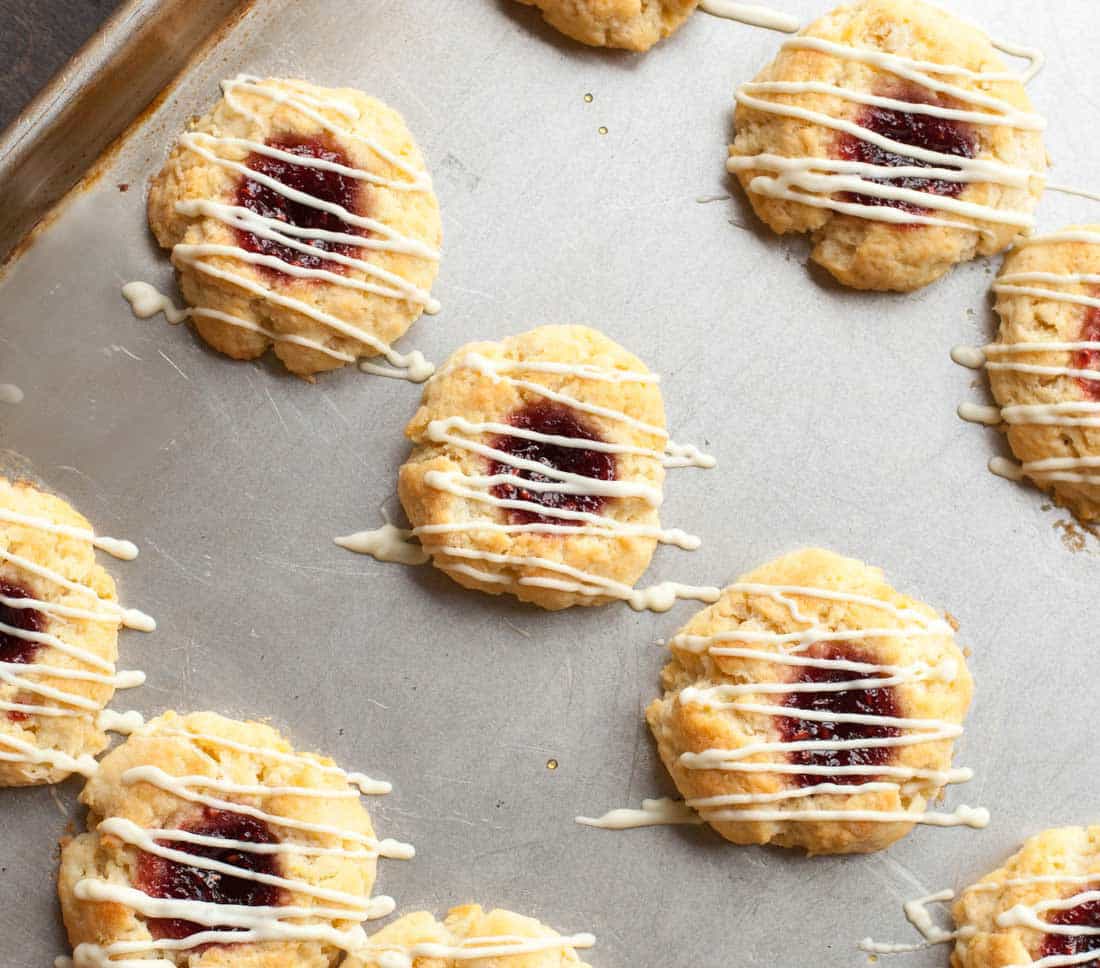

The white chocolate adds a little bit of sweet creaminess to the buttery scone and fruity jam. A perfect bite! The chocolate also sets up very quickly, so if you need to pack them up to go, or you want to stack them on a serving tray, it won’t be long until the risk of smooshing the chocolate has passed.
I knew they would taste good. How could they not? They have a tried and true buttery scone base…they are filled with a delicious jam and topped with creamy white chocolate. All this is packed into a lovely little package that’s good for two or three bites. It’s a perfect little treat and so pretty, too!
I loved the addition of the jam baked right into the scone. But, what I wanted to figure out was this…was it really worth it to make Jammy Thumbprint Scone Bites and take that bit of extra time to roll the balls and fill each with jam?

Why, yes. Yes it was.


Jammy Thumbprint Scone Bites
Ingredients
For the scones:
- 2 1/4 cups all purpose flour
- 1/3 cup sugar
- 1 Tablespoon baking powder
- 1/8 teaspoon salt
- 6 Tablespoons cold unsalted butter, cut into small pieces
- 1 large egg
- 1/2 cup or more of heavy cream
- 1/2 teaspoon vanilla
- 1/4 teaspoon almond extract
For the filling:
- about 1/2 cup jam, I used raspberry
For the topping:
- 1/4 cup white chocolate chips
- 1 teaspoon shortening, I use non-hydrogenated
Instructions
- Preheat oven to 400 degrees F.
- In a medium bowl, whisk flour, sugar, baking powder and salt.
- Cut in butter with a pastry cutter, two knives or you can rub the butter in with your fingertips, until the mixture is crumbly and you have varied size butter chunks no larger than peas.
- Crack an egg in a glass measuring cup then add cream until you reach 3/4 cup. Add vanilla and almond extracts. Mix with a fork until well blended.
- Make a well in the center of flour mixture and pour in the egg/cream mixture. Toss gently with a fork until you've distributed the liquid well and mixture begins to hold together a bit. Your mixture is going to seem to be too dry, but try to resist adding more liquid.
- Use your hands to gently mix/lightly knead the mixture in the bowl until it comes together.
- Once the dough comes together and is fully mixed with no crumbs, take spoonfuls of dough and roll into 1" balls.
- Place the balls about 2" apart on an ungreased baking sheet.
- Using the handle of a wooden spoon or your thumb, make a deep indentation in each cookie, being careful not to poke a hole through to the bottom. If the sides crack at all, just press them back together with your fingertips.
- Refrigerate the scones for about 30 minutes or until they have firmed up.
- Once the scones are firm, fill each cavity with a spoonful of jam, being careful not to overfill them.
- Bake for 12-15 minutes until just lightly golden. Allow to cool and set up for a few minutes on the baking sheet, then remove to a rack to finish cooling. Don't worry about any scones that may have had the jam spill over. The drizzle on top will camouflage it nicely.
- Make topping: Place chips and shortening in a small bowl and heat in a microwave stirring at 15 second intervals until melted and smooth. Place into a zip top bag with a corner snipped off and drizzle over cooled scones. Or, just use a spoon or fork and drizzle directly from the bowl over the scones.The white chocolate will set quickly.
Notes
*Store covered at room temperature. Wonderful on day one, they do get a little moister and denser on day two, which I really like.
*If you want a sweeter scone, increase the sugar to 1/2 cup.
*If you like lots of topping, double the topping ingredients. If you don't use a bag to drizzle the topping, you might need more since it's harder to control how much you use when drizzling with a fork or spoon.
The Merchant Baker Copyright © 2016
Carly
Sunday 3rd of July 2022
YUM. I came across this recipe searching for traditional strawberry scones. I whipped them up this afternoon with some fresh homemade strawberry jam and my family can’t stop eating them! Because I didn’t have white chocolate I made a lemon glaze that went perfect with the strawberry jam. I will definitely be making this again switching up the jam flavors!
Ramona
Monday 4th of July 2022
Carly, thanks for the lovely feedback. I love these little scones! I am a serious scone lover, and if you love fresh strawberry cream scones, you might want to try out my recipe for them. I think you'll really enjoy them as well :)
elizabeth
Saturday 26th of February 2022
what is the yield on this recipe...thank you
Ramona
Sunday 27th of February 2022
Elizabeth, I'm not sure why the yield isn't showing. I'll have to look into that. Until then, the recipe yields about 25 scone bites.
Nicole
Sunday 14th of March 2021
Was thinking of making these and then freezing them to have in a few weeks for an event...any idea if these freeze well?? 😁
Ramona
Sunday 14th of March 2021
Hi Nicole, you can freeze them, but they will always be better freshly baked. If you choose to freeze after baking, then I would wrap each one individually with plastic wrap and then place them in a zip top freezer bag. You can thaw in the refrigerator or at room temperature. Once thawed, if you want to bring back some of that freshly baked texture, you can heat them, lightly covered with foil in a 350 degree oven for 5-10 minutes. If you choose to reheat, I would wait to drizzle them with icing until after they are reheated an cooled. I think a safer idea would be to make the dough, roll into balls and create the thumbprint, then wrap and freeze to bake off later. Then, place the thumbprints on a sheet tray and let sit at room temperature until still chilly but pliable, maybe 20 minutes or so depending on the temperature of your kitchen. Fill them with jam, bake and ice as directed. Hope that helps!
Jo
Tuesday 15th of December 2020
These are SO good!!! There's a local bakery that makes something similar but they're $4.50 a pop so I thought I would attempt to make my own. These definitely were a hit. Very similar actually to the ones I love from the bakery. I didn't change anything in the recipe, it's perfect as is. They also didn't crumble on me at all, the dough was very nice to work with. I'll definitely make these again.
Ramona
Tuesday 15th of December 2020
Thanks, Jo! It's a fun way to enjoy a buttery scone. I'm happy to hear you can indulge in a bakery favorite made in your own kitchen :) I'm a scone fanatic, so if you really love a good scone, be sure to check out the scone and biscuit section in the recipe index. I think you might find others you'll enjoy as much as this one :)
Joanna
Sunday 15th of September 2019
Can i use buttermilk instead of heavy cream ??
Ramona
Sunday 15th of September 2019
Hi Joanna, I wouldn't personally make that substitution. You would be changing the fat ratio and the whole texture would change. I use buttermilk for my biscuit recipes and heavy cream or other fats for my scones because I prefer a buttery, creamy, scone with a higher fat to flour ratio. You can certainly experiment to see if you like it and if it holds the shape you'll need for this recipe , but for me, I like fluffy lower fat ratio biscuits and buttery, creamy scones.