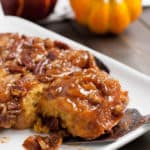
Pumpkin Biscuit Sticky Buns
Ingredients
For the topping/glaze:
- 4 Tablespoons unsalted butter
- 1/2 cup brown sugar
- 1/2 cup heavy cream
- 2 Tablespoons maple syrup or honey
- 1/4 teaspoon kosher salt
- 1/2 cup pecan pieces
- 1 batch Pumpkin Buttermilk Biscuit dough from this recipe
For the filling:
- 2 Tablespoons unsalted butter melted and cooled
- 1/4 cup brown sugar
- 2 Tablespoons white granulated sugar
- 1 1/2 teaspoons pumpkin pie spice
Instructions
-
Preheat oven to 450 degrees F. Grease or spray a 9" round pan. Set aside.
-
Make the glaze. In a small sauce pan, melt the 4 Tablespoons of butter. Add the the rest of ingredients and stir to combine. Bring to a boil, stirring constantly, then simmer for 3-4 minutes while continuing to stir. Sauce should be golden brown and glossy. This will make about 1 cup of sauce.
-
Pour 1/2 cup of the sauce in the bottom of the prepared round pan and tilt pan to cover the bottom evenly. Sprinkle pecans evenly over the sauce. Set pan aside to cool completely. Reserve the balance of sauce for extra topping after baking.
-
Prepare pumpkin biscuit dough as recipe directs through step #11 where you'll just have finished gently folding the dough. It is now ready to roll.
-
On a floured surface, roll dough into about a 12" x 10" rectangle or until your dough is just a little more than 1/4" thick. Mine ended up being about 13" X 11". It doesn't have to be exact.
-
Spread the 2 Tablespoons of melted butter all over the dough, leaving a little space at the upper and lower edges so that it doesn't squeeze out when you roll it. (I used an offset spatula to quickly spread the butter, but you can brush it on, use a spatula or use your hand.)
-
Mix the brown sugar, white sugar and pumpkin pie spice together. Evenly sprinkle this mixture over the melted butter.
-
Starting from a long side, roll up the dough tightly but without stretching it. (As pointed out in the post, mine was not rolled as tight as I would have liked, but all worked out fine.) I work from one end and roll a little bit while I work my way down to the other end. It doesn't all roll up at once.
-
You should now have about a 12" long rolled up log. It may have gotten longer while rolling. No worries. Cut a little off each end to even up any uneven edges. (See notes, you can save these little slices and bake them separately, if you wish.) If the dough has gotten too soft from handling, cover the roll with plastic wrap and place it into the refrigerator or freezer for 10-15 minutes. After the dough is cold and the butter firmed up again, proceed with the cutting step.
-
Slice the log into slices about 1 to 1 1/4" wide. How many slices you get will depend upon how long your log is. You just want them all to be about the same size so that they bake up evenly. I got 12 slices out of mine.
-
Place the slices flat in the baking pan on top of the cooled nut and syrup layer. It's okay if the sides just touch, but you don't want to crowd the pan. The biscuits need room to rise and expand while baking. Don't worry if they feel loose and like they're going to unravel. Just put them in the pan and wrap any loose ends back around the roll.
-
Bake for about 13-15 minutes or until golden. Mine took the full 15 minutes. The syrup is going to bubble up alot during baking. If you're worried about overflow, just put a baking sheet underneath your pan to catch possible drips. Mine did not overflow, but it was close.
-
Remove from oven and allow to cool in pan for about 5 minutes. Then, place a serving dish on top of the pan and flip the biscuits out onto the plate. The biscuits should release easily.
-
Serve warm and drizzle additional reserved syrup on top of the biscuits, if desired.
Recipe Notes
*Biscuits are best served immediately. Store leftovers at room temperature wrapped in foil. You can reheat them the next day, covered with foil in a 350 F degree oven. (If you think you're going to have leftovers, don't drizzle the extra sauce over all of the biscuits. Just do it individually and save the rest for after you reheat the biscuits the second time.)
*You want your bits of butter that you cut into your dough to be firm when you bake these. If they are all melted from too much time out or too much handling, then you need to put your dough back in the refrigerator or freezer for 10-15 minutes to firm the dough up.
*I roll my dough out on plastic wrap. I lay two sheets down on my counter and then flour the surface. My plastic wrap sticks to the counter, so there's no shifting. (This doesn't work well unless your plastic wrap is clingy enough to stick to your counter) If my dough gets too warm from handling, I just cover it with another piece of plastic wrap, move the whole thing to a baking sheet and put it in the freezer to firm up as mentioned above. The plastic wrap makes it easy to transport the dough from the counter to the freezer and back. And it makes for easy clean up.
*If your dough is cold enough to roll, but it's gotten very soft from being out too long, you can also refrigerate/freeze the biscuits after you've rolled, sliced and put them into the pan. Basically, you just want the butter firm when you bake the rolls. You can put the dough in the refrigerator to get cold at any point in the process before baking.
*The amount of biscuits you yield from this recipe will vary simply based on what size your dough is when you roll it and how thick your slices are when you cut it. It may differ a bit each time you make it unless you decide to be extremely exact each time you roll it. I only measured it for the post to give you an idea. I usually wing it and do it by eye, so I may end up with anywhere between 9 and 12 rolls. If you accidentally (or purposefully) roll it from the short side, then you will end up with larger biscuits with more layers, but you will get less biscuits. Either way, you'll be fine.
*I saved the uneven ends I sliced off and baked them separately. I would have just tucked them between the "good" rolls in the pan, but it didn't make for a nice photo, so I baked them up on a separate pan in my toaster oven because they would bake up so much faster than the full pan and I didn't want to keep opening the big oven to check them. (The kids always fight over those scraps :)
*I gave you enough glaze in the recipe to put in the pan, then top the biscuits again after they are baked. I drizzled the extra on each biscuit individually while serving. It makes for a super drenched roll. For me personally, I didn't need any extra, but it's a sweet bonus for those who do. If you want to skip the extra glaze, cut the glaze recipe in half and use all of it in the bottom of the pan. Alternatively, if you don't want to make sticky buns, you could simply bake the rolls without the glaze or pecans. You'll just follow the baking directions in the Buttermilk Biscuit Cinnamon Rolls recipe.
*Store extra glaze covered in the refrigerator. You can quickly reheat it in the microwave. If you don't use it for your rolls, it's also good over pancakes and waffles.
The Merchant Baker © 2016