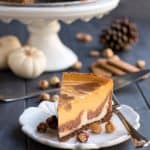
Triple Layer Pumpkin Nutella Cheesecake
Ingredients
For the crust:
- 7 ounces speculoos cookies about 24 cookies
- 1/2 cup hazelnuts toasted
- 1/3 cup brown sugar
- 7 Tablespoons melted salted butter
For layering:
- 1/4 cup Nutella
For the cheesecake:
- 4 (8 ounce) blocks of cream cheese room temperature
- 1 1/2 cups white granulated sugar divided
- 1/4 cup cornstarch
- 1 Tablespoon vanilla extract
- 4 large eggs room temperature
- 2/3 cup pureed pumpkin not pumpkin pie filling
- 1 teaspoon pumpkin pie spice
- 1/2 cup Nutella
- 9 Tablespoons evaporated milk I used 2%
Instructions
-
Preheat oven to 350 degrees F. Wrap the bottom and sides of a 9" spring form pan with foil. (This will help guard against any leaking. I didn't have any issues but better to be safe.)
Make the crust:
-
In a food processor, pulse cookies, sugar and hazelnuts to a moderately fine texture. Add melted butter and pulse until combined.
-
Empty crumbs into the prepared pan. Press them firmly into the bottom and an inch or so up the sides.
-
Bake crust for 8 minutes. Remove from oven and immediately place small spoonfuls of the 1/4 cup of Nutella right on top of the hot crust. Let it sit for a minute or two. The residual heat of the pan should soften the Nutella and make it easy to spread. Very gently spread the Nutella evenly on top of the crust, being careful not to disturb the crust itself. I had bits of crust pop up on me. I just pressed them back into place and gently smoothed the Nutella back over them. Set aside to cool while you make the cheesecake.
-
Raise oven temperature to 450 degrees F.
Make the cheesecake:
-
In a large mixing bowl, with an electric mixer, beat just one of the blocks of cream cheese for a few seconds or until creamy. Add just 1/2 cup of the sugar and all of the cornstarch and continue beating until well combined and creamy.
-
Blend in the remaining three blocks of cream cheese until combined. Then blend in the remaining 1 cup of sugar.
-
Add eggs, one at a time, beating well after each addition. Add vanilla and combine well.
Divide the batter to make three flavors:
-
Get two bowls large enough to accommodate using your mixer. ( I use a hand mixer for mixing up the flavors)
-
Remove 2 cups of batter from the main mixing bowl and place it into one of the bowls. This will be your plain batter. Set that bowl aside. Take another 2 cups of batter and place it in a second bowl. This will become your pumpkin batter. Leave the remaining batter in the main mixing bowl. This will be a smaller amount of batter than is in the new bowls and will become your Nutella batter.
-
In a separate small bowl, mix the pumpkin puree thoroughly with the pumpkin pie spice. Add it to the 2 cups of batter waiting to become the pumpkin portion. Use your mixer to combine it thoroughly. Set aside. There's no need to rinse off the beaters. Just tap off the excess pumpkin batter and proceed to the next step.
-
In the main mixing bowl, the one that has the smaller amount of batter, add the 1/2 cup of Nutella and beat until combined. You should now have three bowls of cheesecake batter, one plain, one pumpkin and one Nutella.
-
Gather your three bowls. To each bowl, add 3 Tablespoons of evaporated milk for a total of 9 Tablespoons overall. Starting with the plain batter, using a small whisk, combine the milk completely into the batter. Without having to rinse the whisk, repeat the whisking process with the pumpkin batter and then the Nutella. We are not using the electric mixer at this stage, because we don't want to incorporate a lot of air into the batter, but we do want to completely incorporate the milk into the cheesecake batter.
-
If you'd like to create the marbled design on top of the cake, take 1/4 cup of the plain batter and reserve it in a small bowl. Then, take 1/4 cup of the Nutella batter and reserve it in another separate small bowl. Set the two small bowls aside.
Prepare the cheesecake for baking:
-
Pour the plain cheesecake batter into the cooled, pre-baked crust on top of the layer of pure Nutella. Spread evenly.
-
Spoon Nutella cheesecake batter evenly over the plain layer. Spooning the batter instead of pouring it will prevent it from disturbing the plain layer.
-
Spoon the pumpkin cheesecake batter evenly over the Nutella layer.
Make the marbled design on top:
-
You can do this in many different ways. I chose to drizzle the reserved 1/4 cup of plain batter all over the top. Then I dropped small spoonfuls of the reserved 1/4 cup of Nutella batter all over the top. Then, drag a toothpick or the tip of a sharp knife through the batter to "pull" the batter into designs. Make sure you drag the tip in different curly directions to create various swirls. Stop as soon as it looks good to you. If you over swirl, you'll mix it up too much and start to lose the special aspects of your design.
Bake the cheesecake:
-
Place the cheesecake on the middle rack of the oven. Place an empty baking sheet on the rack below it to catch any spills. I had absolutely no issues with over flow, but better to be safe than sorry.
-
Bake the cheesecake at 450 for 15 minutes. Then, without opening the oven, reduce the temperature to 225 degrees and bake for an additional 1 hour and 15 minutes.
-
When the baking time is complete, your cheesecake should be set with just a slight wobble in the center. Turn the oven off and open the oven door wide. Mine was halfway open. Let the cheesecake sit in the oven for another 30 minutes.
-
After the 30 minutes, remove the cheesecake from the oven and allow to completely cool. This will take a few hours. Once cool, cover and refrigerate overnight.
Preparing to serve:
-
Fill a tall mug with very hot water. Let a metal knife sit in the hot water for a minute to heat up. This is now a "hot knife." Dry the knife with a towel, then run it around the edge of the pan to help loosen the cheesecake from the pan. You don't have to run the knife all the way down to the bottom of the pan, just to where the cheesecake meets the crust. The crust should release on its own.
-
Remove the ring of the spring form pan, leaving the cheesecake on the base of the pan for serving. Serve plain or with whipped cream, but don't cover up your pretty design on top!
Recipe Notes
* I use the sides and bottom of a metal measuring cup to press an even layer in the pan. It makes for a nice clean looking crust.
*Remember that you need evaporated milk, not sweetened condensed milk for this recipe.
*As you mix the batter, at whatever stage, remember that we're not trying to incorporate a lot of air into the mixture. We simply want the ingredients to be thoroughly mixed. If you over beat the batter, it will create air pockets and the cheesecake will puff up in the oven, only to sink again once cooled.
*After I did the marbled effect on top, I had all kinds of other ideas of how I could have designed it. In retrospect, I would have liked to create various leaves. It really doesn't matter though. Any marbling effect will make it look special.
*This is a great dessert to make in advance. It needs to chill at least overnight and I think it tastes better two days after I make it. So, I make my cheesecakes two days before I need to serve.
The Merchant Baker Copyright © 2017