
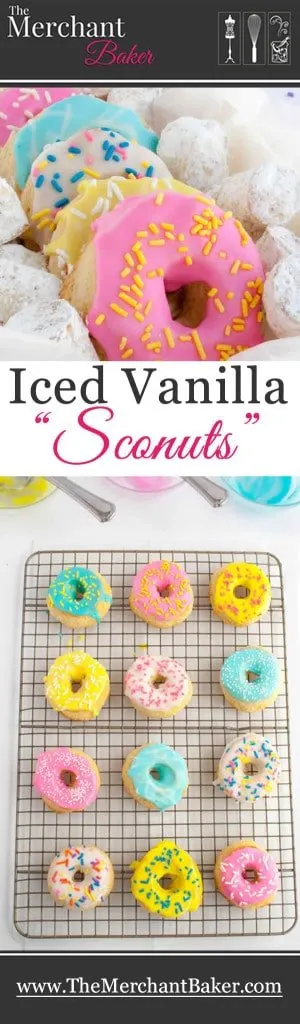
Sconuts? Yes. I went there.
I did a mash up, broke out the sprinkles and food dye and made Iced Vanilla Sconuts. I thought I had invented something new until I did a Google image search and realized others had been there, done that. I even found an image of a boxed mix! Just add water. Go figure.

Why break out into Sconut craziness today? Well, let’s just say I feel like I should have March Madness as the heading over my personal calendar, and it has nothing to do with sports. It’s just been a jam packed month of non-stop life and life challenges.

But let’s skip all of the life challenges and just chat a bit about the blog challenges. We begin with a host of recipe fails. Oh, there were the muffins that I made 5 times over a two week span that tasted delicious but were ugly. (I know, how can a muffin be ugly? Trust me.) Then there were the scones that were beautiful and were a fun new flavor combo, but didn’t taste amazing. My kids loved them. I actually agreed with them after I tasted them again a couple of days later. They were the scones that needed days to have the flavor develop. Aged scones? Perfect. And savory dishes? They were on the calendar. I even made some of them, at dinner time, but then I didn’t have time to shoot them. Or, I did have time to shoot them, but learned that corn tortillas won’t wait for you to get the perfect shot. Warm and ready to roll turned into cold and breakable, and they were already topped with fillings, so I just put all the stuff in the pan, unrolled, poured on the sauce and baked it. It was all good. Dinner was delicious; it just was not photo ready.

This month, I used every post I had banked as back up for busy days. There’s no cushion, no room for failure. You’ve heard of farm to table? I’m living table to blog. I’m just hoping that the creation I made last night tastes as good as it looks or I’ll be back to the drawing board. My fingers are crossed.

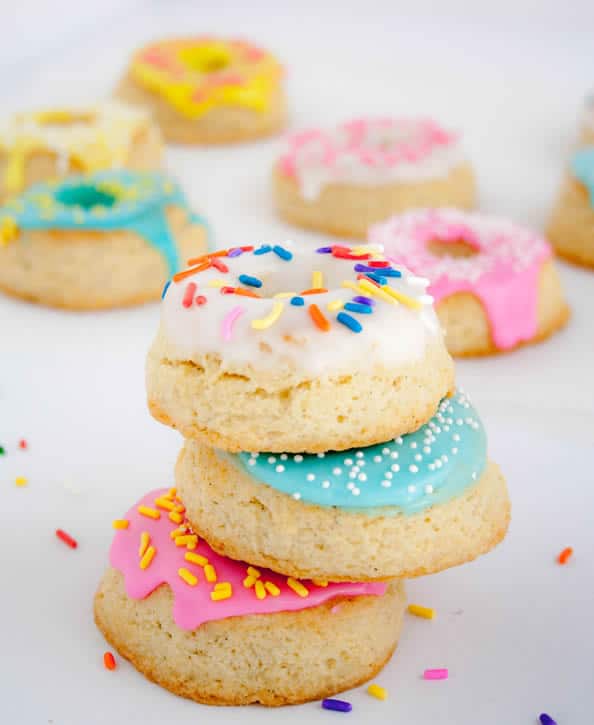
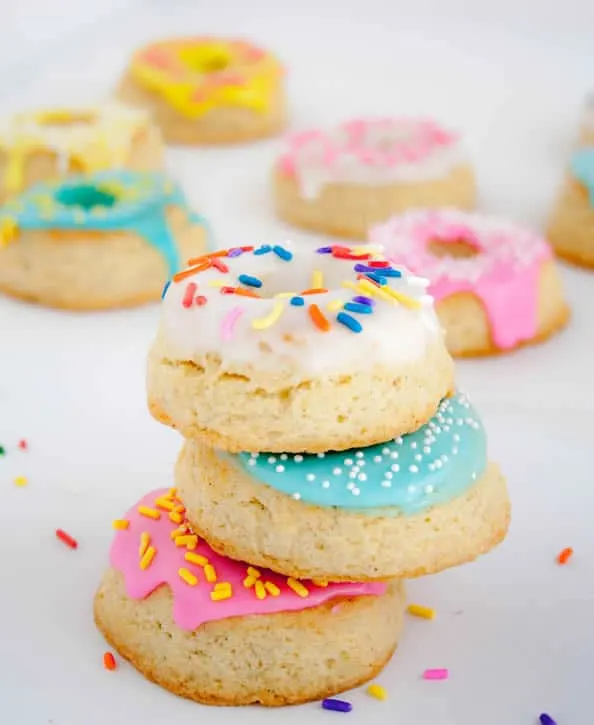
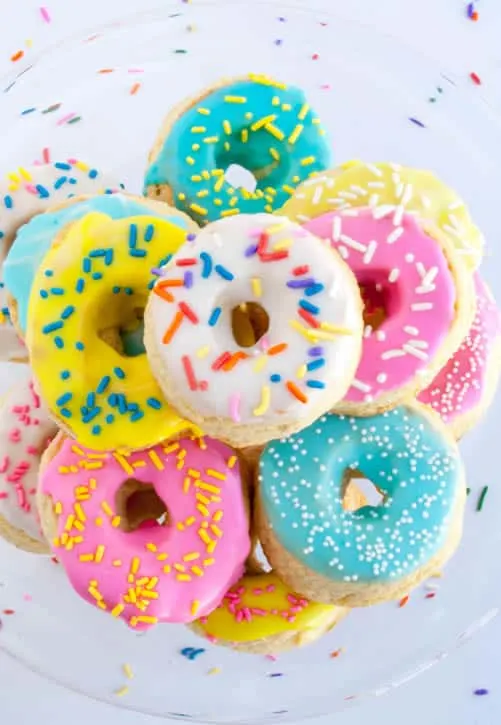
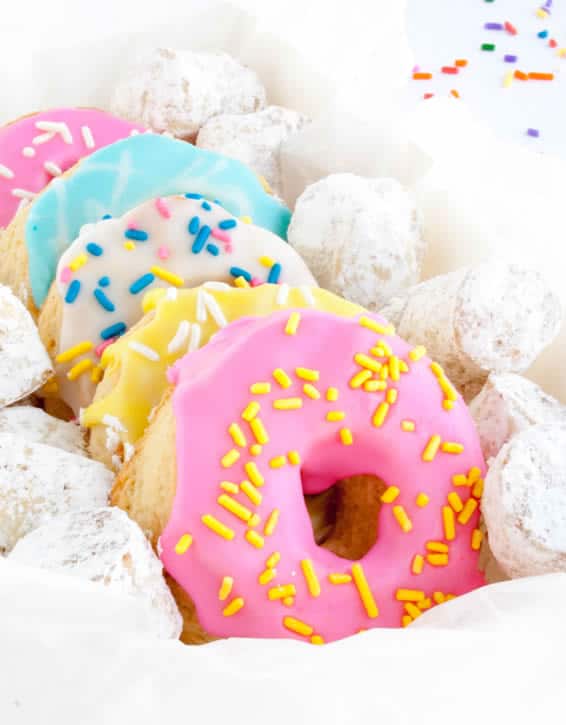
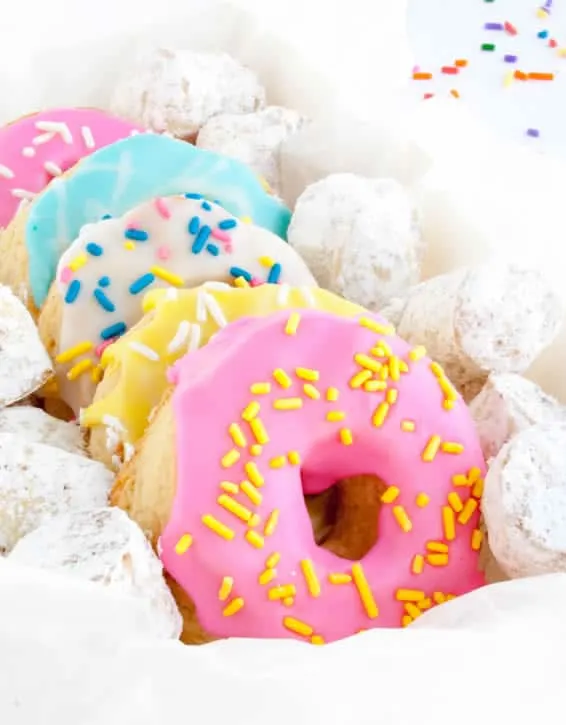
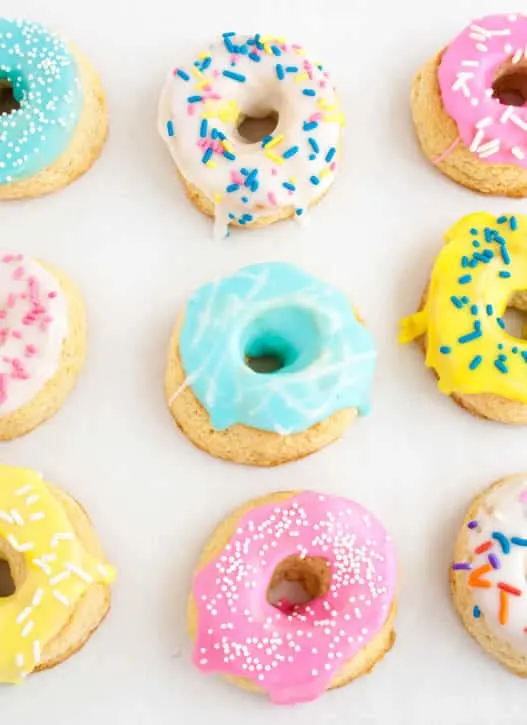
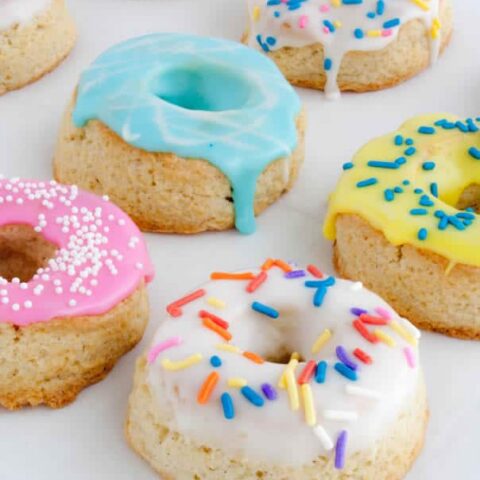
I needed a quick win so I made a tried and true recipe adapted from My Favorite Cinnamon Scones. It’s a vanilla scone version but I thought I’d switch it up. Instead of cutting them into traditional triangles, squares or rounds, I thought I’d go donut shaped and have a little fun with color. Food coloring, sprinkles and icing? My kids were sharks lurking in the kitchen just dying to try one. Can I taste the icing? (Not until I’m done shooting.) Can I have one of the sconut holes? (Not until I’m done shooting.) Can I just have the sconut hole that’s crumbled? (Nope, gonna shoot that too.) Can I? Can I? Can I?

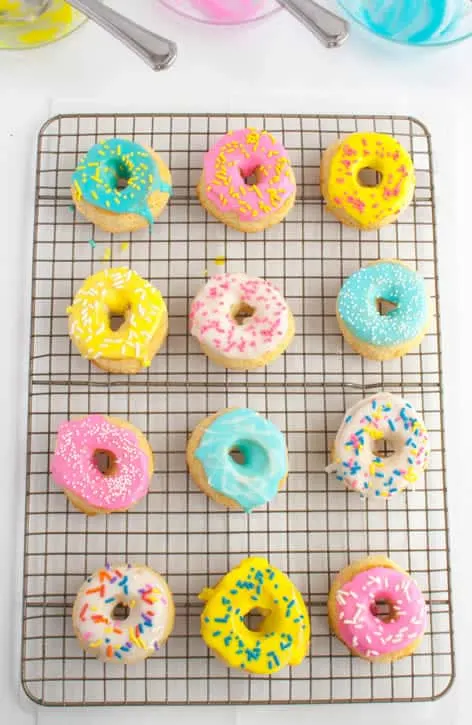
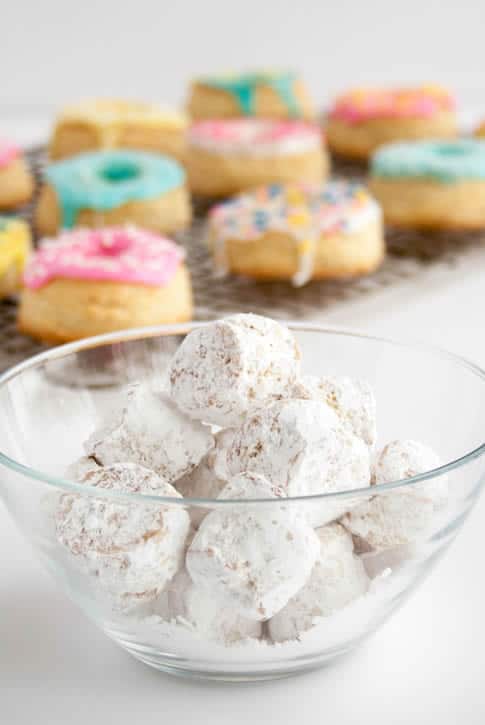
I chose a bunch of bright colors for icing and sprinkles for the sconuts, and decided to roll the sconut holes into powdered sugar, just to have more diversity. It all looks like so much fun! And since today is also the eve of my six month blog anniversary. I thought I’d get a bit festive. Woo hoo! Yep, Iced Vanilla Sconuts is me kicking up my blogging heels :)
Oh, and on top of all this other stuff going on, I found out what it means to get some peer blog love. Last Thursday, a blogger that I’ve followed for years, Mel, from Mel’s Kitchen Cafe, named my blog as one of a handful she’s loving these days! My Tandy Birthday Cake uses Mel’s Perfected Yellow Cake as the base. Her recipes never fail me.

Then on Saturday, one of the first and longest bloggers I’ve followed, Jessica, at How Sweet It Is, included my Lemon Lime Cream Slab Pie in her Currently Crushing On post! I bought her cookbook, Seriously Delish, last year and met her at a signing. What a doll! Her recipes are inspiring! She introduced me to Grilled Fontina and Blackberry Basil Smash Sandwiches. I think I made them every week for a month.

What does blog love do to a fairly new blog? My site just about crashed on Thursday and I thought something was wrong until I figured out it was HUGE traffic gridlock. So, for those of you who have been reading before the crash of March 19th, that’s why the site was loading sooooo sloooowwlly. And for all of the new readers, (especially all of the new subscribers,) just know that it was not a typical day. Thankfully, we were able to work with our hosting company immediately so that we could handle the larger volume… just in time for Saturday’s unexpected boom from Jessica! (What!?!)
So, who could have expected all of that excitement just days before my six month milestone? Not me, that’s for sure. But I’m considering it a wonderful, unexpected and deeply appreciated gift of recognition.
Call the kids! The wait is over!
It’s time for some sconuts!
Iced Vanilla Sconuts
Ingredients
For the scones:
- 2 1/4 cups all purpose flour
- 1/3 cup sugar
- 1 Tablespoon baking powder
- 3/8 teaspoon salt
- 10 Tablespoons cold unsalted butter, cut into small pieces
- 1 large egg
- 1/4 cup or more of heavy cream
- 1 teaspoon vanilla bean paste, or vanilla extract
- 1/2 teaspoon butter extract, optional, I used Lorann
- 1/4 teaspoon ground nutmeg, optional
- 1/4-1/2 cup confectioner's sugar for rolling sconut holes
For the icing:
- 2 cups confectioner's sugar
- 2-4 Tablespoons milk
- 1/2 teaspoon vanilla
- food coloring
- sprinkles
Instructions
- Preheat oven to 400 degrees F.
- In a medium bowl, whisk flour, sugar, baking powder and salt.
- Cut in butter with a pastry cutter, two knives or you can rub the butter in with your fingertips, until the mixture is crumbly and you have varied size butter chunks no larger than peas.
- Crack an egg in a glass measuring cup then add cream until you reach 1/2 cup. Mix with a fork until well blended.
- Make a well in the center of flour mixture and pour in the egg/cream mixture. Toss gently with a fork until you've distributed the liquid well and mixture begins to hold together a bit. Your mixture is going to seem to be too dry, but try to resist adding more liquid. Your scones will not hold shape with too much liquid.
- Use your hands to knead the mixture in the bowl until it comes together. This may take a couple of minutes, but as you work the butter and cream mixture, it will begin to come together. You don't want to melt the butter, so if you have hot hands, try using a large spoon or a spatula to fold the mixture onto itself in between using your hands.
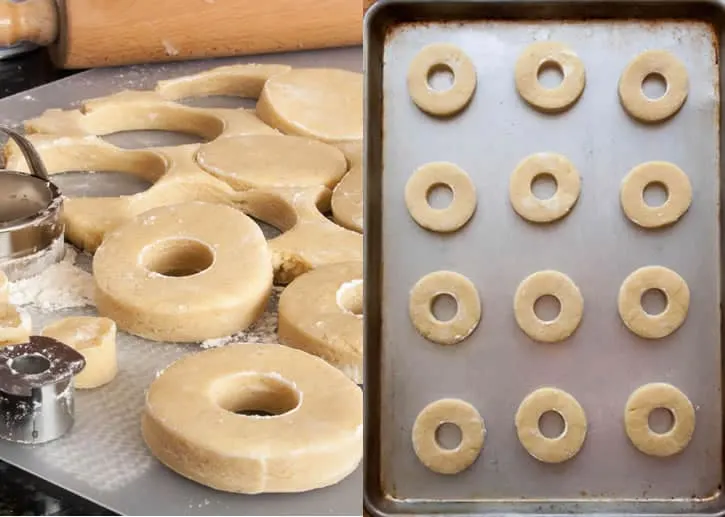
- Once the dough comes together with no crumbs, on a lightly floured surface, roll it to about 1/2 inch thick. Using a doughnut cutter dipped in flour, cut out scones, gathering scraps (save the holes!) and re-rolling until you've used up all of the dough. You can form the last bit of dough into additional sconut holes.
- Place all sconuts and holes on an ungreased baking sheet and refrigerate for 30 minutes so that the butter in the dough has time to firm up again. After refrigeration, separate the sconuts to another baking sheet, arranging them about 2 inches apart. Put the holes back into the refrigerator.
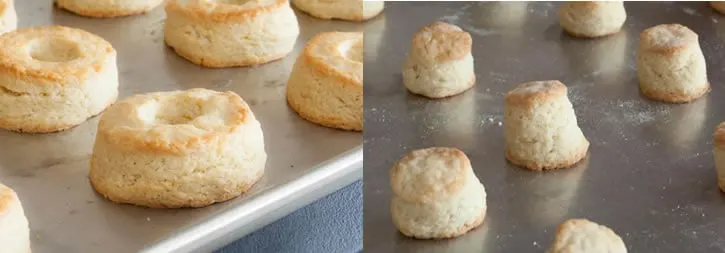
- Brush tops with additional cream and bake for 10-15 minutes or until puffed and lightly golden on the edges. Remove from oven and allow to cool on baking sheet for a few minutes, then remove to finish cooling on a rack..
- Bake sconut holes for 6-8 minutes or until puffed and lightly golden. Remove from oven. Allow to cool and set up for a few minutes on the baking sheet, then remove to a rack to finish cooling.
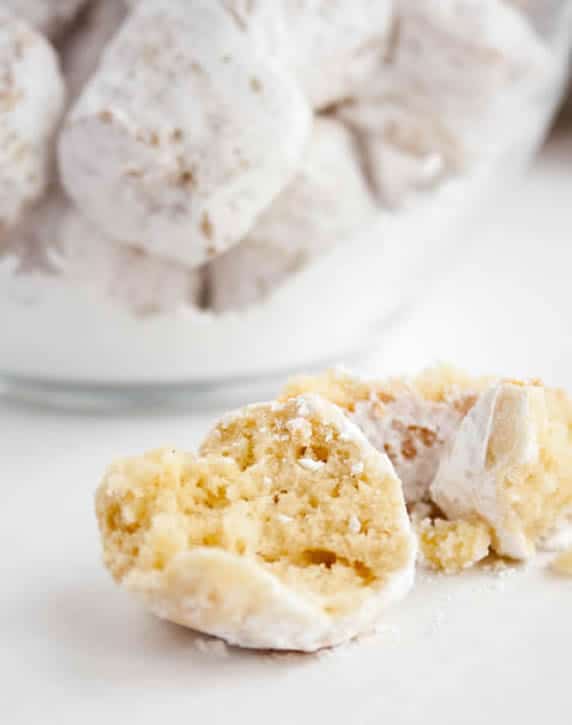
- Place the 1/4 -1/2 cup confectioner's sugar in a small bowl. Roll sconut holes in sugar until completely coated.
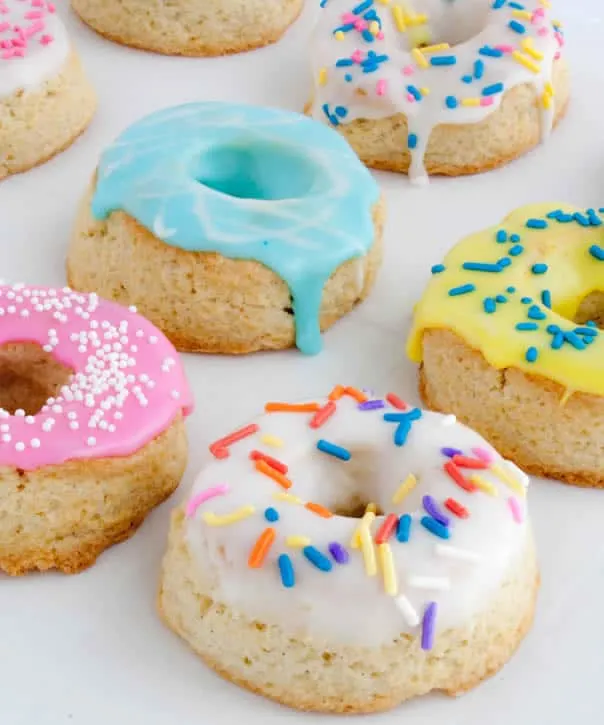
- For the sconuts. whisk the 2 cups of confectioner's sugar with vanilla and enough milk until desired consistency. For a nice opaque glaze, you want it fluid, but still thick. Decide how many sconuts you would like dipped in white and do those first. Add any sprinkles or other toppings while glaze is still wet.
- Once you've finished with the white, separate it into as many bowls as you want colors and add desired food coloring. I needed less than a drop for each bowl and just used the tip of a toothpick dipped in a droplet to get my desired colors. Add milk, as necessary, to keep your icing at good dipping consistency. Finish dipping and topping and allow to dry.
- If you prefer to completely coat the entire sconut and/or sconut holes, make your glaze thinner by adding more milk so that you have a more transparent glaze. Carefully dip and flip your scones in the glaze and set aside on a rack to dry.
Notes
*Store baked scones well covered or in an air tight container at room temperature. Because of the high butter ratio, these will still be good the next day or even two.
*You can also freeze them after you cut and separate them on a tray, then put them in a zipped freezer bag to bake at a future time. Just add a couple of minutes to the baking time.
*Because of the hole, these will bake faster than if they were cut into triangles. Take care not to over bake or you will have dry scones. I probably could have baked mine a minute or two less than you see in the pictures. The holes will likely bake up a bit drier because they are so small. They are still very buttery so when rolled in powdered sugar, they taste like Russian teacake cookies. Alternately, you could just dip the holes in the icing for extra moisture.
*I didn't have a doughnut cutter so I used a 2 1/2" round biscuit cutter and a 1 1/4" round cutter (for the holes) to make my sconuts.
*If you want to make regular vanilla bean scones, roll or pat dough about 3/4 to 1" inch thick in the shape of a square (see Favorite Cinnamon Scones) and cut into large or small triangles. After baking, you can ice the tops of them with the white vanilla glaze, or you could make the glaze much thinner and dip the entire scone into the glaze completely coating it.
*I added the nutmeg and the buttery dough flavor just for the sconut recipe. It is completely optional and I don't include either of them when I make simple vanilla scones. In other words, if you don't have them in your pantry, don't buy them just for this recipe.
The Merchant Baker Copyright © 2015
Jenna
Saturday 25th of February 2017
These are so cute! And yummy. I just made them, but didn't realize until they were in The oven that the extracts and nutmeg didn't make it into the directions. They were good anyway, though!
Ramona
Saturday 25th of February 2017
Well, at least the extracts don't change how they bake, just the flavor. I hate forgetting an ingredient, but usually it's something critical that had to be in the recipe. At least with your omission, you still get plenty of sweet buttery flavor, so no big worries there. I'm excited to hear that you made them! Glad they were good even without the extracts :)
Kelsey @ Snacking Squirrel
Wednesday 25th of March 2015
you just made my day and gave my vocabulary a delicious boost- sconuts!!!!!
Kathy @ Beyond the Chicken Coop
Tuesday 24th of March 2015
Nope....never heard of them! But they do look fantastic! Very clever, but who would have known they were a "thing" already out there!
Ramona
Tuesday 24th of March 2015
I guess where there can be cronuts, there can be sconuts!
Dorothy @ Crazy for Crust
Tuesday 24th of March 2015
Haha that's why I didn't google before I put them in my book. But mine were fried. I liked these better!
Ramona
Tuesday 24th of March 2015
Really? I should have known the queen of mashups must have conquered this category! But fried? Who knew you could fry a scone? :)
Tasbih @ Cleobuttera
Tuesday 24th of March 2015
I'm squealing at the creativity of these SCONUTS!!! These should totally become a thing and skyrocket just like cronuts!!! I was literally LOLing at the part were your kids were begging for a bite; story of my blogging life:))) Congrats for being featured in these 2 awesome blogs; they're my long-time favorites too! You deserve it BIG time Ramona! You're recipes are amazing and your hard work and dedication really shows.
Ramona
Tuesday 24th of March 2015
Thanks so much Tasbih! It means alot coming from someone who really knows her food and has such an amazingly beautiful blog filled with mouthwatering recipes! And, yes, I'm sure you get the pros and cons of having a mother who blogs...there's lots of stuff to try, but you just can't have it 'til the pictures have been taken!